Amigurumi Llama Purse Crochet Free Pattern

ABBREVIATIONS:
(the pattern is in US terms)
- sl st: slip stitch
- sc: single crochet stitch
- ch: chain
- st, sts: stitch, stitches
- sc2tog: single crochet decrease (work next 2 single crochet stitches together)
- 2sc: single crochet increase (work 2 single crochet stitches in the same st)
- R: round
- FLO: front loop only
NOTES:
- This pattern is worked in continuous rounds (do not join rounds unless specified)
- Using the mentioned yarn, the llama body/purse (without the head and the legs) measures 5.9 inches (15 cm) width and 4 inches (10 cm) in height.
- I used the following colors: DROPS Paris Off White 17, Shocking Pink 06, Pistacho 39, Opal Green 11, Dark Old Pink 60, Light Light Pink 50, Dark Beige 26.
LLAMA PURSE PATTERN:
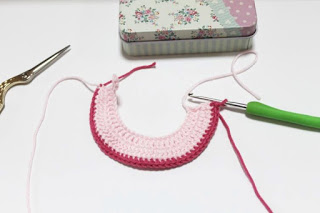
Start with a circle (you will need it later on):
with Off White
R1: Magic ring, 6 ch in ring (6)
R2: 2sc in each ch (12)
R3: * sc in next 3 st, 2sc * 3 times (15)
Break the yarn and weave in ends. (pic.1)
FIRST LEG:
with Dark Beige
R1: Magic ring, 6 ch in ring (6)
R2: 2sc in each ch (12)
R3-R5: 3 rows even (12)
Change color (Off White)
R6-R10: 5 rows even (12) (pic.2)
Insert stuffing.
R11: Press both sides of the leg’s open end together so that they lie lat on top of each other, aligning 6 sts side by side. Sc together the corresponding sts to close the open end. (5) (pic.3)
Break the yarn and weave in ends.
SECOND LEG + BODY:
R1-R11: same as the first leg, but don’t break the yarn and continue working:
R12: Ch20, join and sc in the 4 st of the first leg (FLO) (pic.4), 3sc in next st (pic.5), on the opposite side sc in next 4 st (FLO), sc in next 20 ch, sc in next 4 st of the second leg (FLO), 3sc in next st, on the opposite side sc in next 4 st. (62)

R13: sc in next 20 ch (pic.6), sc in next 42 st (62)
R14-R29: 16 rows even (62)
R30: sc in next 53 st, sc in next 15 st together with the 15 st of the circle you previously made (this will be the base of the llama’s neck). (15) (pic.7-8)
R31: skip the 53 st of the body, sc in the next 15 st of the neck (15) (pic.9)

R32-R41: 10 rows even (15) (pic.10)
R42: * sc in next 3 st, sc2tog * 3 times (12)
Attach the safety eyes (between R41 and R42, leaving a space of 4 st between each eye). (pic.11)
Insert stuffing.
R43: * sc, sc2tog * 4 times (8)
Break the yarn and weave in ends. (pic.11)
MUZZLE:
with Off White
R1: Magic ring, 6 ch in ring (6)
R2: * sc, 2sc * 3 times (9)
R3-R5: 3 rows even (9)
Break the yarn and leave a long strand.
Embroider the nose and mouth with a strand of black yarn.
Fill with stuffing and attach to the head. (pic.12)
EARS (x 2):
with Off White
R1: Ch4, sc in 2° ch from hook, sc in next 2 ch.
Break the yarn and leave a long strand.
Attach the ears to the head. (pic.12)

SHOULDER BELT:
R1: Join Off White yarn to the body, in the 23st st on the left (counting from the neck) (pic.13). Sc in same st. sc in next 2 st, turn (3)
R2: Ch1, sc in next 3 st, turn (3)
Continue until the shoulder belt measures 33.5 inches (85 cm).
Break the yarn and leave a long strand.
Attach the belt to the base of the neck. (pic.14)
FLAP:
with Pistacho
R1: Magic ring, 3 ch in ring, turn (3)
R2: Ch1, 2sc in each ch, turn (6)
R3: Ch1, * sc, 2sc * 3 times, turn (9) (pic.15)
Change color (Opal Green)
R4: Ch1, * sc in next 2 st, 2sc * 3 times, turn (12)
R5: Ch1, * sc in next 3 st, 2sc * 3 times, turn (15)
Change color (Shocking Pink)
R6: Ch1, * sc in next 4 st, 2sc * 3 times, turn (18)
R7: Ch1, * sc in next 5 st, 2sc * 3 times, turn (21)
Change color (Light Light Pink)
R8: Ch1, * sc in next 6 st, 2sc * 3 times, turn (24)
R9: Ch1, * sc in next 7 st, 2sc * 3 times, turn (27) (pic.16)

Change color (Dark Old Pink)
R10: Ch1, * sc in next 8 st, 2sc * 3 times (30)
Don’t break the yarn, weave in all the other ends (on the back).
R11: Without turning the work, ch1, sc in same st, sc along the top of the flap (1 st in the Light Light Pink part, sc in 2 st of the Shocking Pink part, sc in 4 st of the Pistacho part, sc in 2 st of the Opal Green part, sc in 2 st of the Shocking Pink part, sc in 2 st of the Light Light Pink part, sc in 1 st of the Dark Old Pink part.
R12: Without turning, continue along the flap sides: Ch1, sc in next 9 st, 2sc, sc in next 5 st, ch8, sc in next 4 st, 2sc, sc in next 9 st, 2sc. (pic.17)
Attach the flap to the body (in the following way):
R13: Make a sl st inserting the hook in the same st, together with the second st of the body counting from the right (only the back side) (pic.18). Sl st in next 19 st, of the flap and the back side of the body(always working in both sts).
Break the yarn and weave in ends.
Attach the wooden button to the bag, at the height of the flap loop. (pic.19)
MAKE 4 TASSELS:
- For every tassel, cut 4 strands of Dark Old Pink yarn of 13.4 inches (34 cm) in length.
- Insert the first 4 strands all together in the 2 °st of the flap counting from the ch8 loop you previously made.
- Tie the strands together with a knot.
- Insert the second tassel in the second st on the right (skipping 1 st).
- Insert the third tassel in the 2° st on the left of the ch8 loop.
- Insert the fourth tassel in the 2° st on the left (skipping 1 st). (pic.20)

MAKE 3 POM POMS:
I chose Pistachio, Shocking Pink and Light Light Pink to make the pom poms.
With Dark Old Pink, ch20. Break the yarn and leave a long strand.
Attach the three pom poms to the chord and bind the chord around the Llama’s neck.

My supply lists include affiliate links. Purchasing from these merchants earns me a small commission with no extra cost to you, and goes towards supporting Birds and crickets.
Please be respectful and do not sell or distribute this pattern in any way, especially claiming it as your own. You can sell finished products made from this pattern by giving credit to Birds and crickets as the pattern designer and linking to the blog post. If you have any questions regarding distribution or translation of this pattern