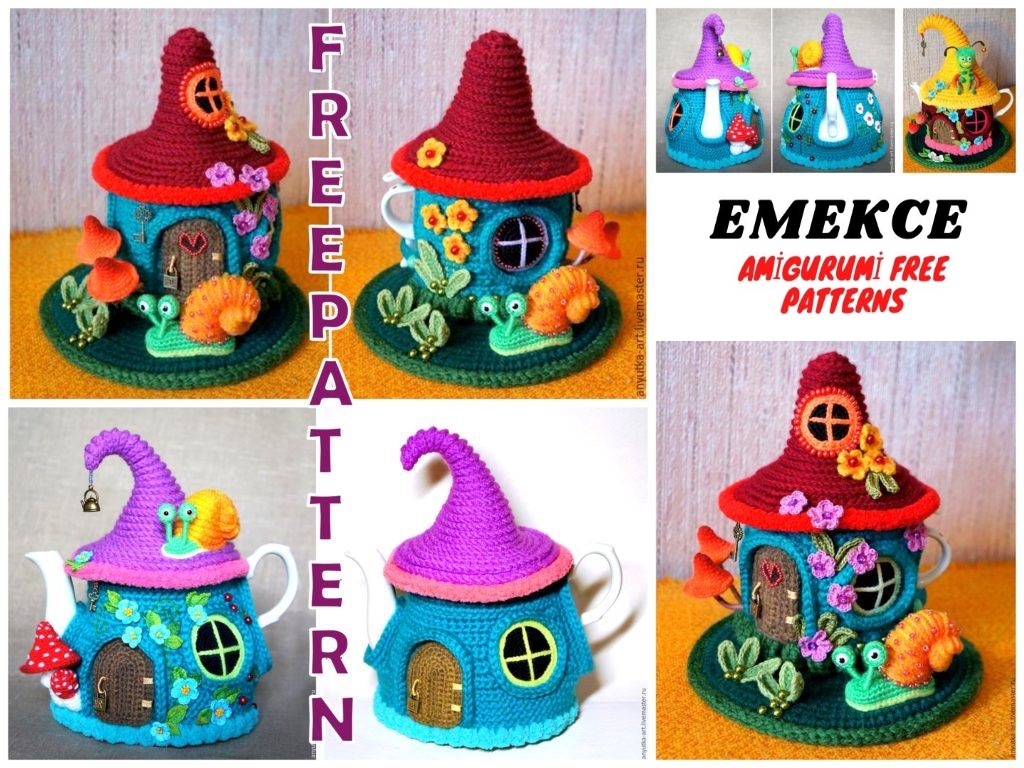
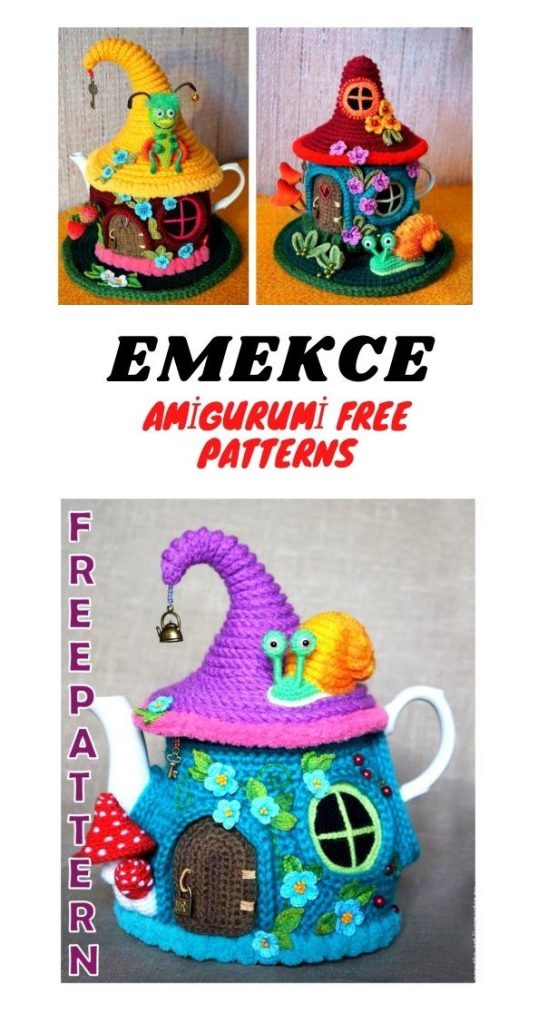
Amigurumi Teapot Fairytale House Free Crochet Pattern
Welcome to our website where you can find the most beautiful and highest quality samples of Amigurumi patterns. All the amigurumi patterns you can’t find are available on our website. Every day we continue to share new amigurumi patterns for you. Stay tuned to reach these amigurumi patterns before anyone else
We knit a heating pad on the “Fairytale House” teapot. Part 1
Difficulty: medium
Work time: 1 day
I think you will agree with me that we are all a little bit in the soul. I’m
I love fairy tales very much. I love to watch, read, and … tinker with them. But
since I’m also quite a practical person (in any case,
trying to be like that), then I like to combine a fairy tale and a way of life. Maybe you
want to create a piece of a very practical fairy tale by tying a heating pad to the kettle
“Fairytale house”. Such a hot-water bottle will keep the heat of tea, raise
mood will become a real decoration of your kitchen. And of course it is
A wonderful gift to family and friends.
As in my previous master classes on heating pads, I
defined as average. Kettles all have different shapes and sizes. During
work, you have to empirically determine the number of increases and
rows.
Another difficulty is that there are a lot of small parts on the heating pad,
which are best made from fine yarn. Therefore, to all this beauty
knit and sew, it takes quite a lot of time and patience.
But it is precisely these details that will make your house one and only.
I got such a heating pad!
Materials:
• yarn of different colors and thickness;
• black yarn for windows;
• brown yarn for the door;
• thin yarn (cotton is best suited – “iris”, “chamomile”,
“Coco”, “rose”) for flowers and leaves;
• beads, beads, sequins and the like for finishing the product;
• a wire and two beads for the eyes of a snail;
• filler for the body of a snail;
Read more about yarn in the text.
• Moment Crystal glue or other universal transparent glue;
• monofilament or thin thread in the color of yarn (it is convenient to use a floss
different colors).
Optional:
• acrylic paints;
• charms (metal pendants in the form of a lock, key, teapot).
Instruments:
• crochet hooks;
• sewing needles;
• a needle with a big eye (the so-called “gypsy”);
• brushes for acrylic paints.
Terms in the text:
• increase – two columns in one loop; decrease – we knit two loops
together;
• amigurumi ring – we wind yarn on a finger (two turns),
we tie the resulting ring with crochets. Remove from
finger and tighten by pulling the free end of the thread.
We knit the parts of the heating pad in a spiral, that is, without lifting loops (if not
indicated different).
Acrylic, semi-woolen or
wool yarn of medium thickness.
I knit houses from Alize ecolana yarn (100% wool, 220 m / 100
d), Alize lanagold (wool mixture, 240 m / 100 g), Alize fine (wool mixture, 390 m / 100
d) in two threads.
The larger the kettle and, accordingly, the larger the heating pad, the thicker
yarn should be taken so that the heater keeps its shape well.
I knitted a heating pad on such a kettle.
Roof
Attention! We knit for the back half loop.
1) We knit six single crochet into an amigurumi ring (first
row).
We knit five rows, making one increase through a row, starting from the second
row.
Next, we knit several rows, making one increase in each row.
The number of rows depends on how high you wish to make the crown
the roof. The photo shows how long the crown of my
hot water bottles after I knitted 12 rows (photo A).
Then we knit, making two increases in a row, three increases and so on
further (photo B).
In the course of knitting we try on the roof of the kettle.
And so, our roof became like a wizard’s hat and completely
covers the lid of the kettle (in my case also the sides).
Now we knit, making six increases in each row, forming fields
hats (forgot to take a picture, but the following photos show that
It turns out as a result).
Do not get carried away too much! Fields must not cover the spout and
interfere with the handle!
We finish knitting with a connecting column. We do not cut the thread.
The roof we get with a “ribbed” pattern due to untied facial
half-loop.
2) We unfold the knitting and knit the connecting posts on these
non-knit half-loop, moving to the beginning of knitting (photo AB).
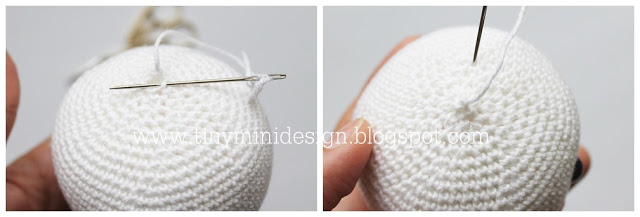
Having finished knitting, we leave a long “tail” of yarn.
The tail is tucked into the needle and passed along the entire canvas to the edge
knitting.
Tighten so that the crown is bent. We fix the knot on the wrong side
side of knitting (photo A).
3) We tie the edge of the roof with yarn of a different color. I made a harness in two
threads, single crochet, Alize softy yarn (100% micropolyester) (photo
B)
The roof is ready!
The base of the house
1) We put the roof on the kettle and with pins mark the places where the roof
in contact with the kettle.
2) Turn the inside out towards you and the marked pins
we knit a circle of connecting posts (chain stitch)
the same yarn that knitted the roof (gray in the photo).
If you, like me, knitted the roof in two threads, then make the chain stitch one
a thread.
So that the pins do not interfere, you can remove them by first drawing
circle with a vanishing marker or crayon.
3) Attach a yarn of a different color and knit on the resulting loops
single crochet.
Then we knit as I already described in detail in my previous
master classes.
However, I will repeat some points.
When they tied to the upper bases of the nose and handles, we knit two sidewalls
warmers separately (if the spout and handle are on the same or
almost at the same level). So I knitted a heating pad “Sheep on
hillock. ” But on this teapot, the top base of the handle is higher,
than the nose. Therefore, I continued to knit in swivel rows in one
canvas. For a cutout under the handle, I left three loops untied.
Tied to the upper base of the spout, she continued to knit two halves
(sidewalls) warmers separately.
I have a kettle at the top almost straight. So I knitted without
increase. Increases (one in each row, on each of the sidewalls
heating pads), I began to do when the kettle began to expand.
When knitting, often try on a heating pad on the kettle and adjust
the number of increases according to the shape of the kettle.
When you tie the first half, tie a chain of air loops, it
we then need to connect the two halves of the heating pad.
I recommend when knitting the first half of the heating pad to record how much
you made increases. Then tie your soulmate without any problems
symmetrically first.
4) When both halves of the heating pad are connected, connect them with chains of
air loops under the spout (photo A) and under the handle (photo B).
The shape of this teapot allows you to knit a heating pad without a button. But nonetheless,
I made a hole under the handle big enough to make the heating pad without
problems could be removed and worn.
If you want to make a heating pad with a fastener under the handle, then look at the workshop “Knit a heating pad on a hedgehog kettle”.
5) Next, we again knit in a spiral. We finish knitting, a little short
to the bottom.
6) We do the strapping with magnificent columns.
I knitted Alize softy yarn.
Lush bollards. In the first loop of the row we knit a crochet.
In the second loop we knit a lush column of 3-5 columns with
double crochet, then we knit an air loop and again a single crochet in
third row loop. Thus, we knit the whole row. More embossed
the pattern is obtained if you do not knit between lush columns
single crochet, and connecting column.
7) We tie the holes for the nose and handle with 2-3 rows of columns without
crochet and one row of connecting posts (can be tied with a “crustacean
step “).
The base of the house is ready!
Before further work, it is worth moistening the heating pad from the bullet machine and
dry by putting on the kettle.
Windows
1) We knit windows with single crochet according to the circle pattern. Make increases with
offset so you don’t get a hexagon.
I knitted windows made of Iris yarn.
Determine the size of the circle yourself, based on the size of your house.
2) From colored yarn, knit two chains of air loops.
When knitting the second chain, knit the middle loop through the middle
loop of the first chain, forming a window binding (photo A).
3) Using a hook, attach the binding to the window (photo B).
Ponytails can be fixed with knots on the wrong side or
hide when knitting the frame.
4) On the edge of the window, knit a series of connecting posts (photo B).
5) Knit a row of single crochet posts by inserting a hook into the middle of each
chain loops (photo D). The result was a window frame.
If you knit a frame of thicker yarn than knitted the window itself, then
knit without increase. If the yarn is the same thickness, then do six
increase, as in the usual knitting circle.
Our windows are ready!
Door
I knit “by eye”. But you can pre-calculate the quantity
the stitches you need to knit the door.
1) We knit the door according to the semi-crochet pattern. The number of rows in the scheme is conditionally –
knit as many rows as necessary for the desired door size.
I knitted a door made of medium-sized wool yarn (brand and footage not
I know, since these were the remains). It is quite possible to knit from another yarn,
the main thing is that it should be a suitable color and not very thick.
The door is ready (photo A).
2) Embroider the loops (photo B). I used Tulip YarnArt yarn.
3) Make a door handle. To do this, fasten on the wrong side
thread and bring it to the front side.
Take some stick of suitable thickness (I have this hook) and
sew a few stitches, as if sewing a stick to the fabric.
I made a door with a lock, so I skipped a thread with every stitch
through the handle of the castle.
Fasten the thread on the wrong side and put it on the front again
side.
Remove the wand and wrap the resulting loop. Put the coils
close to each other, without overlaps.
After wrapping, bring the thread to the wrong side and fasten.
The design of the heating pad
1) Sew windows and doors.
2) We knit the outer frame.
Lay a chain stitch around the window (in photo A is indicated by color).
We knit one row of single crochet. When knitting, make 4-5 increases,
so that the frame does not twist to the window.
Make one row of connecting posts (photo B).
3) Similarly, we arrange the door. We knit with different columns, forming
visor. On fillets symmetrically do 1-2 increments.
Here is the result.
4) On the other side of the heating pad we also draw a window.
5) We knit mushrooms. How to knit and sew fly agarics we look in the workshop on the heating pad “We knit a heating pad on the hedgehog teapot” (link given above) or
if larger mushrooms are needed, in the workshop “Crochet a needle plate
“By the mushrooms.”
We decorate the house
Decorate the house to your liking. There are a lot of schemes on the Internet
all kinds of flowers, twigs, leaves.
And I will show how I decorate my houses.
We knit leaves according to the scheme. If the leaves are needed longer, then increase the length
initial chain and, accordingly, the number of columns with two
crochets.
Beautiful leaves are obtained from section dyeing yarn. But you can
toned leaves themselves. To do this, moisten the leaves. Diluted to
ink status dark green acrylic paint tint
the base of the leaves.
How to tie flowers is shown in master classes on knitting warmers “Hedgehog” and
needle beds “On mushrooms”. The links are given above.
Sew the leaves along the central vein 2/3 of the length. In this case, the edges and
the tip of the leaf remains free and the leaf looks livelier.
The middle of the flowers can be embroidered with beads, sew a bead or sequins.
From beads you can make berries.
Imagine!
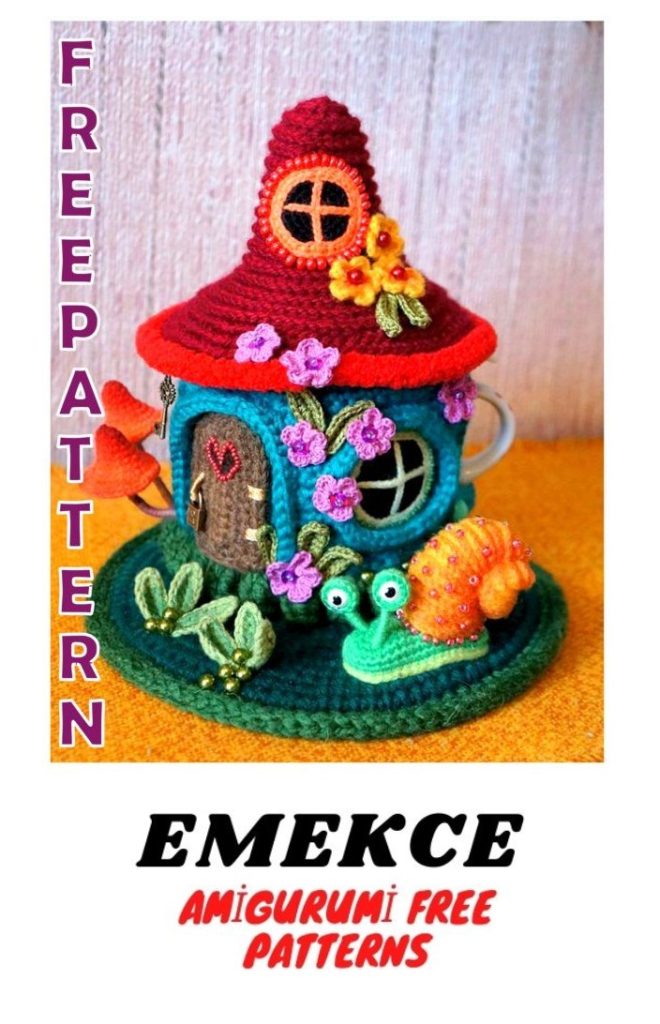
How to tie a snail is shown in the second part of the workshop
mushrooms ”(link above).
This snail is knitted in the same way, but from a different yarn.
Sink from Alize fine, body made of “Children’s Novelty” yarn (acrylic, 200 m / 50 g).
Accordingly, I took larger beads for the eyes.
Sew the snail to the roof around the perimeter of the body. Additionally
Sew the sink to the side of the roof with a few stitches
the snail did not fall to the side.
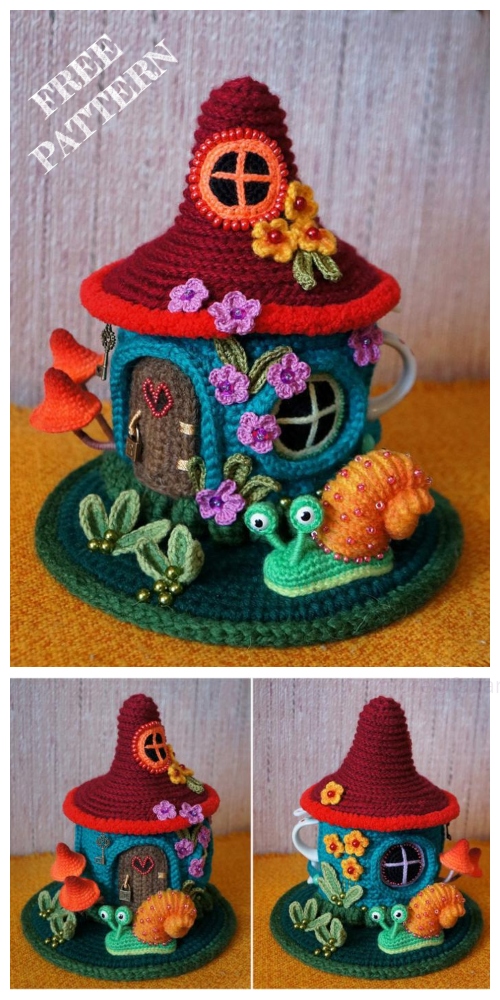
This is how the heating pad looks from different angles.
The second part of the workshop will be more of an addition. I will show different
design options warmers houses.
I also want to immediately answer a couple of questions that often arise.
Charms (metal pendants) that I use in the design
Hot water bottles, I buy here, at the Fair of Masters. They stand at all
inexpensively. At the locks, I bite the loop with the help of pliers.
I’m sometimes asked if things made can be put up for sale.
in my workshops. I answer – of course you can! Only me
It will be very nice if you give a link to the master class. But that, again
However, it remains at your discretion.
Good luck! Warmth and comfort of your home!
We knit a heating pad on the “Fairytale House” teapot. Part 2
Types of Creativity: Knitting> Crochet
Difficulty: medium
Work time: 1 day
In this part of the master class I will give examples of the design of a heating pad-house.
And we will tie a funny little bug, which is very comfortable on the roof.
I think that such a heating pad will be very pleasant to children. After all, in the company with
a little bug drinking tea is more fun!
We will need:
Materials:
• yarn for insects of different colors. I used Children’s Novelty
(acrylic, 200 m / 50 g);
• black yarn for embroidery of a face (iris or floss);
• wire;
• glue Moment-crystal or other universal transparent glue;
• two beads for the eyes (you can use ready-made ones);
• filler (I have holofiber).
At will – acrylic paints.
Instruments:
• crochet hooks;
• sewing needle;
• a needle with a big eye.
Terms and abbreviations in the text:
• increase – two columns in one loop;
• decrease – we knit two loops together;
• sc – single crochet.
We knit all the details of the bug in a spiral, that is, without lifting loops.
Head and body
We knit the head and body of a bug in one piece.
In the process of knitting, fill the body with a stick.
1st row – 5 sc in amigurumi ring
2-4th rows – 1 increase in a row = 8 sc.
5-8th rows – 2 increments per row = 16 sc.
9-12th rows – 16 sc in a row.
13-14th rows – 3 decreases in a row = 10 sc.
It turned out the bug body. Next, we knit the head.
15-18th rows – 5 increments per row = 30 sc.
19-22th rows – 30 sc in a row.
From the 23rd row, we make 5 decreases in a row, to the end.
We embroider a nose
For the spout, first we make the flooring with transverse stitches (photo A). Then
make vertical stitches (photo B-V). You can do the second and third
layer. In the middle part we make an additional layer of stitches so that the spout
was more convex and rounded (photo D).
Make paws
For the legs, take six pieces of wire and twist, as shown in
a photo.
Using a needle, wrap the loop around the yarn. In this case, the yarn is not cut from
skein (photo A).
We squeeze the loop a little with pliers. The tip of the yarn that
wrapped a loop around it, cut it off and glue it to the wire. Yarn from the ball
wrap the wire, pre-lubricating it with glue. Put the turns
close to each other, without overlaps (photo B).
Lubricate the foot with glue again and make the second layer of winding, capturing and
the very tip of the foot (photo B).
Thus, we do all the paws (photo D).
With a spoke we make holes in the body of the insect.
Lubricate the tips of the paws with glue and glue them into the body.
In order to glue better, dry the first layer for
2-3 minutes, and then spread a new layer of glue.
The legs are bent. Glue or sew eyes. Embroider eyebrows and
a smile.
I previously toned the bug with acrylic paint. After
paint dried up, painted freckles on the nose.
For tinting, you can also use pastel or pastel
pencils.
Make hairstyle
Pieces of yarn, using a hook, are fixed on the crown of a bug (photo
A). If it is not entirely clear how this is done, then you can see in the first
parts of the workshop “We knit a needle box“ Por mushrooms ”, as I fastened the yarn for
blades of grass.
With a needle, we divide the yarn into fibers and comb it with a brush. Trim.
Glue the antennae (photo B). We make and attach antennae, similarly to
like we did paws.
Wings
1st row – 6 sc in the amigurumi ring.
2-3 rows – 6 increments in a row = 18 sc.
4-6th rows – 18 sc.
7-8th rows – 1 decrease in a row = 16 sc.
9-10th rows – 2 decreases in a row = 12 sc.
11-12th rows – 3 decreases in a row = 6 sc.
We put the tip of the yarn into the needle and pull the wing so that it
acquired the shape of a spoon (photo A).
In the same way we make the second wing (photo B).
On the back of a bug we sew a brooch pin and wings. Photo of this
There is no stage, but I think no difficulties will arise.
A pin is needed so that the bug can be unfastened when
need to wash the heating pad.
We plant our bukarah on the roof. Hurrah!
As I said, on the Internet there are a lot of schemes of the most
various colors. However, I recommend you knit simple,
small flowers and leaves. They look much better and more harmonious.
on the house than large, complex parts.
I decided to decorate this heating pad with small roses. I didn’t draw a diagram,
but I will try to explain in words.
1. We knit a chain of air loops. The number of loops is a multiple of two.
The quantity is determined from the calculation – two loops on one petal. It’s better
make roses of different sizes.
2. Knit a number of single crochet posts.
3. We make two lifting loops. In the same base loop, we knit
four double crochet.
4. We knit the connecting column in the next, second loop
grounds.
5. We knit the connecting column in the next, third loop and
repeat steps 3 and 4.
Thus, we knit out all the rose petals.
When knitting, you will see how the resulting ribbon twists. Ready
Twist and sew the ribbon.
Very nice look on the heating pad berries of strawberries. Sorry, I do not
recorded the number of loops and rows when she knitted. But I think on the Internet
without problems you can find master classes and descriptions of such berries.
But this hot water bottle on the teapot with a lid and a strainer.
If you are still not confident in your abilities and are afraid to get lost in the increase, with
knitting heating pads on a kettle, this is your option!
We knit the roof as shown in the first part of the master class. We knit further without
any increase. Fortunately, the shape of most mugs allows this.
Just remember to leave a cutout for the handle. And this warmer is better to do with
with a button.
Teapots are very convenient when you do not need to make tea for the whole family. Such
a mug with a heating pad can be a great gift for mom or grandmother.
How to knit mushrooms-poganochki, described in the second part of the workshop “Needle box” Mushrooms. “
Decorating the stand for the kettle, you can create a whole composition! That’s where
scope for imagination.
The leaves, beads and snail are sewn on a stand.
A snail can creep around a house, depending on how you
turn the mug.
This is where I end. Imagine, create – please yourself and others!
Warmth and comfort of your home!