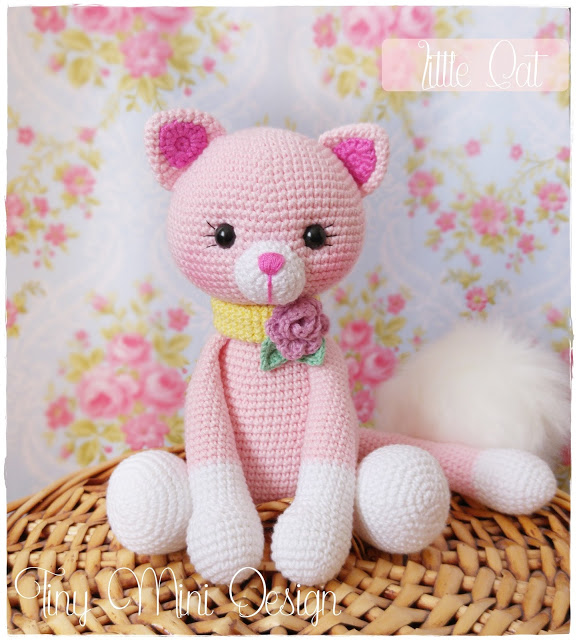
Bob E Cat Crochet Amigurumi Free Pattern
Check for Comparison to Perle Cotton: Wrap the thread you want to use around a
ruler, with each thread wrap touching the last wrap. The number of wraps that fit
inside ¼ inch (.6 cm) is the equivalent size to perle cotton. For instance, if your
thread wraps around 12 times, then it is equivalent to size 12 perle cotton.
Check for Comparison to Crochet Cotton: Wrap the thread you want to use around a
ruler, with each thread wrap touching the last wrap. The number of wraps that fit inside
½ inch (1.3 cm) is the equivalent size to crochet cotton. For instance, if your thread
wraps around 30 times, then it is equivalent to size 30 crochet cotton
_____________________________________________________________

Abbreviations
beg – begin/beginning
bet — between
BL – back loop
ch – chain stitch
ch- – refers to a ch space previ
BOB E. CAT
Materials: Cat is approximately 3.5″ (9cm)
• Size 30 crochet thread, size 10 perle cotton, or punch thread – MC (main color)
• Same as above – AC (accent color)
• Size 10 (1.3mm) crochet hook
• Stuffing of choice
• mm onyx beads for eyes
• Jointing set for head (optional) – two ¼” disks and one ½” cotter pin
• Embroidery thread in color of choice for nose and other facial features
• Upholstery or other strong thread for jointing limbs, color similar to cat
• Nylon or other thin, strong thread for attaching eyes – black
• 6-inch (12cm) length of ¼-inch (6mm) ribbon in color of choice
• Sewing needle, milliner’s needle (or other 2.5″ needle), beading needle
• Small hemostat, dowel, long tweezers, or other long, narrow tool for stuffing
• Small needle-nose pliers for turning cotter pins
• Small, sharp scissors

Head:
1. With AC ch 6; 2 sc in 2nd ch from hook, sc in next 4 ch; continuing around to
opposite side of chain, sc in next 4 ch, 2 sc in last ch; do not join; place marker. (I use a
piece of contrasting thread as a marker.) (12 sc)
2. Sc in ea sc around. (12 sc)
3. Sc in next 5 sc, 2 sc in ea of next 2 sc, sc in next 5 sc. (14 sc)
4. Sc in ea sc around; FO with a sl st in next sc. (14 sc)
5. Join MC with sc in last sl st on rnd 4, sc in next 2 sc, 3 sc in next sc, sc in next 6 sc, 3
sc in next sc, sc in next 3 sc; do not join; place marker. (18 sc)
6. Sc in next 4 sc, 2 sc in ea of next 10 sc, sc in next 4 sc. (28 sc)
7. Sc in ea sc around. (28 sc)
8. 2 sc in next sc, sc in next 3 sc, 2 sc in ea of next 3 sc, (sc in next 2 sc, 2 sc in next sc) 4
times, sc in next 2 sc, 2 sc in ea of next 3 sc, sc in next 3 sc, 2 sc in next sc. (40 sc)
9 – 10. Sc in ea sc around. (40 sc)
11. (Sc2tog, sc in next 6 sc) 5 times. (35 sc)
12. Sc in ea sc around. (35 sc)
13. (Sc2tog, sc in next 3 sc) 7 times. (28 sc)
14. Sc in next sc around. (28 sc)
• At this point, you’ll insert the cotter pin. First, find the center of the very bottom of
the muzzle and mark it with a pin. Trace an imaginary line straight down from the pin to
round 10; mark this spot with another pin. Place a disc onto a cotter pin, and insert the
pin inside the head and push it through to the other side, working between stitches,
between rows 10 and 11. Ease the pin through carefully so as not to tear the thread. Stuff
the head about half full, then check to make sure your cotter pin is positioned correctly.
If it’s off-center, remove the stuffing and reposition the pin. Continue to stuff head firmly,
shaping as you go. Cheeks will be fat and top of head will be rounded and higher at
center top.
15. (Sc2tog, sc in next 2 sc) 7 times. (21 sc)
16. Sc in ea sc around. (21 sc)
17. (Sc2tog, sc in next sc) 7 times. (14 sc)
18. (Sc2tog, sc in next sc) 4 times, sc2tog; FO with sl st in next sc, leaving long end.
• Round out the back of the head with stuffing. Head should be stuffed firmly, but not
so full that the stitches are being pulled apart.
• Thread long end on needle and run a gathering stitch around the FL of rnd 18; pull
tightly to gather (with care if you’re using punch embroidery thread so as not to break it);
FO; insert needle into head and pull out of head at another spot to hide thread end. Trim
end of thread close to head.
Note: While instructions have been provided on placement and size of eyes, ears,
nose, mouth, and whiskers, they are suggestions only. Don’t be afraid to experiment
with these features to make each cat uniquely yours!
Eye Sockets (optional): First use pins to locate the desired eye position. Thread a
needle using a doubled strand of upholstery or other strong thread similar in color to the
head; knot the end. Insert the needle up into the bottom of the head and out the 1st eye
location. *Take a stitch the width of one sc, inserting needle back into head, and bringing
it out at the 2nd eye location. Take a stitch the width of one sc, inserting needle into head
at 2nd eye location, and back out the 1st eye location. ** Repeat * to ** once. Pull
tightly to indent the eyes. (If the thread still wants to slip through, repeat * to ** once
more. Keeping thread taut, insert needle into eye socket, and bring it out the bottom of
head. Fasten off securely, making sure that eye sockets remain indented. At this point you
may use dark brown eye shadow on a cotton swab, water color pencil, or other medium to
shade the eye area, if desired.
Attach eyes: Using black nylon, or other strong thread, sew black beads into eye
sockets. Begin by inserting needle into bottom of head and out at left eye socket. (If your
needle won’t pass through the bead, remove the thread from the needle, thread it through
the bead, then rethread the needle.) Sew through bead, and then insert needle back into
left eye socket and out right eye socket. Sew through second bead, then insert needle
back into right eye socket, and bring out at bottom of head. Fasten off securely, making
sure that eye beads are pulled tightly to imbed them into sockets.
Nose, Mouth, Eyebrows:
Embroider the nose in the shape of small triangle using satin stitch with 1 strand of
embroidery thread in color of choice. Make an inverted v-stitch for mouth, with
center being at the bottom of the center of the nose. Pull these two stitches rather
tight, to raise the chin, and make the sides of the muzzle puffy a bit for a cat-like
appearance. Embroider a straight st over each brow.

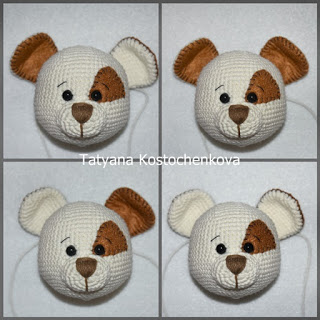
Ears (make 2)
1. Leaving a long tail at the beginning, ch 6, sc in 2nd ch from hook and in next 4
ch; ch 1, turn. (5 sc)
2. Sk 1st sc, sc in next sc, sc2tog, sc in next sc; ch 1, turn. (3 sc)
3. Sc in ea sc across; ch 1, turn. (3 sc)
4. Sk 1st sc, sc2tog; ch 1, turn. (1 sc)
5. Sc in next sc, ch 1, continue down edge of ear, sc in side of sc just made, (sc in next
row end) 4 times, Sc in side of 1st free lp of beg ch. (7 sc)
• Flatten ear horizontally; then fold ear vertically to front until left and right lower
corners meet. Use pins to help you locate the position for the ears, then sew the ears to
the head using the long end. The center fold should be about 1 round behind the right
and left edges.
Whiskers: Thread a needle with ecru sewing thread and knot the end. (Nylon sewing
thread may also be used.) Insert the needle into the side of the head and bring out on the
muzzle where you’d like to place a whisker. Pull through, and tug gently to cause the
knot to be pulled just into the head out of sight but not all the way through. Take a tiny
stitch where the thread came out, and wrap thread around needle once. Pull thread,
holding knot against muzzle, until the tiny knot is flush against muzzle. Trim the whisker
to about 3/8″ in length, or desired length. Repeat the process to make 3 whiskers on each
side of muzzle. In the same way, make 2 protruding hairs directly above each eyebrow,
with the innermost hair being about twice as long as the outer. If using regular thread, rub
a little fray stop between your thumb and forefinger, and gently rub some on ends of
whiskers and eyebrow hairs. This will make them stiffer.
Body:
1. With MC ch 2, 5 sc in 2nd ch from hook; do not join; place marker. (5 sc)
2. 2 sc in ea sc around. (10 sc)
3. (2 sc in next sc, sc in next sc) twice, 2 sc in ea of next 2 sc, (sc in next sc, 2 sc in next
sc) twice. (16 sc)
4. (2 sc in next sc, sc in next 3 sc) 4 times. (20 sc)
5. Sc in ea sc around. (20 sc)
6. Sc in next sc, place rnd marker to begin rnd here (does not count in rnd stitch count); 2
sc in ea of next 2 sc, sc in next 18 sc. (22 sc)
7. Sc in next sc, 2 sc in next 2 sc, sc in next 19 sc. (24 sc)
8. Sc in next 3 sc, move rnd marker to begin rnd here; sc in next sc, 2 sc in next sc, sc in
next 8 sc, 2 sc in next sc, sc in next 2 sc, 2 sc in next sc, sc in next 8 sc, 2 sc in next sc, sc
in next sc. (28 sc)
Neck Joint: At this point push the cotter pin protruding from the bottom of
the head into the top of the center of round 1 of the body. Reach inside the
body to place a disk onto the cotter pin and push flush toward head; then,
reaching inside body with small pliers, curl each side of cotter pin outward
and down toward disk, until the curled leg is resting on the disk.
9 – 15. Sc in ea sc around. (28 sc)
16. We need to begin the next rnd at center front, so sc in next sc and move marker – this
does not change the stitch count; sc in next 2 sc, sc2tog, sc in next 8 sc, sc2tog, sc in next
sc, sc2tog, sc in next 8 sc, sc2tog, sc in next sc. (24 sc)
17. Sc in ea sc around. (24 sc)
18. (Sc2tog, sc in next 2 sc) 6 times. (18 sc)
19. Sc in ea sc around. (18 sc)
• Stuff body.
20. (Sc2tog, sc in next sc) 6 times. (12 sc)
21. Sc2tog 6 times; FO with sl st in next sc, leaving long end for closing bottom. (6 sc)
• Finish stuffing. Body should be firmly stuffed.
• Thread long end on needle, then sew a row of gathering stitches in and out of the front
lps of row 21; pull to gather and close. Insert the needle into the body and out elsewhere
on body. Insert needle into exact spot where you just brought it out, and then bring
needle out again at a different place on opposite side of body. This will secure the thread.
Clip the thread close to body so that the end disappears inside body.

Right Arm:
1. With AC ch 4, sc in 2nd ch from hook, sc in next ch, 2 sc in next ch; moving
around to work on opposite side of ch, sc in next 2 ch, 2 sc in last ch; do not join;
place marker. (8 sc)
2. (2 sc in next sc, sc in next sc) 4 times. (12 sc)
3. (2 sc in next sc, sc in next 5 sc) twice. (14 sc)
4 – 5. Sc in ea sc around. (14 sc)
6. Sc in ea sc around; FO with sl st in next sc. (14 sc)
7. Join MC with sc in last sl st on row 5, sc in ea sc around. (14 sc)
8. Sc in next 5 sc, sc2tog, sl st loosely in next 5 sc, sc2tog. (7 sc, 5 sl st)
9. Sc in ea st around. (12 sc)
10. (2 sc in next sc, sc in next 5 sc) twice. (14 sc)
11– 15. Sc in ea sc around. (14 sc)
16. Sc in next 2 sc, sl st loosely in next 5 sc, sc in next 7 sc. (10 sc, 4 sl st)
• Begin stuffing arm.
17 – 21. Sc in ea st around. (14 sc)
22. (Sc2tog, sc in next 5 sc) twice. (12 sc)
23. (Sc in next 4 sc, sc2tog) twice. (10 sc )
• Finish stuffing.
Thread end on needle, then sew the end closed using a ladder stitch. Insert the needle
into the top of arm and bring out elsewhere on arm, pulling thread taut. Pull on thread
firmly and clip close to arm so that the end of thread disappears into arm.
Left Arm:
1 – 7. Work same as right arm.
8. Sc in next 5 sc, sc2tog, sl st loosely in next 5 sc, sc2tog. (7 sc, 5 sl st)
9. Sc in ea st around. (12 sc)
10. (Sc in next 5 sc, 2 sc in next sc) twice. (14 sc)
11 – 15. Work same as right arm.
16. Sc in next 4 sc, sl st in next 5 sc, sc in next 5 sc. (9 sc, 5 sl st)
17 – 23. Work same as right arm.
• Finish same as right arm.

Attach arms:
Insert a straight pin through each arm at the place where the joint will be, in order to
experiment and find the correct placement. After you’ve decided where the arms will be
placed, mark the entry point for the joint on each side. Thread a 2½-inch needle with
upholstery or other strong thread in a color to match the bear; double but do not knot the
end. Insert needle into 1st shoulder; push needle through body and bring out at 2nd
shoulder. Pull thread through, leaving a 3-inch tail protruding from the 1st shoulder.
Insert the needle back into the bear one round below the exit point, push through the bear,
and bring it back out one round below the spot where the tail is protruding. Insert the
needle back into the exact place from which the tail protrudes, then push it through the
body and back out the top of the stitch on the opposite side. *Insert needle into the arm
from the inside and push through to outside of arm. Insert needle back into arm in same
place where it came out, dipping the tip of the needle downward and then back up to
catch some stuffing as the needle passes through the arm; bring it out inside of the arm in
the exact spot where it went in. Insert the needle back into the body in the same place
where the thread is protruding, push it back through the body**, and out the same place
where the tail protrudes on the opposite side. Repeat from * to ** for the other arm, this
time bringing the needle out just in front of the top of the 1st arm. Pull the needle to
tighten the arm thread and pull the arms firmly against the body.
Clip the thread, leaving a 3-inch tail. Tie off the two ends of the tail
using a surgeon’s knot, then thread the tail back onto the needle and
pull it through the body, thus hiding the ends inside the body. Clip
the ends close to the surface so that they disappear into the body. Tie off the first tail in
the same way.
• Use one strand of black floss to embroider 3 evenly spaced vertical straight stitches on
the end of each paw.
Legs (make 2):
1. With AC ch 7, 2 sc in 2nd ch from hook, sc in next 4 ch, 2 sc in next ch; move
around to other side of ch and make 2 sc in 1st ch, sc in next 4 ch, 2 sc in last ch; do not
join; place marker. (16 sc)
2. 2 sc in ea of next 2 sc, sc in next 3 sc, 2 sc in ea of next 6 sc, sc in next 4 sc, 2 sc in ea
of next 2 sc. (26 sc)
3. Sc in next sc, 2 sc in next sc, sc in next 6 sc (2 sc in next sc, sc in next sc) 5 times, 2 sc
in next sc, sc in next 6 sc, 2 sc in next sc; FO with sl st in next sc. (34 sc)
4. Working in BL for this rnd, join MC with sc in sl st at ctr back of heel, sc in ea sc
around; do not join, place marker. (34 sc)
5 -6. Sc in ea sc around. (34 sc)
7. Sc in next 9 sc, (sc2tog, sc in next sc) 5 times, sc2tog, sc in next 8 sc. (28 sc)
8. Sc in next sc; move rnd marker here to begin rnd here; sc in next 8 sc, sc2tog 6 times,
sc in next 8 sc. (22sc)
9. Sc in next 5 sc, sc2tog 6 times, sc in next 5 sc. (16 sc)
• Stuff foot; continue stuffing as you work every few rounds.
10 – 12. Sc in ea sc around. (16 sc)
13. Sc in next 7 sc, 2 sc in ea of next 2 sc, sc in next 7 sc. (18)
14 – 20. Sc in ea sc around. (18 sc)
21. (Sc2tog, sc in next 7 sc) twice. (16 sc)
22. (Sc2tog, sc in next 6 sc) twice; FO with sl st in next sc, leaving long end for closing.
(14 sc)
• Thread end on needle, then close the opening with a ladder stitch. When finished,
insert the needle into the leg and bring out elsewhere on leg. Pull on thread firmly and
clip close to leg, so that the end disappears inside the leg.
Attach Legs:
• Begin by using pins through the legs to find the desired position, and then follow the
instructions for the arms to complete the jointing.
• With one strand of black floss, embroider 3 or 4 straight stitches on the end of each foot
for claws.
Tail:
1. With AC, ch 2, 3 sc in 2nd ch from hook; do not join, place marker. (3 sc)
2. 2 sc in ea sc around. (6 sc)
3 – 4. Sc around. (6 sc)
5. 2 sc in next sc, sc in next 5 sc. (7 sc)
6 – 8. Sc in ea sc around. (7 sc)
9. Sc in next 2 sc, 2 sc in next sc, sc in next 4 sc. (8 sc)
10. Sc in ea sc around. (8 sc)
11. Sc in ea sc around; sl st in next sc; FO. (8 sc, 1 sl st)
• With a small hemostat or other tool, push a bit of stuffing into the tail tip.
12. Join MC with sc in last sl st; sc in next 7 sc. (8 sc)
13 – 19. Sc in ea sc around. (8 sc)
• Add more stuffing every few rows.
20 – 22. Sl st in next 3 sc, sc in next 5 sc. (3 sl st, 5 sc)
23. Sl st in next 2 st, sc in next 6 st. (2 sl st, 6 sc)
24 – 30. Sc in ea sc around. (8 sc)
31 – 34. Sc in next 3 sc, sl st in next 3 sc, sc in next 2 sc. (3 sl st, 5 sc)
35 – 40. Sc in ea sc around. ( 8 sc)
41. 2 sc in next sc, sc in next 2 sc, 2 sc in next sc, sc in next 4 sc, sl st in next sc; FO,
leaving long end. (10 sc)
• Finish stuffing.
• Sew tail to body at lower center back, with bottom edge of tail between 4th and 5th
row
from bottom row, and top edge of tail between 7th and 8th row from bottom, making sure
that the curve faces up or to the side, and not downward.
• Wrap a ribbon around cat’s neck and tie into a bow. Trim ends to desired length.