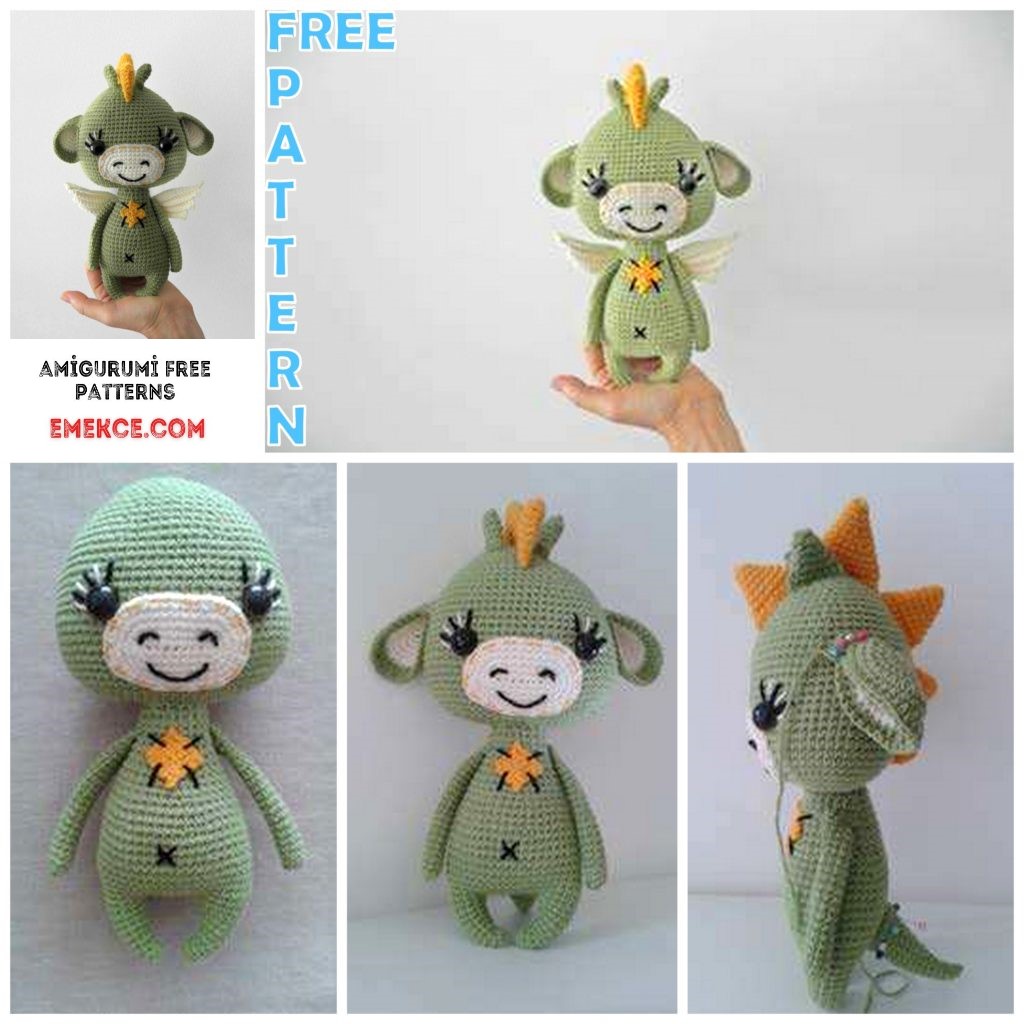
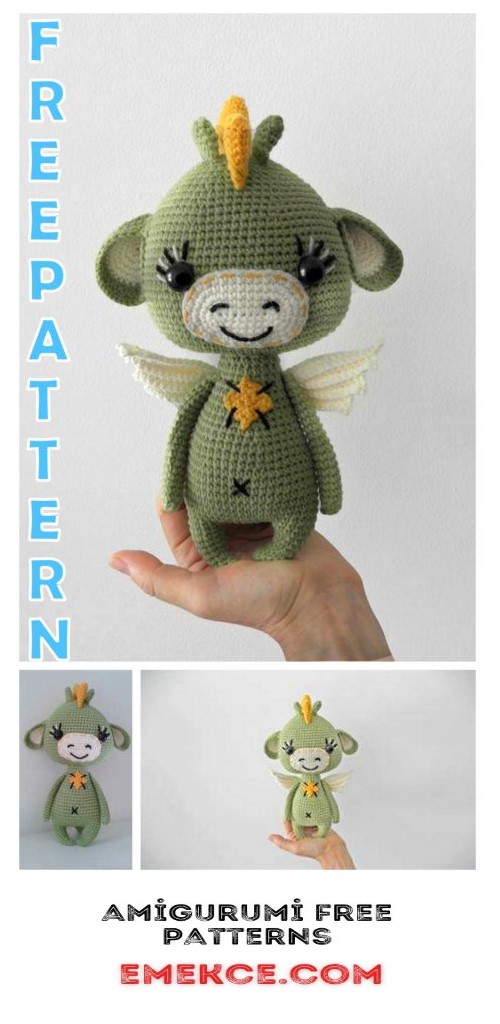
Amigurumi Dragon David Free Crochet Pattern
We continue to bring together the most beautiful amigurumi patterns related to Amigurumi. In this article you are waiting for a of amigurumi dragon david pattern.
Dragon David
Skills level: easy
MATERIALS
I used yarn of different manufacturers:
Colors:
YARN ART Jeans
* Hook size US 1 (2,5 mm)
* Polyester ber ll (or stuf ng of your choice)
I hope you enjoy making your own cute dragon David doll.
ALIZE Cotton Gold (55% cotton, 45% acrylic; 100 g = 330 m / 3,53 oz = 361 yd)
YARN ART Jeans (55% cotton, 45% acrylic; 50g = 160 m /1,76 oz = 175 yd)
ALIZE Cotton Gold
Light green color: 35 g (1,23 oz) – for the head, body, outer ears, two of spikes, tail, legs and arms
Milk color: 7 g (0,27 oz) – for the muzzle, wings, inner ears and embroidery
Yellow color: 6 g (0,21 oz) for the spikes, a patch and embroidery
2 black (or brown) 16 mm (0,6 inch) plastic safety eyes or black yarn to embroider, when the doll is made for a baby
Skills you will need:
Magic ring (alternative for magic ring: Make chain 2. Work SC stitches in first chain), crocheting in
rounds, crocheting in rows, chain stitch, slip stitch, single crochet stitch, double crochet stitch, half
double crochet stitch, decreasing (regular or invisible on you desire), increasing.
*
* Tapestry needle
* Stitch marker
* Pins
* Scissor
* Optional: wooden spoon/chopstick to simplify the lling
MEASUREMENTS
GAUGE
Gauge for the doll: 7 single crochet stitches x 8 rounds to 1 inch (hook size US 1 or 2,5 mm).
Abbreviations used:
Pattern is written using standard US crocheting terms:
Ch = chain stitch
N Ch = make N chain stitches
[…] x N = repeat instructions described in the brackets N times in that round
dec = SC decrease (SC 2 stitches together) = invisible decrease = (insert hook into FLO of
the indicated st and into FLO of next st, YO, pull through both front loops, YO, pull
through both loops on hook = regular decrease = (crochet next 2 stitches
together into 1 stitch by pulling up a loop through both stitches and crocheting the loops
together)
fasten off = Cut the yarn, leaving about 10 cm (4 inch) tail, and pull this tail all the way through
the top of the last stitch made.
inc = SC increase (2 SC into the same stitch)
N SC / N slst = crochet one SC / slst in the following N stitches
( N sts ) = number of stitches after nishing this round / row
Black embroidery thread (or yarn) for embroidery of the mouth, nostrils and eyelashes
Using the stated hook size and yarn, your doll will turn out about 29 cm (11,4 inch) from the feet to
the top of the spikes.
beg Ch = beginning chain
BL(O) = back loop (only) = crochet through back loops only. If BL(O) is marked after the
round number, crochet the entire round through BL(O). If BL(O) is in the middle of a sentence
between commas, crochet only the indicated stitches BL(O)
Rd(s) = round(s)
hdc = half double crochet = (YO, insert hook in indicated stitch, pull through loop, YO, pull
through all 3 loops on hook)
DC = double crochet = (YO, insert hook in indicated st, YO, pool through loop, (YO, pool
through 2 loops) twice.
Dc inc = double crochet increase (2 DC into the same stitch)
Special crochet techniques
Crochet in spiral rounds
When you crochet in spiral rounds you do not turn or join the round. Use a stitch marker to mark
the beginning of each round. Move the marker up each time you start a new round.
Alternative for stitch marker: you can use different colored yarn for stitch markers too, just place it
into the rst stitch of every row/round as you go.
Crochet in rows
When you crochet rows you need to turn your work, make 1 turning chain, if the next row starts
with a SC. If the turning chain(s) count as stitch or not is indicated in the row.
Closing up a piece of circular crochet
When you nish working a piece of circular crochet that forms a 3-D-object, you must close the
small hole that remains. This is normally completed after stuf ng the piece.
1) Cut the yarn, leaving a long yarn end. Draw the end through the nal loop on the hook and
thread it onto a tapestry needle.
2) Insert the needle under the front loop of each stitch around the opening, so the needle goes
from the center of the hole to the outside.
3) Pull the tail tight to close the hole. To weave in the loose end insert the needle through the
middle of the ring you’ve created and push it through the crochet piece. Cut off the end.

SOME USEFUL HINTS
1. Stitch count is given in each row/round so you can check your work.
2. Crochet tightly so you get a clean and rm surface and no lling can shine through. If you
crochet very loose, choose a smaller hook size.
3. You can choose a different kind of yarn with a different gauge. Adjust hook size
accordingly. The measurements of the doll will also change.
4. Fill the doll with ber ll as you go. The rmer as you stuff, the rmer your doll will turn out.
5. And don’t forget have fun!))
YO = yarn over
rem = remaining
SC = single crochet = (Insert hook in indicated stitch, YO, pull through loop, YO and pull through
both loops on hook)
slst = slip stitch = ( insert hook in indicated stitch, YO and pull through both loops on hook)
st(s) = stitch(es)
START HERE …
Please, read the whole pattern through properly, so you have a good overview
Directions
Legs (make 2 of them)
Rd 1 7 SC in a magic ring (7 sts)
Rds 2 – 3 SC in each st around (7 sts)
Rd 4 inc, 5 SC, inc (9 sts)
Rd 5 SC in each st around (9 sts)
Rd 6 inc, 7, inc (11 sts)
Rd 7 SC in each st around (11 sts)
Rd 8 inc, 9 SC, inc (13 sts)
Rd 9 SC in each st around (13 sts)
First leg: fasten off (do not leave a long tail).
Now crochet the second leg in the same way. Repeat rounds1– 9, but do not cut the yarn, make
1 slst in the 1 stitch of Rd 9, crochet 8 Ch and continue with body. st
Body
Hook US 1 ½ or 2,5 mm, light green color yarn
Work the legs in spiral rounds
Hook US 1 ½ or 2,5 mm, light green color yarn
Work the body in spiral rounds
Connect both legs with 1 slst in the first stitch of Rd 9. It is important that the tips of feet look to
each other. + Crochet now 12 SC around the first leg + 8 SC in the chains + 13 SC around the
second leg + 8 SC in the chains = 42 SC = Rd 1 of the body. This will be the new begin of the
round.
Rd 2 SC in each st around (42 sts)
Staff the legs with ber ll tight. Use the scissors or something pointy to insert the stuf ng.
Rd 3 [ 6 SC , inc ] x 6 (48 sts)
Rds 4 – 10 SC in each st around (48 sts)
TIP! Its easier to ll in some stuf ng material while you are working out the body decreases – when it’s
nished it is harder to stuff the body tight, because of the small opening at the end.
Rd 11 [ 1 dec , 6 SC ] x 6 (42 sts)
Rds 12 – 13 SC in each st around (42 sts)
Rd 14 [ 1 dec , 5 SC ] x 6 (36 sts)
Rd 15 SC in each st around (36 sts)
Rd 16 [ 1 dec , 10 SC ] x 3 (33 sts)
Rd 17 [ 1 dec , 9 SC ] x 3 (30 sts)
Rd 18 SC in each st around (30 sts)
Rd 19 [ 1 dec , 8 SC ] x 3 (27 sts)
Rd 20 SC in each st around (27 sts)
Rd 21 [ 1 dec , 7 SC ] x 3 (24 sts)
Rd 22 SC in each st around (24 sts)
Rd 23 [ dec, 6 SC ] x 3 (21 sts)
Rd 24 SC in each st around (21 sts)
Fasten off, leaving a long tail about 35 cm (14 inch) for sewing.
Arms (make 2 of them)
Rd 1 6 SC in a magic ring (6 sts)
Rd 2 inc, 2 SC, inc, 2 SC (8 sts)
Rds3– 11 SC in each st around (8 sts)
Start to little ll the arm.
TIP! Be gentle and do not stuff the arm too rmly to avoid losing the shape. Use the scissors or something
pointy to insert the stuf ng. Do not add stuf ng to the top of the arm (after Rd 8) otherwise the arms will not lay neatly at but stick out too far from the body.
Rds 12 – 20 SC in each st around (8 sts)
Push the top of the arm at. Insert the hook through loops of both stitches. Crochet over the
opening with SC until the end. Fasten off, leaving a long tail about 15 cm (6 inch) for sewing
Patch on the chest (make 1)
For the patch you start with 5 Ch.
Row 1 … start from the 2 Ch from the hook and crochet along the chain – 4 SC nd . (4 sts), turn the work
Rows 2 – 4 1 Ch, 4 SC (4 sts), turn the work
Fasten off, leaving a long tail about 15 cm (6 inch) for sewing. (photo 7)
Hook US 1 ½ or 2,5 mm, light green color yarn
Work the arms in spiral rounds
Work the patch in row
Hook US 1 ½ or 2,5 mm, yellow color yarn
Muzzle (make 1)
Hook US 1 or 2,5 mm, milk color yarn
Work the muzzle in spiral rounds
For the muzzle you start with 9 Ch.
Rd 1 … start from the 2 Ch from the hook and crochet along the chain – 7 SC , 3 SC into the nd
. last Ch , continue in the circle direction along the opposite side of the chain: 6 SC, 2 SC
. in last Ch (18 sts)
Rd 2 1 inc, 6 SC, 3 inc, 6 SC , 2 inc (24 sts) (photo 9)
Rd 3 1 SC , 1 inc, 6 SC , [ 1 SC , 1 inc ] x 3, 6 SC , [1 SC ,1 inc] x 2 (30 sts) (photo 10)
Rd 4 2 SC , 1 inc , 6 SC, [2 SC ,1 inc ] x 3, 6 SC, [ 2 SC , 1 inc ] x 2 (36 sts) (photo 11)
Rd 5 3 SC , 1 inc , 6 SC, [3 SC ,1 inc ] x 3, 6 SC, [ 3 SC , 1 inc ] x 2 (42 sts)
Rd 6 loosely! SC in each st around (42 sts) (photo 12)
Fasten off, leaving a long tail about 40 cm (16 inch). Make a neat finish of the muzzle. Thread the
yarn tail into the tapestry needle. Skip one stitch and insert the needle into the next stitch back to
front through both loops. Insert the needle from the top of the last stitch between loops and bring
the yarn into the backside. Pull the yarn until the loop is the same size as other stitches.
Head
For the head you start with 15 Ch.
Rd 1 … start from the 2 Ch from the hook and crochet along the chain – 13 SC , 3 SC into . .
Nd. the last Ch , continue in the circle direction along the opposite side of the chain: 12 SC, .
. 2 SC in last Ch (30 sts)
Rd 2 1 inc, 12 SC, 3 inc, 12 SC , 2 inc ( 36 sts ) (photo 18)
Rd 3 1 SC , 1 inc, 12 SC , [ 1 SC , 1 inc ] x 3, 12 SC , [1 SC ,1 inc] x 2 (42 sts) (photo 19)
Rd 4 [ 1 SC , 1 inc ] x 2, 5 SC, 1 inc, 6 SC , 1 inc , [1 SC ,1 inc ] x 3, 6 SC, 1 inc, 7 SC,
. 1 inc, 1 SC, 1 inc, 2 SC (52 sts)
Rd 5 [1 SC , 1 inc ] x 2, 7 SC, 1 inc, 1 SC , 1 inc , 7 SC, 1 inc, [1 SC ,1 inc ] x 4, 7 SC, 1 inc, .
. 1 SC, 1 inc, 7 SC, 1 inc, 1 SC , 1 inc , 2 SC (65 sts) (photo 20)
Rd 6 [ 12 SC , inc ] x 5 (70 sts)
Rds7– 19 SC in each stitch around (70 sts)
Hook US 1 ½ or 2,5 mm, light green color yarn
Work the head in spiral rounds
It’ s time to attach safety eyes to the head.
Safety eyes:
Attach the eyes (16 mm) between Rd 13 and Rd 14 with 15 stitches space between. Poke the eye shafts
through to the inside of the head. If you are happy with the placement of the eyes push the washers into place.
Start decrease rounds
Rd 20 [ 8 SC , dec ] x 7 (63 sts)
Rd 21 SC in each stitch around (63 sts)
Rd 22 [ 7 SC , dec ] x 7 (56 sts)
Rd 23 SC in each stitch around (56 sts)
Rd 24 [ 6 SC , dec ] x 7 (49 sts)
Rd 25 SC in each stitch around (49 sts)
Rd 26 [ 5 SC , dec ] x 7 (42 sts)
Rd 27 SC in each stitch around (42 sts)
Start to ll the head.
Rd 28 [ 4 SC , dec ] x 7 (35 sts)
Rd 29 SC in each stitch around (35 sts)
It” s time to stuff the head tight, before we are
nish the top of the head.
Rd 30 [ 3 SC , dec ] x 7 (28 sts)
Rd 31 [ 2 SC , dec ] x 7 (21 sts)
Continue to ll of the head with ber ll.
Rd 32 [ 1 SC , dec ] x 7 (14 sts)
Rd 33 [ 1 dec ] x 7 (7 sts)
Fasten off, leaving a 10 cm (4 inch) tail.
Close the hole as described on page 4.
Ears
Hook US 1 ½ or 2,5 mm, light green and milk color yarn
Work the ears in spiral rounds
Inside ear (make 2 of them)
Milk color yarn
Rd 1 6 SC in a magic ring (6 sts)
Rd 2 [1 inc ] x 6 (12 sts)
Rd 3 [1 SC, 1 inc] x 6 (18 sts)
Rd 4 [2 SC, 1 inc] x 6 (24 sts)
Rd 5 [3 SC, 1 inc] x 6 (30 sts)
Rd 6 1 slst in the 1st st (1 sts)
Fasten off, cut the yarn
Outer ears
Light green color yarn
Rd 1 6 SC in a magic ring (6 sts)
Rd 2 [1 inc ] x 6 (12 sts)
Rd 3 [1 SC, 1 inc] x 6 (18 sts)
Rd 4 [2 SC, 1 inc] x 6 (24 sts)
Rd 5 [3 SC, 1 inc] x 6 (30 sts)
Rd 6 SC in each st around (30 sts)
Do not cut the yarn.
To connect the both pieces turn wrong sides together and work the following Rd 7:
Start in the 1st SC of the milk piece (photo 27) and work: 30 SC = (30 sts)
Rd 8 11 SC, 1 hdc, 1 DC, 4 Dc inc , 1 DC, 1 hdc, 11 SC ( 30 sts)
Now fold the ear in half and SC the 2 opposed st together: 3 SC
Fasten off, leaving a long tail about 10 cm (4 inch) for sewing.
Tail (make 1)
Hook US 1 ½ or 2,5 mm, light green color yarn
Work the tail in spiral rounds
Rd 1 3 SC in a magic ring (3 sts)
Rd 2 [ 1 inc ] x 3 (6 sts)
Rd 3 SC in each st around (6 sts)
Rd 4 2 SC, 2 inc, 2 SC (8 sts)
Rd 5 SC in each st around (8 sts)
Rd 6 3 SC, 2 inc, 3 SC (10 sts)
Rd 7 SC in each st around (10 sts)
Rd 8 4 SC, 2 inc, 4 SC (12 sts)
Rd 9 SC in each st around (12 sts)
Rd 10 5 SC, 2 inc, 5 SC (14 sts)
Rd 11 SC in each st around (14 sts)
Rd 12 6 SC, 2 inc, 6 SC (16 sts)
Rd 13 SC in each st around (16 sts)
Rd 14 7 SC, 2 inc, 7 SC (18 sts)
Rd 15 SC in each st around (18 sts)
Fasten off, leaving a long tail about 15 cm (6 inch) for sewing. (photo 30). Fill the tail slightly.
Wings
Hook US 1 ½ or 2,5 mm, milk color yarn
Work the wings in row
Note: The slst in the rows count as a stitch. Do not work the slst too tight. See also photos 31 – 32
how to work.
Wing right
Row 1 13 SC, 1 slst (14 sts), 1 Ch, turn the work
Note: 6 Ch remain unworked (rem chains)
Row 2 BL(O) 12 SC (12 sts), 1 Ch, turn the work (photos 31 – 32 show how to crochet 1st BL(O) SC)
Row 3 BL(O) 12 SC, and in the rem chains of the beg Ch: 1 SC, 1 slst (14 sts) (photo 33), 1 Ch, turn
Row 4 BL(O) 12 SC (12 sts), 1 Ch, turn the work
Row 5 BL(O) 12 SC, and in the rem chains of the beg Ch: 1 SC, 1 slst (14 sts)
Row 6 BL(O) 12 SC (12 sts), 1 Ch, turn the work
Row 7 BL(O) 12 SC, and in the rem chains of the beg Ch: 1 SC, 1 slst in the last Ch st, then 2 SC in the
same last Ch, continue in the circle direction along the edge into the chain sts of the beg Ch 19 SC (35 sts)
Fasten off and weave in ends.
Wing left
Repeat rows 1 – 6 of the wing right,
Row 7 BL(O) 12 SC, and in the rem chains of the beg Ch: 1 SC, 1 slst in the last Ch, Fasten off, turn the
work and attach yarn to the 1st SC of Row 7 (photos 36 – 37) and
Row 8 13 SC, 1 inc in last st (15 sts)
Fasten off, leaving a long tail for sew both wings on. (photo 39)
For the wings you start with 21 Ch
Spikes
Hook US 1 ½ or 2,5 mm, yellow and green color yarn
Work the spikes in spiral round
Spike 1 – make one – yellow color yarn
Rd 1 6 SC in a magic ring (6 sts)
Rd 2 [ 2 SC, 1 inc ] x 2 (8 sts)
Rd 3 [ 3 SC, 1 inc ] x 2 (10 sts)
Rd 4 [ 4 SC, 1 inc ] x 2 (12 sts)
Rd 5 [ 5 SC, 1 inc ] x 2 (14 sts)
Rd 6 [ 6 SC, 1 inc ] x 2 (16 sts)
Rd 7 [ 7 SC, 1 inc ] x 2 (18 sts)
Rd 8 [ 8 SC, 1 inc ] x 2 (20 sts)
Rd 9 [ 9 SC, 1 inc ] x 2 (22 sts)
Rd 10 [ 10 SC, 1 inc ] x 2 (24 sts)
Do not fill the spikes with fiberfill. Finish all spikes same way as for the arms: push the spike flat.
Insert the hook through loops of both stitches. Crochet over the opening with SC until the end.
Fasten off, leaving a long tail for sewing.
Spike 2 – make two – yellow color yarn
Rd 1 6 SC in a magic ring (6 sts)
Rd 2 [ 2 SC, 1 inc ] x 2 (8 sts)
Rd 3 [ 3 SC, 1 inc ] x 2 (10 sts)
Rd 4 [ 4 SC, 1 inc ] x 2 (12 sts)
Rd 5 [ 5 SC, 1 inc ] x 2 (14 sts)
Rd 6 [ 6 SC, 1 inc ] x 2 (16 sts)
Rd 7 [ 7 SC, 1 inc ] x 2 (18 sts)
Spike 3 – make one yellow and two green color
Rd 1 6 SC in a magic ring (6 sts)
Rd 2 [ 2 SC, 1 inc ] x 2 (8 sts)
Rd 3 [ 3 SC, 1 inc ] x 2 (10 sts)
Rd 4 [ 4 SC, 1 inc ] x 2 (12 sts)
Rd 5 [ 5 SC, 1 inc ] x 2 (14 sts)
Spike 4 – make one – yellow color yarn
Rd 1 6 SC in a magic ring (6 sts)
Rd 2 [ 2 SC, 1 inc ] x 2 (8 sts)
Rd 3 [ 3 SC, 1 inc ] x 2 (10 sts)
The sequence of the yellow spikes attached to the head starting from the forehead is: 2, 1, 2, 3,
4. (photo 40)
Assembling all the parts
Step 1: MUZZLE AND HEAD
Fasten the muzzle with some sewing pins first to find the right placement. Sew the muzzle onto the head.
Use tapestry needle and a yarn tail. (photos 41 42)
Step 2: EMBRODER NOSTRILS, MOUTH AND EYELASHES
Use sewing pins to mark the location of the nostrils and the mouth (photo 43). Embroider the nostrils as two
loops loosely and the mouth as one loop loosely. I used a tapestry needle and black yarn.
Tip: sew the nostrils and mouth on with regular sewing thread, when the doll is made for a baby
Use sewing pins to mark the location of the eyelashes (photos 44 – 46). Thread the embroidery floss to a
needle and embroider the eyelashes. I used a tapestry needle and black and milk yarn threads.
Embroider the muzzle along the edge. I used a tapestry needle and yellow yarn thread (I split it and
remove one thread to get more slim thread). (photos 47 – 48)
A great video how to do an almost invisible join in amigurumi, when you join an open ended piece to a closed piece you can nd here: https://www.youtube.com/watch?v=JwnVv0BJOlE
Step 3: HEAD AND BODY
Make a neat finish of the body (same way as of the muzzle).
Make sure the body is stuffed firmly, especially the neck (it’s even better to overstuff the neck for extra
strength) and sew the head onto the body.
Tip: Use sewing pins to attach the head to the body before sewing to get a symmetrical result. Add a bit more staffing before closing the seam. (photos 49, 50)
Step 4: ARMS AND BODY
Fasten the arms with sewing pins between rounds 19 and 22 of the body in a slightly diagonal position. (photos 51, 52) Sew the arms onto the body. Use a tapestry needle and the yarn tails.
Step 5: PATCH AND BODY
Fasten the patch to the body with some sewing pins first to find the right placement. Sew the patch onto the
body. Use a tapestry needle and the yarn tail. Thread the black embroidery floss (or black yarn) to a
tapestry needle and embroider 4 of decoration seams. Use photos 53 and 54 as a guide.
Step 6: EMBRODER NAVEL
Embroider a navel as X, using a tapestry needle and black (or pink) yarn thread. (photo 53 – 54)
Step 7: SPIKES, EARS AND HEAD
Fasten the spikes the spikes and ears with some sewing pins first to find the right placement. (photos 55, 56) (plase the ears between Rd 18 and Rd 22 of the head) Sew the spikes and ears onto the head. Use tapestry needle and yarn tails.
Step 8: TAIL AND BODY
Fasten the tail to the bottom of the back with some sewing pins first to find the right placement between
Rd 2 and Rd 8 of the body (photo 54) Sew the tail onto the body. Use tapestry needle and the yarn tail.
Step 9: WINGS AND BODY
Fasten the wings with some sewing pins first to find the right placement (photo 61) Sew the wings onto the
back. Use tapestry needle and yarn tails.
Congratulations!
You finished your own handmade
dragon David – amigurumi doll!
Now let ‘s play!