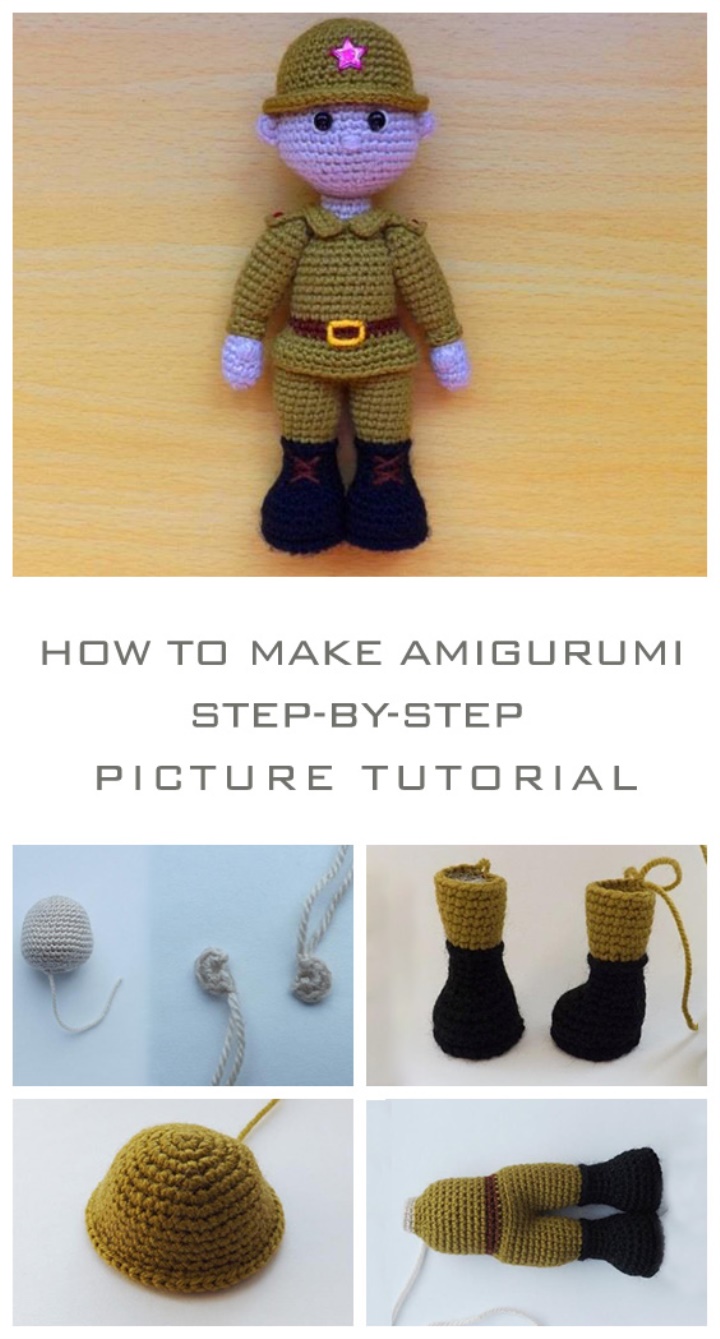
Amigurumi Soldier Tutorial Free Pattern
Click For Crochet Abbreviations List
ATTENTION! The master class is free!
Necessary materials:
1. Yarn (50 g / 200 m) colors: green, flesh, black,
a little yellow (I have a Pechorka “Children’s novelty”),
brown (I have a Semyonovskaya “Carolina”)
2. A hook of the appropriate size (I have No. 1.6)
3. Filling filler (holofayber or sintepon)
4. Plastic cover for the insole
5. A piece of wire or a cotton swab
6. Needle for stapling parts
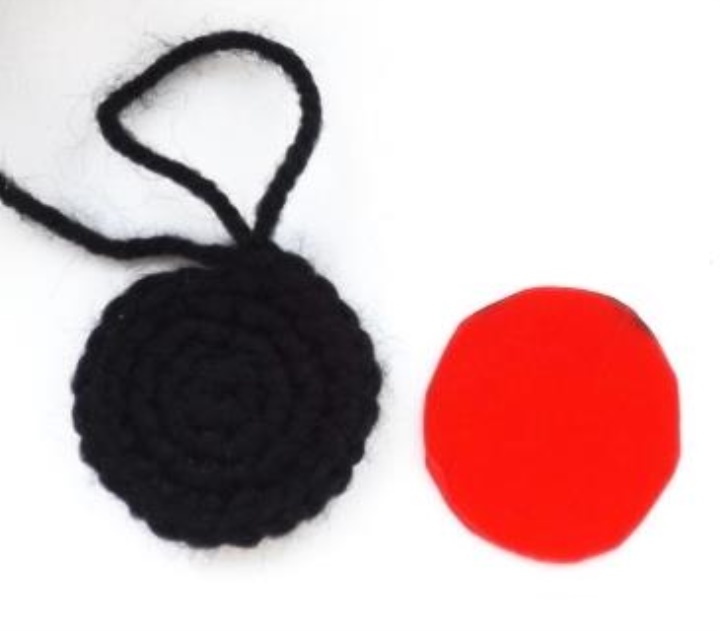
7. Finished eyes, star
8. Glue
The size of the finished toy is 16.5 cm
Provided that these materials are knitted.
Legend:
sb – column without crochet
sur-increment
уб – reduction
SSN – column with crochet
Вп – air loop
ss – connection bar
twist – twist of knitting
Lush column of 3SNN – we make a cape and enter
hook into the loop of the base. Capture the work thread
and draw a loop. Then we again seize the working
thread and bind an elongated loop and cape,
we leave on the hook two loops. Again we make a crochet on
hook and insert it into the same loop of the base. And also
we are tying an unfinished bar. Similar
we also sew a third unfinished column. On
The hook must have four loops (three unconnected
column and working loop). Capture the work thread
and we sew all these four loops together.
Feet 2 pcs
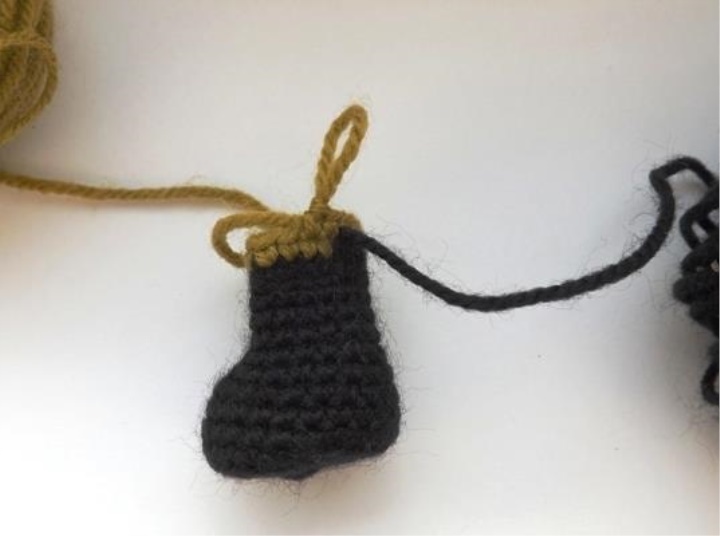
Begin to knit from the boot with a black color
1 row: 6sbn in an amigurumi ring
2 row: (приб) х 6раз = 12 сбн
3rd row: (1sbn – prib) x 6raz = 18sbn
4 row: (2sbn – prib) x 6 times = 24sbn
Circle the resulting part on the plastic and cut it out.
insole. I melt the edges of the insole with fire for
smoothness of the cut.
5th row: 24sb for rear hinge wall
6-8 series: 24sbn (3 rows)
9th row: 6 – 6ub – 6 = 18cb
Insert the plastic footbed.
10th row: 6 – 3ub – 6 = 15sbn
11-13 series: 15sbn (3 rows)
16th row: 15sb for rear hinge wall
Densely to fill a foot with a filler.
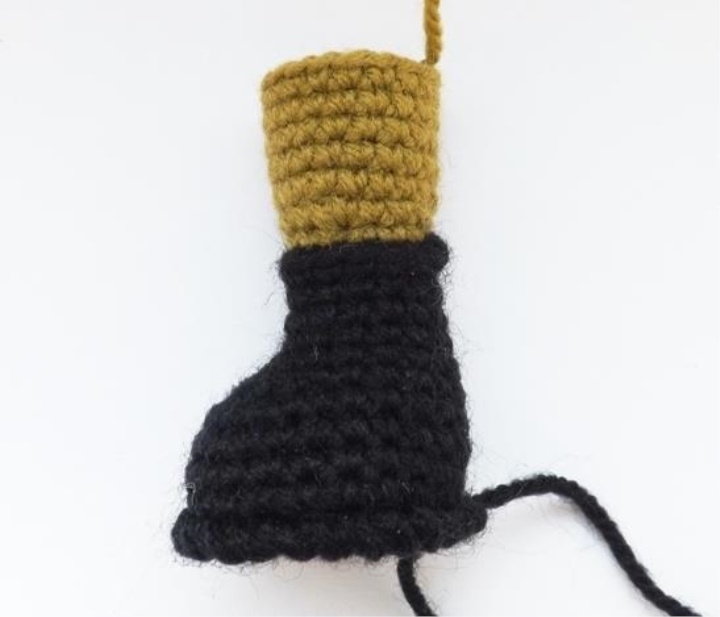
Change the thread to green
But do not cut the black thread, but throw it on
the outside (photo below).
17th row: 15sbn
18 row: (4 – prib) x 3p = 18sbn
19-23 series: 18sbn (5 rows)
The second leg is tied in the same way, but the thread is not trimmed,
since we will continue to knit the torso.
Tie up the top of the boot for the remaining half-loops of the 16th
row with a black thread, which is not cut off from us (15 sc.).
Tie the sole: attach the black thread to the
remaining half-loops of the 5th row and tying the sole
sbn or step by step.
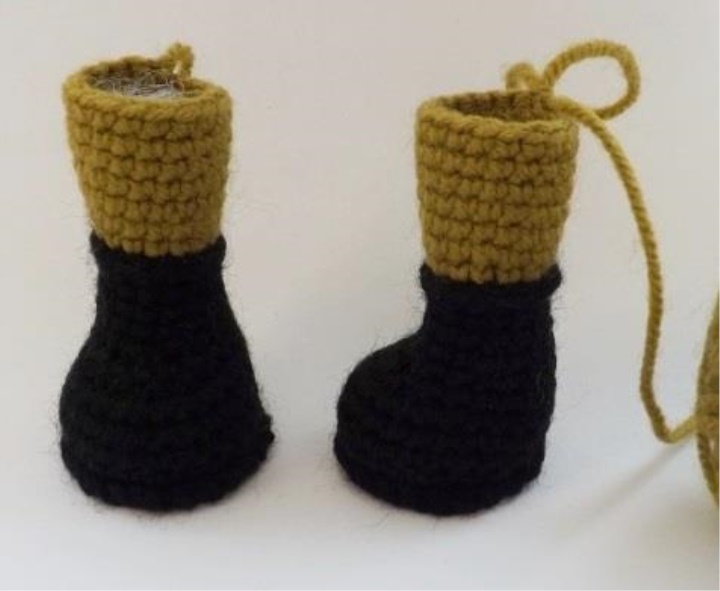
We connect the legs After both legs are ready, put them together so that the toe of the legs are pointed at you. Now on each leg we mark with a marker on 1 loop in volume The place where the legs touch (this should be mid-thigh). We continue to knit along the 2nd leg of the sb before the marker, then – 1sbn in a loop with a marker – 1sbn in a loop with a marker of the 1st legs – 17sbn on the 1st leg – 1sbn in the 2nd leg. Put the marker. This is our new beginning of the series.

Torso (we continue to knit) 1-4 row: 36 sbn (4 rows) 5th row: 36sb for rear hinge wall Change the color to brown. 6 row: 6 sbn – 3ub – 12 sb – 3ub – 6 sbn = 30 cbn 7th row: 30sbn Change the thread color to green 8-15 rows: 30 sbn (8 rows) Do not forget to stuff 16 row: (3 – уб) х 6 times = 24сбн 17 row: (2 – уб) х 6 times = 18 сбн 18 row: (4 – уб) х 3 times = 15сбн Change the thread to a solid color Row: 15sb for the back of the hinge 20-22 series: 15sbn (3 rows) Finish ss, leave the sewing thread

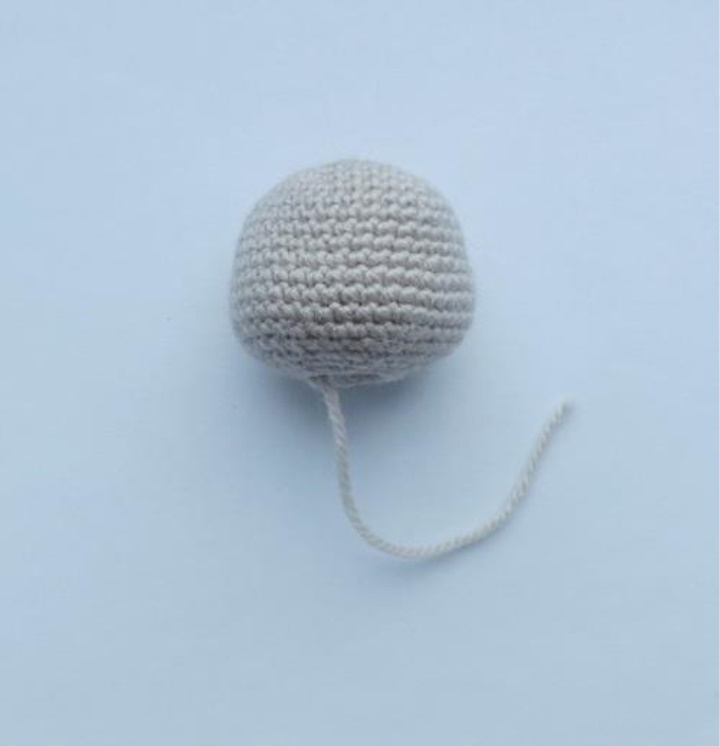
We bind the gymnast: on the back, attach green thread to the remaining half-loops of the 5th row 1 row: 36bb per half loop 2 row: (11 – prib) x 3 = 39sbn 3 row: 39sbn We knit a collar: in the center of the neck to the remaining half-loops of the 19th row attach a green thread 1 row: vp- (3bn – prib) x 3 times – 3sbn – 1sbn in the same half loop, with which we started = 19sbn 2 rd: bn – rotation – prib – 17sbn – prib = 21sbn 3 rd: in – turn – 4sbn – prib – 5sbn – prib – 5sbn – приб – 4сбн = 24 сбн Head We knit with a solid color 1 row: 6sbn in the ring amigurumi 2 row: (prib) x 6 times = 12sbn 3rd row: (1sbn – prib) x 6raz = 18sbn 4 row: (2sbn – prib) x 6 times = 24sbn 5 row: (3bn – prib) x 6 times = 30sbn 6 row: (4cb – prib) x 6 times = 36sbn 7-12 series: 36sbn (6 rows) 13 row: (5bn – prib) x 6 times = 42sbn 14-16 series: 42sbn (3 rows) 17 row: (5sbn – yb) x 6 times = 36sbn 18 row: (4cb – yb) x 6s = 30sbn 19 series: (3сбн – уб) х 6раз = 24 сбн 20 series: (2сбн – уб) х 6раз = 18сбн 21 series: (4 – уб) х 3раза = 15сбн Finish ss, cut the thread. Ears 2 pcs. (Solid color) 6сбн in a ring amigurumi to tighten, but not to connect.

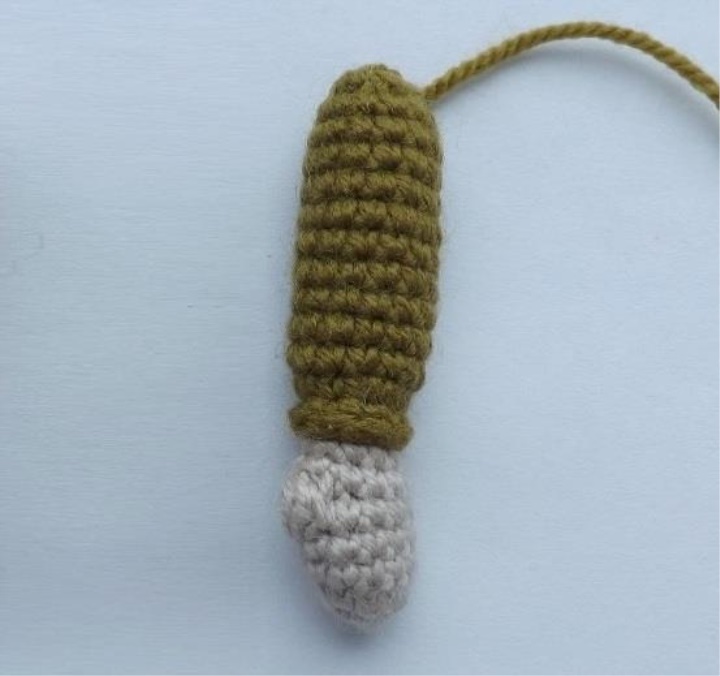
Hands 2 pcs Begin to knit with a solid color 1 row: 6sbn in the ring amigurumi 2 row: (prib) x 6 times = 12sbn 3-4 rows: 12sbn (2 rows) 5 row: 10sbn – 1 magnificent column from 3SNN to the next loop – Bn – 1sbn = 13sbn (here Bn is counted for 1 loop) 6 row: 9sbn – 2ub = 11sbn 7 row: 3sbn – 2ub – 4sbn = 9sbn Change the thread color to green 8th row: 9 sbn 9th row: behind the back wall of the loop (2-prib) x 3p = 12sbn 10 row: 5sbn – prib – 6sbn = 13sbn Do not forget to stuff 11-19 series: 13sbn (9 rows) 20 series: make 7 deductions. Leave the thread for sewing, pull the hinge. The cuff of the gymnast: attach the green thread to the the remaining half-loops of the 9th row 1-2 row: 9sbn (2 rows)
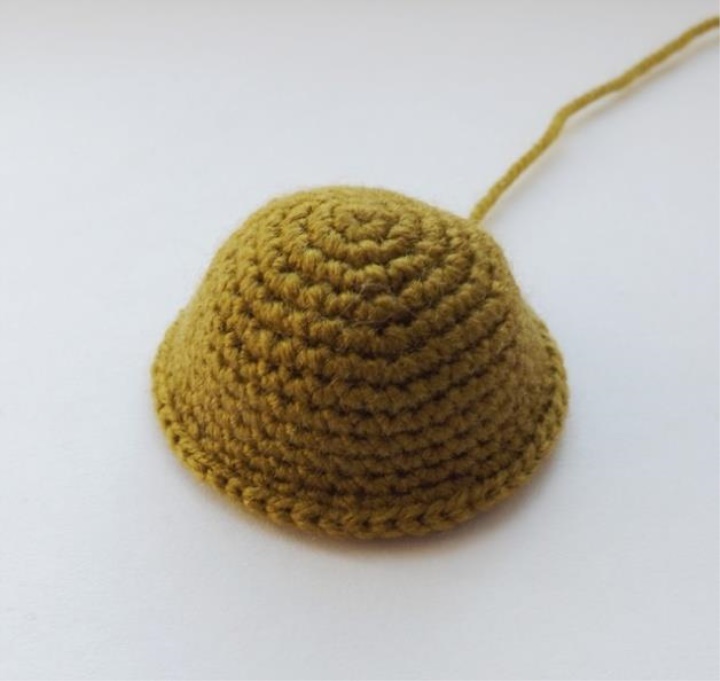
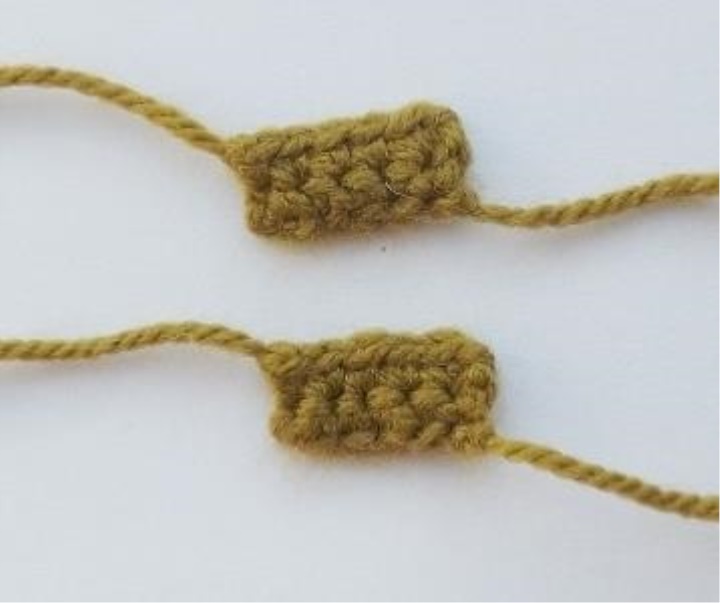
Helmet We knit in green color 1 row: 6sbn in the ring amigurumi 2 row: (prib) x 6 times = 12sbn 3rd row: (1sbn – prib) x 6raz = 18sbn 4 row: (2sbn – prib) x 6 times = 24sbn 5 row: (3bn – prib) x 6 times = 30sbn 6 row: (4cb – prib) x 6 times = 36sbn Sequence: (11bn – prib) x3raz = 39sbn 8-13 series: 39sbn (6 rows) 14th row: (2cb – prib) x13raz = 52cbn 15th row: 52cc Shoulder straps 2 pcs. We knit in green color 7вп – from the 2nd loop 5сбн on the chain – вп – turn – 5сбн. If you decide to make the soldier’s arms mobile, then you have to give up the epaulettes!
Build a toy Eyes can be glued ready, I attached them between 12 and 13 near the head. Or, if desired, embroider. Nose: make a few stitches. Ears sew on the sides of the head, visually at the level eye. Helmet to the head I sewn. Attach or embroider a star on the helmet. Sew a head to the body, pre-insert into neck with a cotton swab or wire. Hands, too, to sew to the body, so they do not move. Fingers from lush columns should be aimed at you. If you wish, you can attach hands with thread fastening. But here there is one nuance: you have to give up the epaulettes. Wires to sew on one side, butt The collar, on the other hand, is directly on hand. From above on I fastened epaulettes of tiny red strasses. Buckle the strap with a yellow thread. On shoes, if desired, you can embroider a brown thread lacing.

Our soldier is ready! Knit with pleasure! Straight to you loops! Ready-made toys are at your discretion. Give joy to your loved ones, friends, relatives!