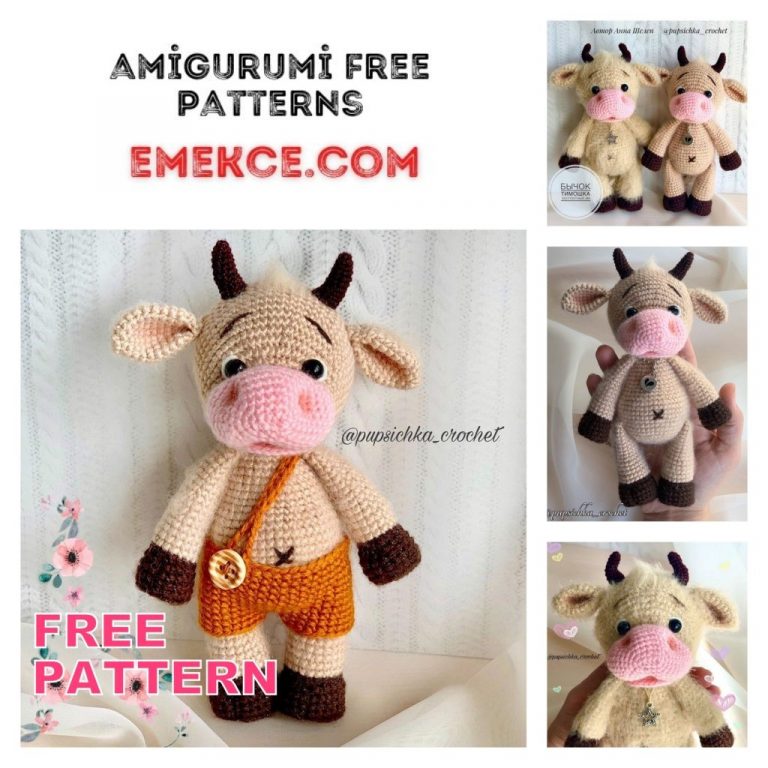
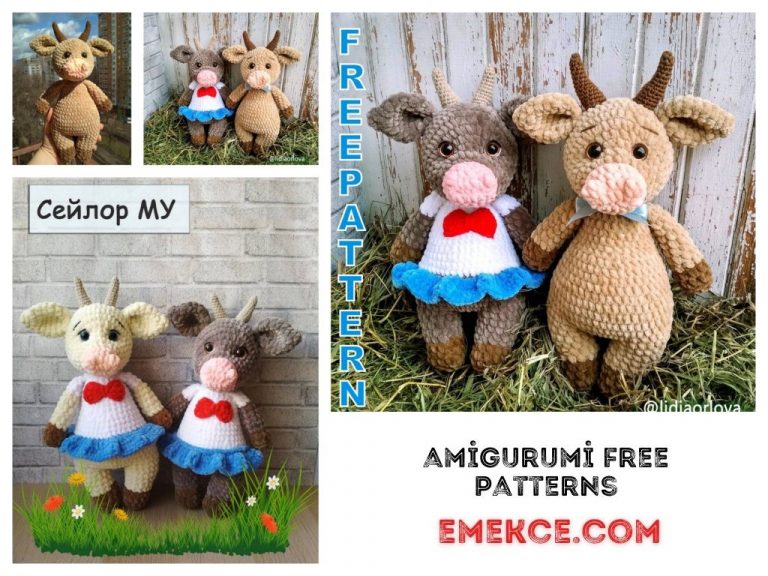
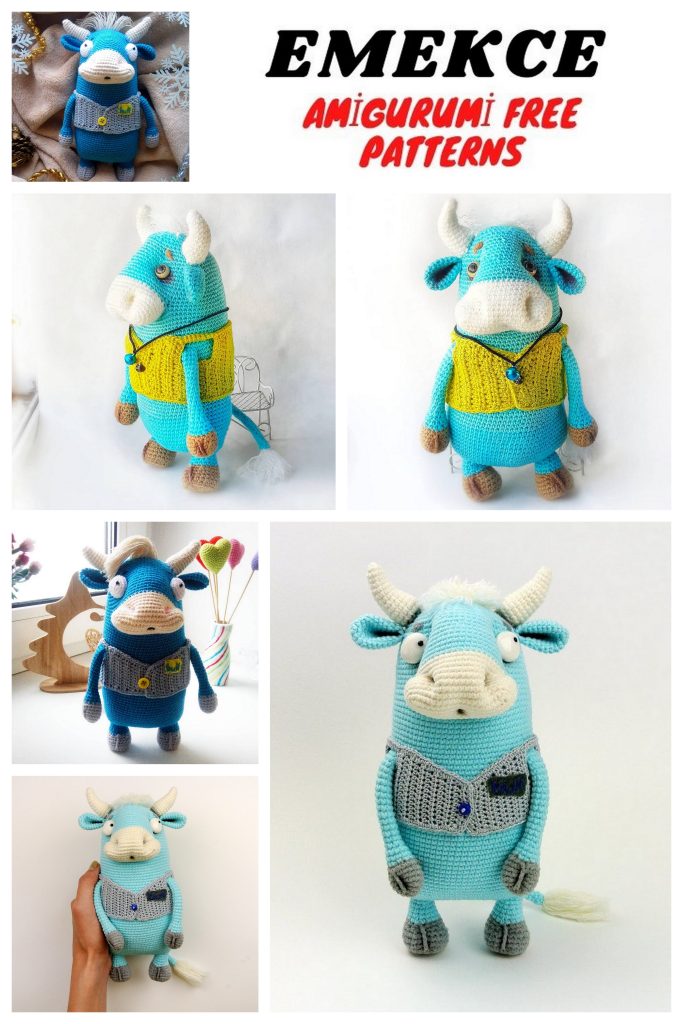
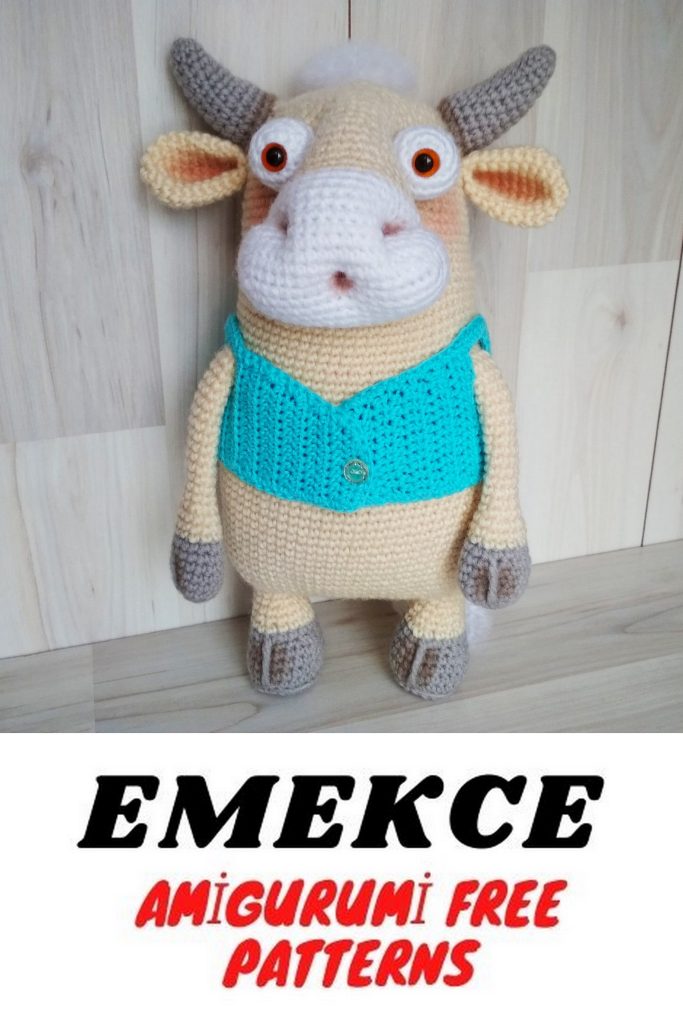
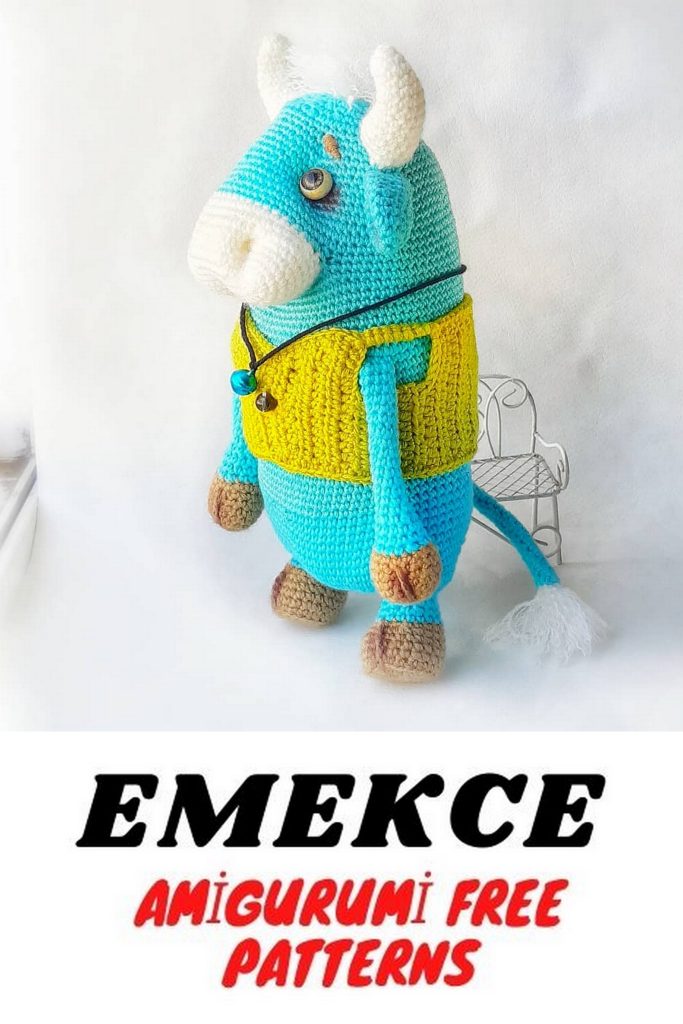
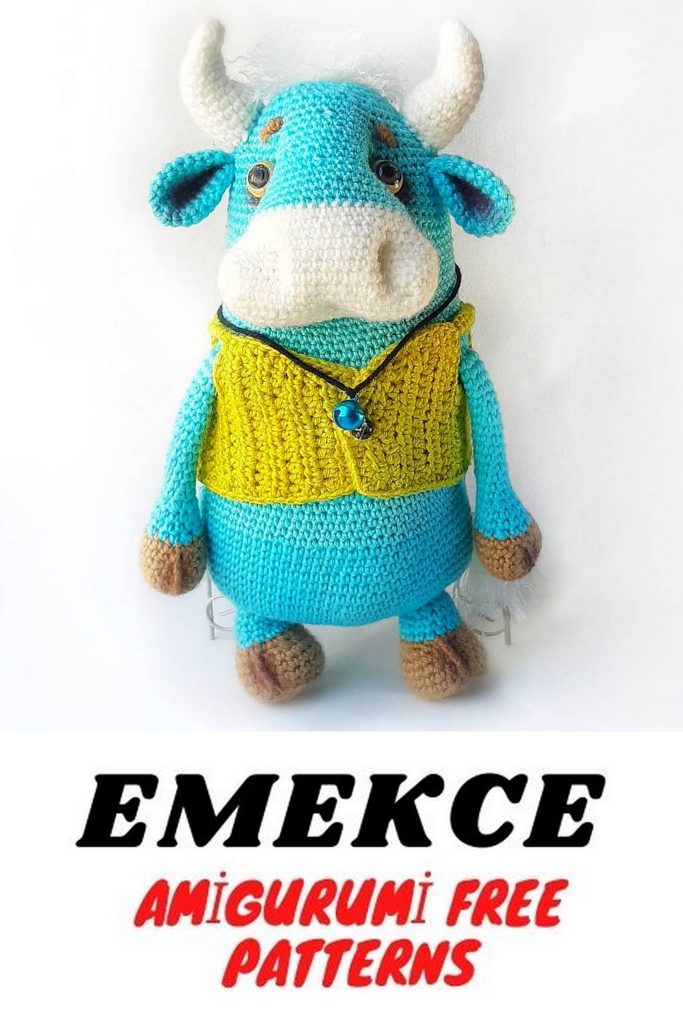
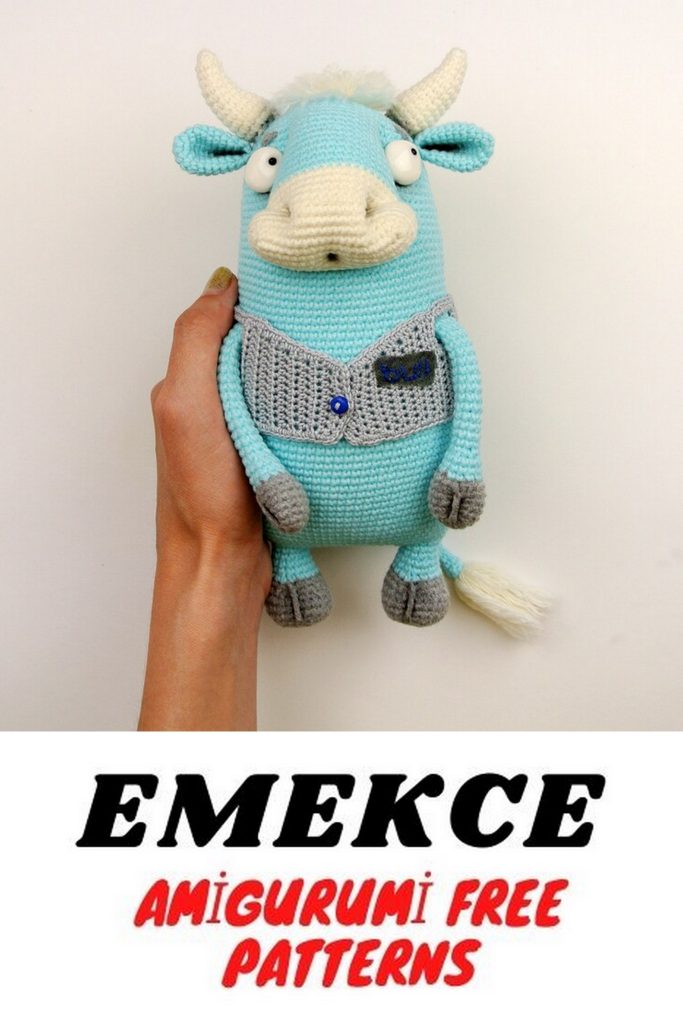
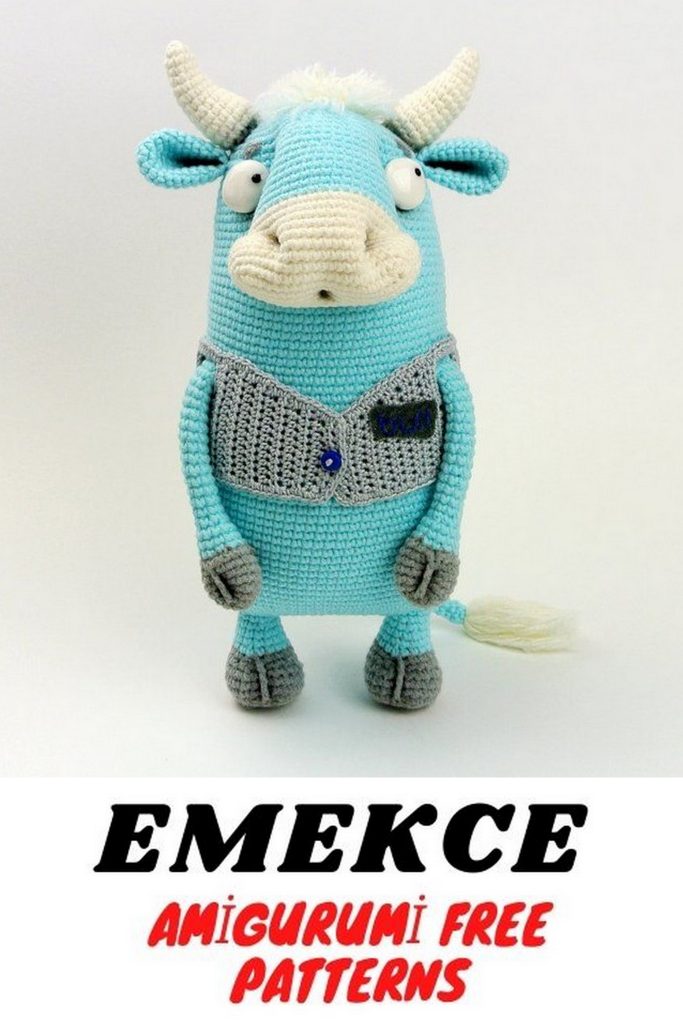
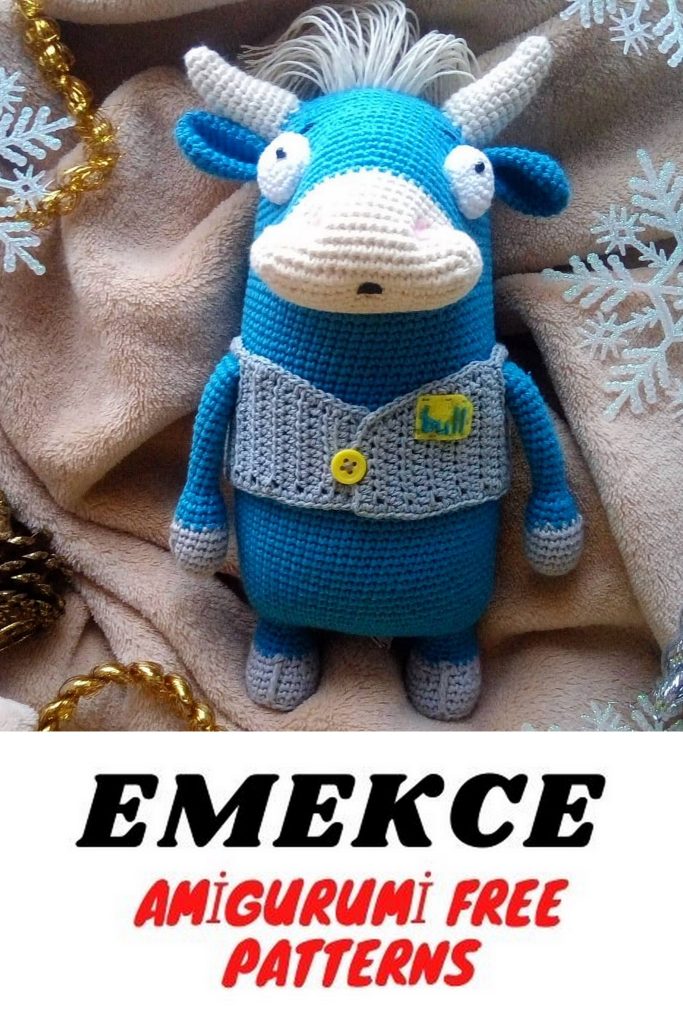
Crafting Happiness: Free Cute Cow Amigurumi Crochet Pattern for Endless Smiles!
Enter the enchanting world of crochet with our Free Cute Cow Amigurumi Pattern! Meet the adorable cow, a lovable creation designed to bring boundless joy and charm to your crafting adventure. This project is more than just a pattern; it’s an invitation to craft a delightful companion that will surely moo-ve its way into your heart.
Designed for crafters of all skill levels, this amigurumi cow pattern promises a stress-free and enjoyable creative experience. Imagine creating your own cute cow, complete with endearing details and a personality as charming as its spots. Whether you’re a crochet maestro or just starting your yarn journey, this cute cow is here to add a dose of handmade happiness to your collection.
Materials
1) YarnArt Jeans yarn, colors 46, 76, 86 👈 click
2)Yarn Pekhorka Openwork, light gray color
3) Hook Clover 1.75;
4) Filler;
5) Needle for tightening;
6) White polymer clay for the eyes and beads for the pupils, or ready-made eyes (the diameter is better not less than 12 mm);
7) Floristic wire, D 0.90 mm, about 10 cm (needed if you will sculpt eyes, but do not want to glue them), or Crystal moment glue;
8) Dry pastel for toning and a brush for applying it (you can not toning at all);
9) Thick cardboard for insoles, very little is needed;
10) Mini-buttons for a vest;
11) Velcro or combing brush (optional).
Abbrevations
ch – chain
Sc – single crochet
Dc – double crochet
D2c – double crochet with two crochet
D3c – double crochet with three crochets
Hdc – half double crochet
inc- increase
dec – decrease
trdec – triple decrease
Sl-st – slip stitch
Flo – front loop
Blo – back loop
Pattern
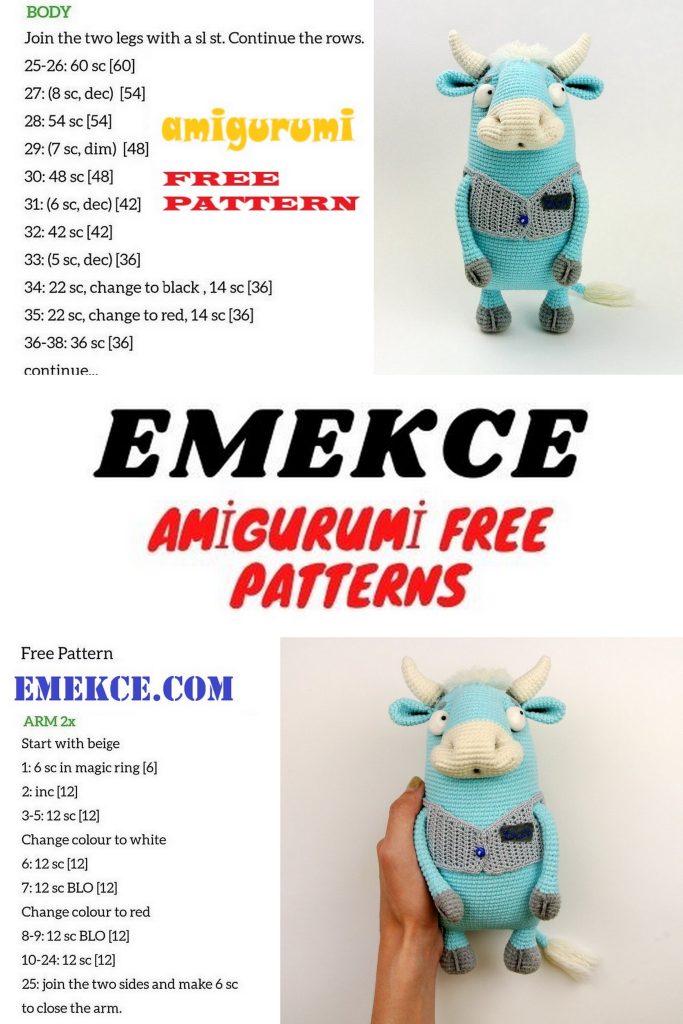
Hands
We start in gray.
6 into magic ring
1)inc, inc, inc for Blo, inc, inc, inc (12)
2)(2 sc, inc) * 4 times (16)
3-5) 16 sc
6)8 sc, d2c in first row Flo, 7 sc (16)
7)16 sc
Change color to main
8) (2 sc, dec) * 4 times (12)
9-10)12 sc
11) (1 sc, dec) * 4 times (8)
12)8 sc
Fill the gray part tightly enough. Next, we fill the hand as we knit, not very tightly, and we do not fill the last 3-4 rows of the hand at all. You can not fill, but insert a frame, for example.
13-26) 8 sc
Leave a small tip of the thread.
Tail
We knit in the main color
5 into magic ring
1-20)5 sc
Leave a small tip of the thread.
Wrap light yarn around four fingers. Use a long thread to secure it like a tassel. Using a needle, pull the long end of the thread through the tail. Do not trim the tails.

Muzzle
We knit with light yarn. Cast on 20 ch, from the second from the hook:
1)inc, 17 sc, 4 in the last loop, on the other side: 17 sc, inc (42)
2)42 sc
3)inc, inc, 18 sc, inc * 3 times, 18 sc, inc (48)
4)48 sc
5)6 sc, 4 dc single, 11 sc, 4 dc single, 29 sc (54)
6)54 sc
7)6 sc, 4 dc knit as one loop (with one vertex – this will be a decrease), 11 sc, 4 dc knit as one loop (with one vertex – this is a second decrease), 29 sc (48)
8)48 sc
9) (trdec, 21 sc) * 2 times (44)
Work in 23 sc more and leave a small thread tip.
Ears
We knit in the main color.
6 into magic ring
1)inc * 6 times (12)
2)(1 sc, inc) * 6 times (18)
3-9) 18 sc
Fold in half and knit 9 sc on both ear halves. Leave a small tip of the thread.
Horns
We knit with light yarn.
6 into magic ring
1) (1 sc, inc) * 3 times (9)
2-3) 9 sc
4) (2 sc, inc) * 3 times (12)
5-7) 12 sc
8) (3 sc, inc) * 3 times (15)
9-12)15 sc
Leave a small tip of the thread.
Legs
First leg. We start in gray.
8 into magic ring
1)inc * 8 times (16)
2)(1 sc, inc) * 2 times, (2 hdc, inchdc) * 2 times, 2 hdc, (inc, 1 sc) * 2 times (22)
Circle this part on cardboard and cut 2 insoles at once. We continue to knit.
3)2 2 sc for Blo
4-6) 22 sc, insert the insole, it can be glued, but I didn’t.
7)6 sc, trdec, 3 sc, trdec, 7 sc (18)
8)9 sc, d3c in 11 st of third row behind flo, 8 sc (18)
Change the color to the main one.
9)18 sc
10)(4 sc, dec) * 3 times (15)
11)15 sc
Stuff your leg tightly enough.
12)7 sc, dec, 6 sc (14)
13)14 sc
We move on to knitting the base, continue knitting along the same leg: 7 sc is the first row of the base. Next, we knit in rotary rows, at the end of each row you need to knit a lifting loop and make a U-turn:
14-15) 6 sc
Cut off the thread, leaving a small tip.
Second leg.
We repeat knitting of the first leg up to row 12 inclusive. Continue to knit at leg 9 sc.
Now we need to tie this leg to the base, knit 6 sc together, grabbing the base and the leg. And knit 1 sc on the leg for easy tracking – here we put a marker for the beginning of the row.
Body
Next, knitting will go in a spiral.
1) (inc, 1 sc) * 3 times, 1 sc, (base inc to corner, 13 sc, inc to corner), 1 sc, (inc, 1 sc) * 3 times, 1 sc, (base inc to corner, 13 sc, inc corner), 1 sc (56)
🍑 Now attention!
If your bull needs a butt, then skip this. And if you don’t want to knit the ass, then we knit like this:
2)(6 sc, inc) * 8 times (64)
3-4) 64 sc
5) (7 sc, inc) * 8 times (72)
6-8) 72 sc
Further according to the description.
2)44 sc, inc * 5 times, 7 sc (61)
3)1 sc, inc, (4 sc, inc) * 2 times, 13 sc, (inc, 4 sc) * 3 times, inc, 6 sc, inc * 4 times, 6 sc, inc, 3 sc (73)
4)11 sc, (inc, 4 sc) * 5 times, 37 sc (78)
5-7) 78 sc
8)61 sc, skip 6 sts, 11 sc (72)
9)59 sc, 3 sc with tail, 10 sc (72)
10.60 sc, 2 sc tail, 2 sc – In these two loops, knit the ponytail of the warp, 8 sc (72)
🍑 If you did not knit the butt and your tail position “leaves” from the center, feel free to move it into place by tying several loops for offset.
Pull up the light thread that was pulled through the tail and tie it in a knot with the tail of the main thread. It sounds tricky, but I know you can handle it))
The inner 6 sts in the eighth row remain open. They can be sewn up, but I left it that way.
11-32)72 sc
33)14 sc, 4 sc with arm, 22 sc, 4 sc with arm, 28 sc (72)
34-44) 72 sc
45)21 sc, 21 sc with the muzzle (start with 21 sts on the muzzle from the end of knitting, knit the end of the thread from the muzzle), 31 sc (72)
46)21 sc, (on the muzzle 1 sc – this column must be knitted in the same loop with which the muzzle was started, inc, 21 sc, inc, 1 sc), 31 sc (79)
47)21 sc, inc, 25 sc, inc, 31 sc (81)
48-49) 81 sc
50.13 sc, dec, 7 sc, dec, 24 sc, dec, 7 sc, dec, 22 sc (77)
51)77 sc
52)3 sc, dec, 18 sc, dec, 8 sc, dec, 8 sc, dec, 19 sc, dec, 6 sc, dec, 3 sc (71)
53)71 sc
54) (10 sc, dec) * 5 times, 11 sc (66)
55)11 sc, 4 sc with the ear folded in half, 30 sc, 4 sc with the ear folded in half, 17 sc (66)
56) (9 sc, dec) * 6 times (60)
We fill the body to the muzzle.
57)9 sc, 5 sc with horn, 25 sc, 5 with horn, 15 sc (60)
58)4 sc, dec, 4 sc, 1 sc along the horn, skip one stitch over the body and knit 3 sc, again skip one stitch over the body and from the outside along the horn work 1 sc, 4 sc, dec, 5 sc, dec , 6 sc, dec, 4 sc, 1 sc along the horn, skip one loop over the body and knit 3 sc, again skip one loop over the body and from the outside along the horn knit 1 sc, 4 sc, dec, 5 sc, dec, 2 sc (54)
59)9 sc, 1 sc along the horn, skip one stitch over the body and knit 3 sc, skip one stitch again and from the outside along the horn 1 sc, 4 sc, dec, 10 sc, dec, 4 sc, 1 sc along the horn , skip one loop over the body and knit 3 sc, again skip one loop and from the outside along the horn 1 sc, 13 sc (52)
60.9 sc, dec * 3 times along the horn, skip four loops over the body, 20 sc, along the horn dec * 3 times, skip 5 loops over the body, 13 sc (48)
To stuff the horns and the muzzle, it is not very tight to be pulled.
61) (6 sc, dec) * 6 times (42)
62)(5 sc, dec) * 6 times (36)
63) (4 sc, dec) * 6 times (30)
64) (1 sc, dec) * 10 times (20)
Stuff the body.
65)dec * 10 times (10)
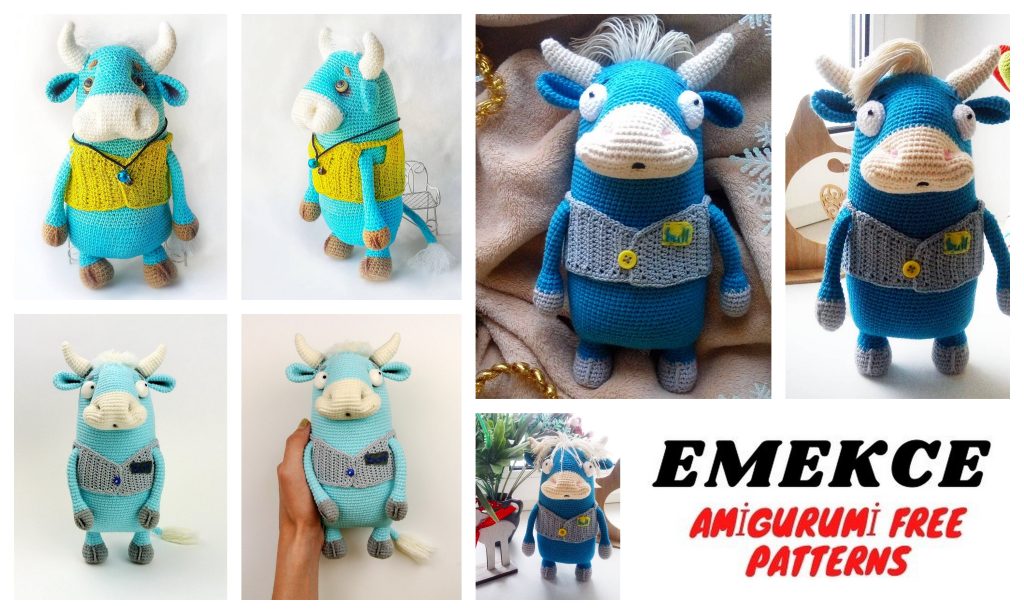
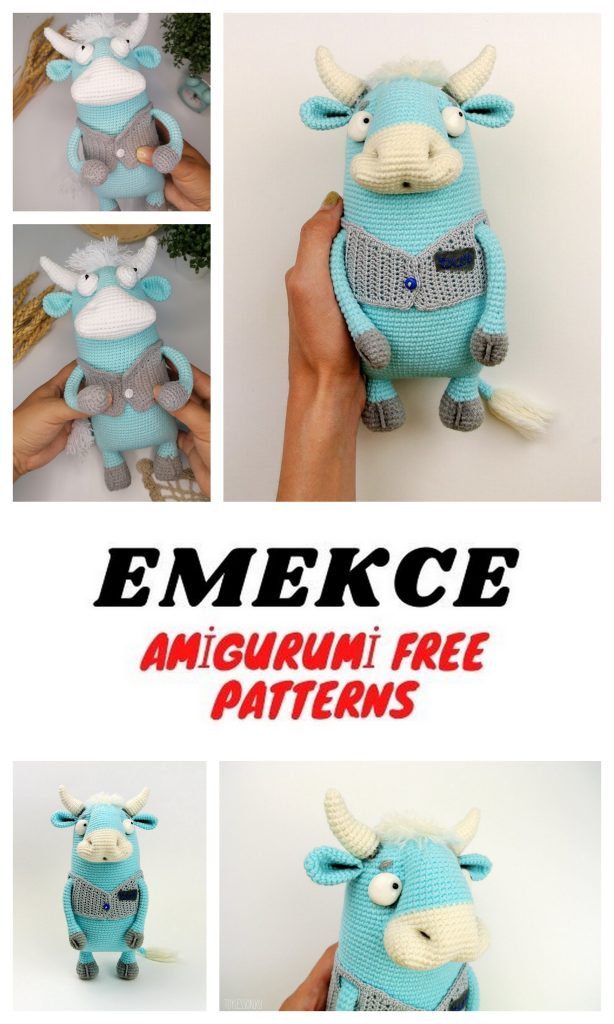
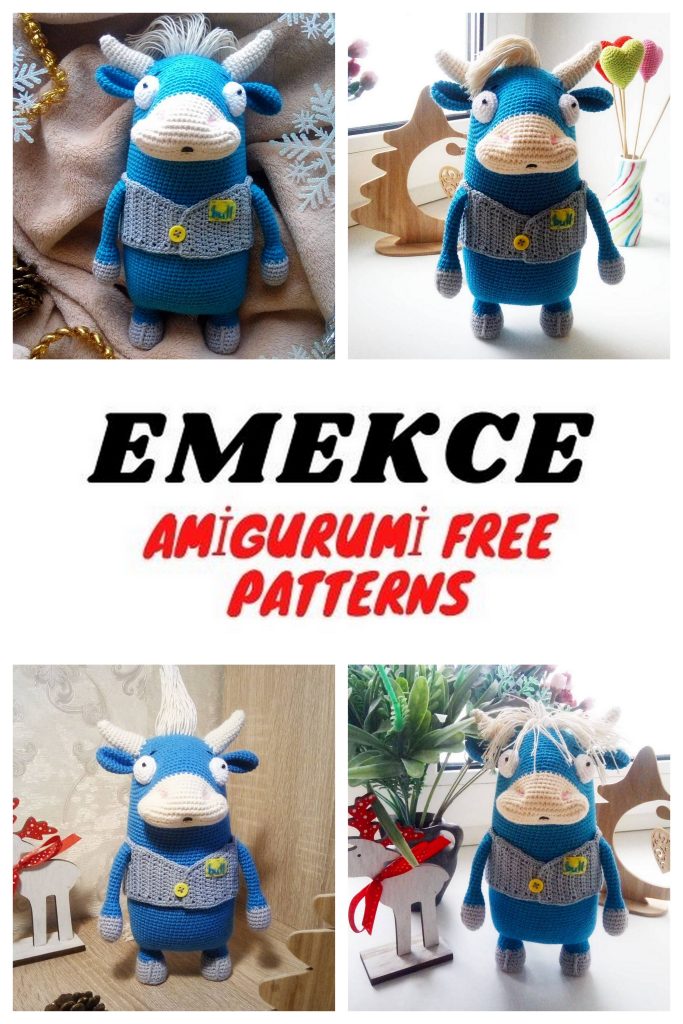
🐮 Decoration
I will show the tightening of the muzzle and bridge of the nose in the video, so it will be clearer.
From the wire you need to twist such a loop, it is for attaching the eyes. If there is a ready-made solution, use it.
Roll two balls out of polymer, flatten them so that one edge is thinner and the other thicker (the shape of the eyes can be any). We remove all the villi and irregularities with a cotton pad abundantly moistened with nail polish remover. We put the pupils. We put a loop on the back, on top we fix the legs of the loop with pieces of polymer. We bake according to the instructions on the polymer packaging. Cover your eyes with varnish on top or not as you wish.
We install the eyes without glue or with glue, as you wish. I was so carried away that I forgot to shoot this moment on the bull-calf, but I will show it with an example. We put strong threads into the eye loop, insert the needle where the eye will be located, draw it out on the crown and tighten the eye. We do the same with the second. We tie the ends of the threads at the crown into a strong knot and hide them. We embroider eyebrows.
We knit a hairstyle. We need to hide all the anchors and knots at the top of the head. Here you yourself need to determine how many rows to knit. We knit the hairstyle with elongated loops or attach pieces of yarn like a fringe. I knitted with elongated loops in a zigzag manner without tearing off the threads 5 rows. Then we simply cut the elongated loops in the middle, cut the length and comb. Do the same with a brush on the tail.
If arms / legs / ears and other things stick out or some detail needs to be given a slight bend, we can do this with water. Almost WTO, but not quite.
It is necessary to properly wet (directly soak through) the limb with clean water (in our case, these are the hands and we need to wet the place of tying into the body too), fix it with needles in the desired position and, for fidelity, tie it with a thread from above. And in this position, leave until complete self-drying (a day or two, depending on the thickness of the part). Bend the horns a little too. We stick needles into them and tie them, shape them with our hands and also leave them to dry.
We apply tinting as desired, but only after complete drying. If yes, then around the horns, inside the ears and nostrils, on the bridge of the nose, where the color of the yarn changes, mouth, on the arms and legs, highlight a vertical strip. You can even slightly around or under the eyes and eyebrows. Everything, in principle, the bull is ready.
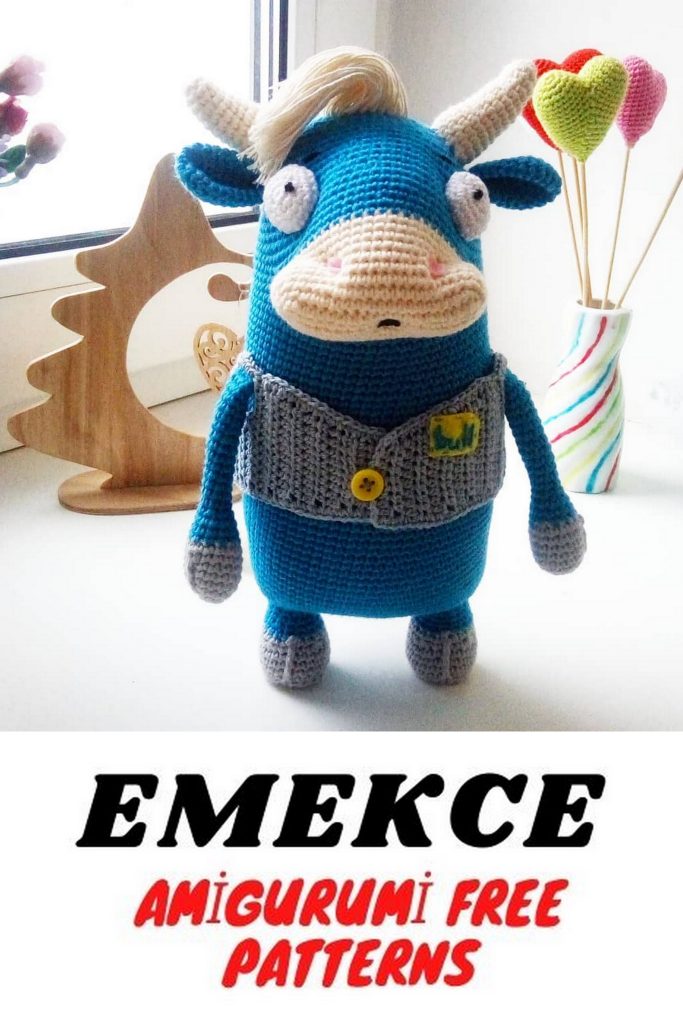
Vest
The hook is the same, we change the yarn to Pekhorka. The vest is knitted in rotary rows of half-columns with a crochet. At the end of each row, 2 ch rise and turn – I do not indicate this in the description, unless otherwise stated.
Cast on 11 ch, third from the hook:
1)9 hdc
2)inc, 8 hdc (10)
3)10 hdc
4)inc, 9 hdc (11)
5)11 hdc
6)inc, 10 hdc (12)
7)12 hdc
8)inc, 11 hdc (13)
9-10)13 hdc
11-14) 8 hdc
15)8 hdc and here dial 7 ch, in the third from the hook:
16)13 hdc
17-18) 13 hdc
19)13 hdc, 1 ch lift, reversal
20.5 sl-st, 8 hdc (13)
21-36) 13 hdc
37)13 hdc, 1 ch lift, reversal
38)5 sl-st, 8 hdc (13)
39-40)13 hdc
41)13 hdc, 1 ch lift, reversal
42-45) 13 hdc
46-49) 8 hdc
50.8 hdc and here dial 7 ch, in the third from the hook:
51)13 hdc
52-53) 13 hdc
54)11 hdc, dec (12)
55)12 hdc
56)10 hdc, dec (11)
57)11 hdc
58)9 hdc, dec (10)
59)10 hdc
60.8 hdc, dec (9)
61)4 hdc, 1 ch, skip 1 loop, 4 hdc.
Fasten the thread and cut off, leaving a small tail.
Attach the thread to the armhole of the sleeve and tie the armhole by knitting a tail: 17 sc (no need to knit in the corners), here dial 6 ch and connect with the first loop. Repeat with the second sleeve.
Now you need to tie the vest in a circle, here I did not count the loops, I just knitted sc, trying not to pull or stretch the edge. We also knit ponytails. In the ch arch, knit 7 hdc sleeves.
Sew on a button, you can also make a patch with the name of the bull or something else. The vest is ready.
And Goby too. Thank you for your attention and lovely bulls to you