How to Fix Minor Roof Leaks Temporarily
Discovering a roof leak can be stressful, especially when the weather is unfavorable and professional repairs aren’t immediately available. While a minor roof leak might seem manageable, addressing it promptly can prevent further damage to your home’s interior and structure. This guide explains how to fix minor roof leaks temporarily, providing practical steps to protect your home until a permanent repair can be made.
Why It’s Important to Fix Roof Leaks Quickly
A minor leak may not seem urgent at first, but even small amounts of water intrusion can lead to serious consequences over time. Water can seep through the roof’s layers, causing:
- Damage to ceilings and walls
- Mold and mildew growth
- Wood rot and weakened structural elements
- Damage to insulation and electrical systems
Temporary fixes help minimize these risks, giving you time to schedule professional repairs without rushing or risking further damage.
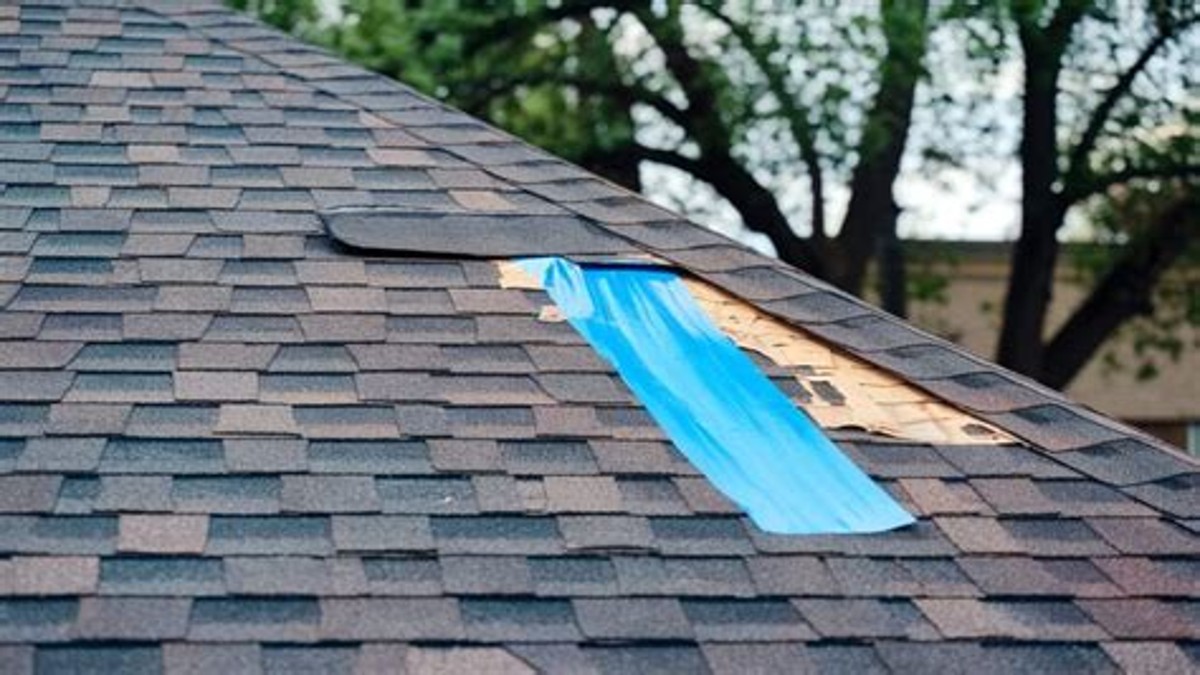
Identifying the Source of a Minor Roof Leak
Before attempting a temporary fix, it’s crucial to pinpoint the general area of the leak. Water can travel along rafters and insulation, meaning the leak’s origin may be some distance from where the water appears inside the house.
Steps to Locate the Leak Source
- Inspect the attic: Look for wet spots, water stains, or mold growth on the underside of the roof decking or insulation.
- Check flashing and roof penetrations: Areas around chimneys, vents, skylights, and plumbing stacks are common leak spots.
- Examine shingles: Look for damaged, cracked, curled, or missing shingles that may allow water penetration.
- During rain or a hose test: If it’s safe, observe the roof during a rainstorm or use a garden hose to simulate rainfall and watch for leaks inside.
Once identified, the following temporary solutions can help reduce water intrusion until you can schedule a full repair.
Materials You’ll Need for Temporary Roof Leak Repairs
To perform an effective temporary fix, gather the following materials beforehand. You likely have some of these items at home or can easily obtain them from a hardware store.
- Roofing cement or roof sealant
- Roofing tape or waterproof patch tape
- Plastic sheeting or tarp (heavy-duty)
- Roofing nails or heavy-duty staples
- Putty knife or trowel
- Ladder and safety gear (gloves, non-slip shoes, harness if needed)
- Utility knife or scissors
Step-by-Step Guide: How to Temporarily Fix Minor Roof Leaks
1. Safety First
Before starting any work on your roof, ensure safety is your top priority. Use a sturdy ladder on level ground, wear appropriate footwear, and consider using a safety harness if your roof is steep or high. Never work on your roof during wet or windy conditions.
2. Clear the Area
Remove loose debris, dirt, or shingles around the leak area. This ensures the patching materials adhere properly and provides a clean working surface.
3. Apply Roof Sealant or Cement
For small cracks or gaps, roofing sealant or cement is an effective temporary solution.
- Use a putty knife to apply a generous amount of sealant over the leak and surrounding area.
- Spread it evenly to cover all visible cracks or holes.
- Press down any lifted shingles and seal edges to prevent water from getting underneath.
Allow the sealant to dry per manufacturer instructions before exposing it to water.
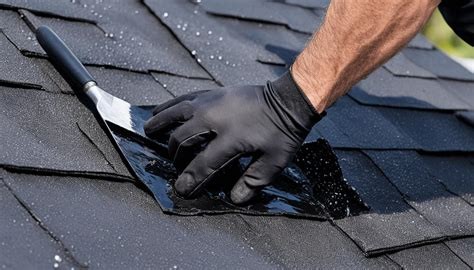
4. Use Waterproof Patch Tape
For quick repairs on cracked shingles or around flashings, waterproof roofing tape provides a durable temporary barrier.
- Cut a piece of roofing tape larger than the damaged area.
- Ensure the surface is dry and clean before applying.
- Press the tape firmly over the leak, smoothing out bubbles or wrinkles.
- Seal edges with roofing cement for added protection.
5. Employ a Tarp for Larger Areas or Unidentified Leaks
If the leak covers a large area or you can’t pinpoint the exact source, using a tarp is the safest temporary fix.
- Choose a tarp larger than the affected area.
- Secure the tarp over the roof, allowing it to extend beyond the leak by a few feet in all directions.
- Use roofing nails or heavy-duty staples to fasten the tarp, ideally securing it under shingles at the top and over the edges at the bottom so water flows over it naturally.
- Use ropes if needed to tie down the tarp and prevent it from flapping in the wind.
A tarp can protect the area for several days or weeks but must be removed before permanent repairs or inspections.
6. Temporary Flashing Repair Using Roofing Cement
If leak points are near flashing around chimneys, vents, or skylights, minor cracks or lifting can be sealed.
- Lift the raised metal flashing gently.
- Apply roofing cement underneath and along edges.
- Press firmly to reattach the flashing.
- Seal the edges generously with roofing cement.
Additional Tips to Reduce Damage from Minor Roof Leaks
- Use buckets or containers: Place them under indoor leak spots to catch dripping water and prevent water damage.
- Remove wet insulation: In the attic, wet insulation dries slowly and supports mold growth. If safe, remove or replace it.
- Monitor leaks regularly: Check your temporary repair frequently to ensure it’s holding up, especially after storms.
- Schedule professional repairs: Temporary fixes are not permanent solutions—arrange for a licensed roofer to inspect and repair the roof as soon as possible.
When to Call a Professional
Minor leaks may sometimes indicate larger problems, such as aging roofing material, poor installation, or damage from storms or fallen branches. If you experience any of the following, it’s best to get expert assistance:
- Leaks spreading over a large area
- Water stains or mold growth increasing quickly
- Visible damage to roof decking or structural elements
- Repeated leaks in the same area despite temporary fixes
Professional roofers can assess the full scope of the problem and offer long-lasting repairs or replacements, ensuring your home’s safety and value.
Conclusion
Fixing minor roof leaks temporarily is a valuable skill that can protect your home from significant damage while you await permanent repairs. By identifying the leak source, using appropriate materials, and following careful safety protocols, you can effectively reduce water intrusion and buy yourself time. Always remember that these methods are stopgap measures—arrange for professional roofing work to ensure the problem is fully resolved and your home remains secure for years to come.