Amigurumi Chloe Doll Cal Free Pattern

Materials:
– Worsted weight yarn – approx. 100 yards skin tone color, 100 turquoise, 80 yards yellow, 80 yards purple, 80 yards hot pink, 30 yards coral, scrap amount of white sparkle (I used Caron Simply Soft yarn in Light Country Peach, Turquoise, Sunshine, Iris, Hot Pink, Neon Coral & Snow Sparkle)
– Suggested hook size: 3.25mm (D)
– 2 x 15mm safety eyes
– Black & Pink embroidery floss
– Poly-fil
– Yarn needle
– 2 small buttons
My doll measures approximately 15″ tall when made with the above materials.
You can use any weight yarn or thread that you are comfortable using. You do not need to use what I used for my doll, just adjust your hook size accordingly.
Stitch abbreviations:
Sc: single crochet
Hdc: half double crochet
Dc: double crochet
Inc: increase
Dec: decrease
Sl st: slip stitch
Ch: chain
FLO: front loops only
BLO: back loops only
St: stitch
MR: magic ring
Special stitches used
5 dc bobble stitch:
· Step 1: Yarn over, insert hook into st, yarn over again & pull up loop, yarn over, draw back through 2 loops. (2 loops)
· Step 2: Yarn over, insert hook into same st, yarn over again & pull up loop, yarn over, draw through 2 loops (3 loops)
· Step 3: Yarn over, insert hook into same st, yarn over again & pull up loop, yarn over, draw through 2 loops (4 loops)
· Step 4: Yarn over, insert hook into same st, yarn over again & pull up loop, yarn over, draw through 2 loops (5 loops)
· Step 5: Yarn over, insert hook into same st, yarn over again & pull up loop, yarn over, draw through 2 loops (6 loops)
· Step 6: Yarn over, draw yarn through all 6 loops on hook.
Picot:
· Ch 3, insert hook into the first chain, yo, pull through.
Special techniques
Crocheting into the 3rd loop of an hdc stitch:
Insert your hook behind the top 2 loops of the hdc stitches (the ones that form the “V”) from the previous round, and into the next loop at the top back of the stitch.
**Pattern is worked in continuous rounds unless noted otherwise.**
Part 1:
Arms
(Make 2- starting in skin tone)
R1: Ch 6, sc in 2nd ch from hook, 3 sc, sc x 3 in last ch. Turn and work on the other side of the chain: 3 sc, sc inc (12)
R2: sc inc, 3 sc, sc inc x 3, 3 sc, sc inc x 2 (18)
R3-7: 18 sc (18)
R8: 9 sc, bobble (see special sts), 8 sc (18)
R9: (4 sc, sc dec) x 3 (15)
R10: (3 sc, sc dec) x 3 (12) Change color to pink on the last st of this round.
R11-32: 12 sc (12)
Fasten off and stuff arms.

Part 2:
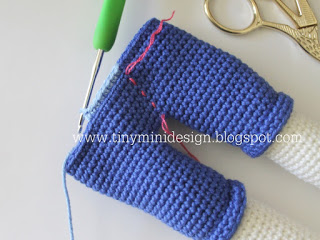
Legs
(Make 2- starting in coral)
R1: Ch 8, sc in 2nd ch from hook, 5 sc, sc x 3 in last ch. Turn and work on the other side of the chain: 5 sc, sc inc (16)
R2: sc inc, 5 sc, sc inc x 3, 5 sc, sc inc x 2 (22))
R3: 7 sc, 1 hdc, hdc inc x 5, 1 hdc, 8 sc (27)
R4: 27 sc BLO (27)
R5-7: 27 sc (27)
R8: sc dec, 5 sc, hdc dec x 7, 6 sc (19)
R9: sc dec, 5 sc, sc dec x 3, 4 sc, sc dec (14) Change to white sparkle on the last st of this round.
R10-13: 14 sc (14) Change to purple on the last st of round 13.
R14: 14 sc BLO (14)
R15-20: 14 sc (14)
R21: (6 sc, sc inc) x 2 (16)
R22-26: 16 sc (16)
R27: (7 sc, sc inc) x 2 (18)
R28-34: 18 sc (18)
Stuff and fasten off the 1st leg but not the 2nd.
Adding sock cuffs:
Holding leg upside down, insert hook into FLO of R13.
R1: Ch 2, dc inc x 14, join to 1st dc (28)
R2: Ch 2, 28 dc (28)
R3: Ch 1, (2 sc, sc dec) x 7 (21)
Fasten off and weave in ends.

Part 3:
Body
Stuff as you go.
**Sc until you are at the center st on the 2nd leg where the legs should be connected, then proceed to R1 to join the legs. You will join with the legs facing towards you.**
R1: Starting at the inner center st on the 2nd leg with the legs facing towards you – Ch 3, 18 sc around the other leg, sc in ch 3, 18 sc around the starting leg, sc in the other side of the ch 3 (42)


R2: 42 sc (42)
R3: (13 sc, sc inc) x 3 (45)
R4-11: 45 sc (45)
R12: (13 sc, sc dec) x 3 (42)
Fasten off purple. Join hot pink yarn to the center stitch at the back of the doll.
R13-15: 42 sc (42)
R16: (5 sc, sc dec) x 6 (36)
R17-21: 36 sc (36)
R22: (4 sc, sc dec) x 6 (30)
R23-25: 30 sc (30)
R26: Joining the arms: 9 sc (you may need to adjust this if your arms don’t end up centered on the side of the body), insert hook through 1 stitch on the inner part of the arm and the next stitch on the body, sc together. Repeat with the next 3 sts on the arm and sc together with the next 3 sts on the body. 11 sc over to the other side of the body, 4 sc next inner arm sts to next 4 sts on body, end with 2 sc remaining on the body (30)


R27: 38 sc working around the body + the outer 8 sts of each arm (38)
R28: 3 sc, sc dec, 17 sc, sc dec, 14 sc (36)
R29: (4 sc, sc dec) x 6 (30)
R30: (3 sc, sc dec) x 6 (24)
R31: (2 sc, sc dec) x 6 (18) Change to skin tone on the last st of this round.
R32-34: 18 sc (18)
Head
Continue stuffing as you go.
R35: sc inc x 18 (36)
R36: (5 sc, sc inc) x 6 (42)
R37: (6 sc, sc inc) x 6 (48)
R38: (7 sc, sc inc) x 6 (54)
R39: (8 sc, sc inc) x 6 (60)
R40-44: 60 sc (60)
R45: 43 sc, bobble (nose should be centered on the face so adjust your stitches if necessary), 16 sc (60)
R46-51: 60 sc (60)
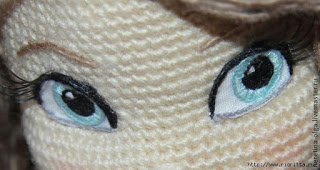
Insert safety eyes between R45-46, 8 sts apart.
R52: (8 sc, sc dec)
R53: (7 sc, sc dec)
R54: (6 sc, sc dec)
R55: (5 sc, sc dec)
R56: (4 sc, sc dec)
R57: (3 sc, sc dec)
R58: (2 sc, sc dec)
Stuff the head.
R59: (1 sc, sc dec)
R60: sc dec x 6 (6)
Fasten off, leaving long tail. Whip stitch FLO of R60 and pull tight to close up head.
Using black embroidery floss, add eyelashes. Using pink embroidery floss, add a mouth.

Part 5:
Dress
(Make 1 – in yellow)
R1: Ch 38, hdc in 3rd ch from hook, 35 hdc, ch 2, turn (36)
R2: (2 hdc, hdc inc) x 12, ch 2, turn (48)
R3: 5 hdc, [1 hdc, ch 2, 1 hdc] in next st, (1 sc, picot (see special sts)) x 12, [1 hdc, ch 2, 1 hdc] in next st, 10 hdc, [1 hdc, ch 2, 1 hdc] in next st, (1 sc, picot) x 12, [1 hdc, ch 2, 1 hdc] in next st, 5 hdc, ch 2, turn (52)
R4: 6 hdc, 1 hdc in ch sp, ch 7, sk 14, 1 hdc in ch sp, 12 hdc, 1 hdc in ch sp, ch 7, sk 14, 1 hdc in ch sp, 6 hdc, ch 2, turn (42)
R5: 42 hdc, ch 2, turn (42)
R6: (6 hdc, hdc inc) x 6, ch 2, turn (48)
R7: 48 hdc, ch 2, turn (48)
R8: (7 hdc, hdc inc) x 6, join with a sl st to 1st hdc (54)
R9: Ch 2, 54 dc, join to 1st dc (54)
R10: Ch 2, (fpdc, bpdc) x 27, join to 1st fpdc (54)
R11: Ch 1, (8 hdc, hdc inc) x 6, join to 1st hdc (60)
R12: Ch 2, 60 dc in 3rd loops (see special techniques), join to 1st dc(60)
R13: Ch 2, (fpdc, bpdc) x 30, join to 1st fpdc (60)
R14: Ch 1, (9 hdc, hdc inc) x 6, join to 1st hdc (66)
R15: Ch 2, 66 dc in 3rd loops, join to 1st dc (66)
R16: Ch 2, (fpdc, bpdc) x 33, join to 1st fpdc (66)
R17: Ch 1, (10 hdc, hdc inc) x 6, join to 1st hdc (72)
R18: Ch 2, 72 dc in 3rd loops, join to 1st dc (72)
R19: Ch 2, (fpdc, bpdc) x 36, join to 1st fpdc (72)
R20: Ch 1, (1 sc, picot) x 72 (72)
Fasten off and weave in ends. Add buttons to front top of dress if desired.
Put the dress on the doll, then sew up the back.
Part 6:
Hair cap
(Make 1 – in turquoise)
R1: Ch 1, hdc x 8 in magic ring, join with a sl st to 1st hdc (8)
R2: Ch 1, hdc inc x 8, join to 1st hdc (16)
R3: Ch 1, (1 hdc, hdc inc) x 8, join to 1st hdc (24)
R4: Ch 1, (2 hdc, hdc inc) x 8, join to 1st hdc (32)
R5: Ch 1, (3 hdc, hdc inc) x 8, join to 1st hdc (40)
R6: Ch 1, (4 hdc, hdc inc) x 8, join to 1st hdc (48)
R7: Ch 1, (7 hdc, hdc inc) x 6, join to 1st hdc) (54)
R8-14: Ch 1, 54 hdc, join to 1st hdc (54)
R15: 1 sl st, 1 dc, 8 tr, 1 dc, 1 hdc, 1 sl st, [ch 9, 3 dc in 4th ch from hook, 3 dc in next 5 chs], sl st to next st. ([ch 15, 3 dc in 4th ch from hook, 3 dc in next 11 chs], sl st to next st, sk 1 st) x 13, [ch 9, 3 dc in 4th ch from hook, 3 dc in next 5 chs], 1 hdc, 1 dc, 8 tr, 1 dc, 1 sl st.
Fasten off with long tail for sewing. Sew the hair cap to the head.

Part 7:
Bow
(Make 1 – in coral)
R1: Ch 30, join with a sl st to form a circle (30)
R2-4: Ch 2, 30 dc, join to 1st dc (30)
Fasten off with long tail. Flatten and weave yarn needle in and out of each row – pull tight to form a bow and wrap yarn around several times. Sew the bow to the hair/head.
Scarf
(Make 1 – in coral)
R1: Ch 53, dc in 4th ch from hook, 49 dc (50)
Fasten off and weave in ends. Tie the scarf onto the neck.
You’re done!
I hope you have enjoyed making your doll as much as I enjoyed designing her.
No unauthorized reproduction or distribution of this pattern or content, in whole or in part, is permitted. You are free to sell any dolls made with this pattern, but please give credit when doing so. A link back to the pattern page is appreciated.