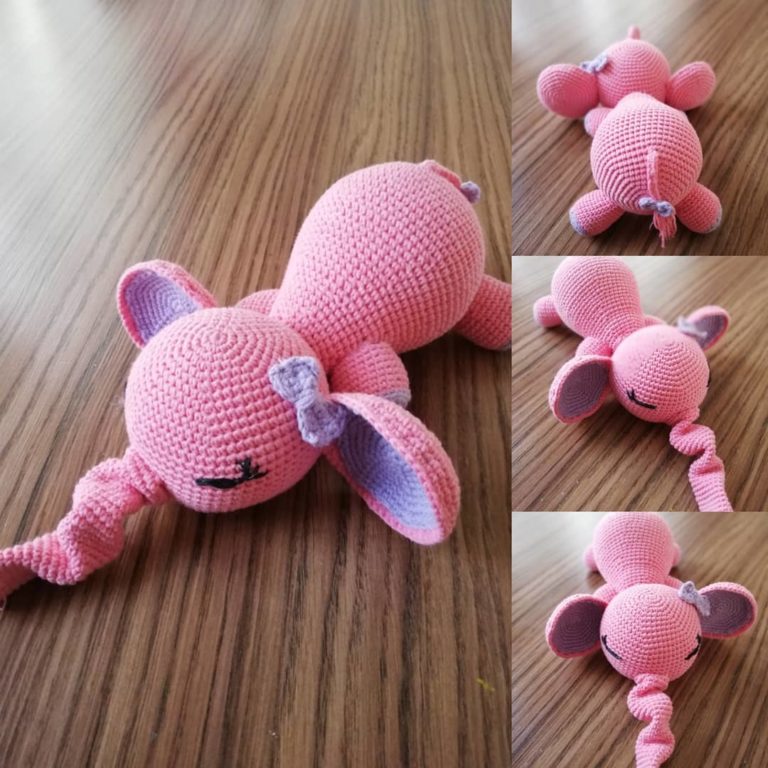
Amigurumi Dedenne Free Pattern
Materials :
Yarn (Sport/5ply) Brown, Cream, Orange and Black
Crochet hook. I’m using 2.5mm and 2.25mm crochet hook.
Felt (Black, and White). For the eyes and teeth.
100% polyester stuffing.
Glue and scissors.
Embroidery thread and needle. For nose and mouth.
Tapestry needle.
Wire.

Abbreviations:
st = stitch
sts = stitches
sc = single crochet
ch = chain
FLO = Front Loop Only
inc = increase, crochet 2 stitches in one sc
dec = decrease, crochet 2 stitches together
sl st = slip stitch
f/o = finish off
Instruction
Head and Body
Using brown yarn.
1) magic ring with 6st (6)
2) inc in each sc (12)
3) [sc, inc] around (18)
4) [sc 2, inc] around (24)
5) [sc 3, inc] around (30)
6) [sc 4, inc] around (36)
7) [sc 5, inc] around (42)
8) [sc 6, inc] around (48)
9) [sc 7, inc] around (54)
10) [sc 8, inc] around (60)
11-18) sc round (60)
19) [sc 9, inc] around (66)
20) [sc 10, inc] around (72)
21-30) around (72)
31) [sc 10, dec] around (66)
32) [sc 9, dec] around (60)
33) [sc 8, dec] around (54)
34) [sc 7, dec] around (48)
35) [sc 6, dec] around (42)
36) [sc 5, dec] around (36)
37) [sc 4, dec] around (30)
38) [sc 3, dec] around (24)*Start to stuff it.
39) [sc 2, dec] around (18)
40) [sc, dec] around (12)
41) dec around (6) sl st and f/o
Leave a long tail for sewing. Make sure you stuff it firmly, then close the gaps.
Belly
Using cream yarn.
1) Ch 2, begin in the second ch from the hook and sc 3 in the same ch. Ch 1 and turn. (3)
2) inc, sc , inc. Ch 1 and turn. (5)
3) inc, sc 3 , inc. Ch 1 and turn. (7)
4) inc, sc 5, inc. Ch 1 and turn. (9)
5) inc, sc 7, inc. Ch 1 and turn. (11)
6) inc, sc 9, inc. Ch 1 and turn. (13)
7) inc, sc 11, inc. Ch 1 and turn. (15)
8) inc, sc 13, inc. Ch 1 and turn. (17)
9-12) sc across. Ch 1 and turn. (17)
13) sc across then sc along the edge of the belly. Sl st and f/o.
Leave a long tail for sewing.
Cheeks
Using orange yarn.
1) magic ring with 6st (6)
2) inc in each sc (12)
3) [sc, inc] around (18) sl st and f/o.
Leave a long tail for sewing.
Whiskers
Using smaller hook (2.25mm) and black yarn. Whiskers are working in 3 parts.
Part 1 (Make 2)
1) magic ring with 4st (4)
2) sc 3, inc (5)
3-16) sc around (5) sl st and f/o.
Leave a long tail for sewing.
Part 2 (Make 2)
1) magic ring with 4st (4)
2-10) sc around (4)
Leave a long tail for sewing.
Part 3 (Make 4)
1) magic ring with 4st (4)
2) sc 3, inc (5)
3-4) sc around (5) sl st and f/o.
Leave a long tail for sewing.
Part 4 (Make 4)
1) magic ring with 4st (4)
2-4) sc around (4)
Leave a long tail for sewing.
(1)Sew part 3 on part 1 in round 4th, repeat for another piece. (2)Sew part 4 on part 1 in round 7th, repeat for another piece. (3)Sew part 1 and part 2 onto cheeks, repeat for another piece. (Optional) you can add a wire in the whiskers to make it moveable.
Ears
Outer ears (Make 2)
Using black yarn.
1) magic ring with 6st (6)
2) inc in each sc (12)
3) [sc, inc] around (18)
4) [sc 2, inc] around (24)
5) [sc 3, inc] around (30)
6) [sc 9, inc] around (33)
7-15) sc around (33)
16) [sc 9, dec] around (30)
17) [sc 8, dec] around (27)
18) [sc 7, dec] around (24) sl st and f/o.
Leave a long tail for sewing.
Inner ears
Using cream yarn.
1) magic ring with 6st (6)
2) inc in each sc (12)
3) [sc, inc] around (18)
4) [sc 2, inc] around (24)
5) [sc 3, inc] around (30) sl st and f/o. Hide the tail.
(1) Glue the inner ears to outer ears. (2) Squish the corner of the outer ears then sew them together. f/o.

Arms
Using brown yarn.
1) magic ring with 6st (6)
2) inc in each sc (12)
3-7) sc around (12)
8-9) sl st 6x, sc 6 (12) sl and f/o.
Leave a long tail for sewing. Do not stuff this arms.
Foots
Using brown yarn.
1) magic ring with 6st (6)
2) inc in each sc (12)
3) [sc 3, inc] around (15)
4-8) sc around (15)
9) [sc 3, dec] around (12)
10) sl st 6x, dec 3x (9) sl st and f/o.
Leave a long tail for sewing. Put some stuff in it, but not too much.
Tail
Using black yarn.
1) magic ring with 4st (4)
2) [sc, inc] around (6)
3) [sc 2, inc] around (8)
4) [sc 3, inc] around (10)
5) [sc 4, inc] around (12)
6) sc around (12)
7) [sc 4, dec] around (10)
8) [sc 3, dec] around (8)
9) [sc 2, dec] around (6)
10-62 ) sc aroound (6) do not cut the yarn, we still needed to make the body stripe. You can add the wire to the tail before we going to make the body stripe.
Body stripe
63) inc in each sc (12)
64) [sc 3, inc] around (15)
65-72) sc around (15)
73) [sc 3, dec] around (12)
74-75) sc around (12)
76) [sc 2, dec] around (9)
77-78) sc around (9)
79) [sc, dec] around (6)
80) sc around (6), sl st and f/o.
Here is the optional, you can leave a long tail for sewing or you can cut the yarn and hide it, then put some glue to reattach into the body.
Tail spikes
Small spikes (Make 2)
Using black yarn.
1) magic ring with 4st (4)
2) [sc, inc] around (6)
3) sc 5, inc (7)
4) sc 6, inc (8) sl st and f/o.
Leave a long tail for sewing.
Big spikes (Make 2)
Using black yarn.
1) magic ring with 4st (4)
2) [sc, inc] around (6)
3) sc 5, inc (7)
4) sc 6, inc (8)
5) sc 7, inc (9) sl st and f/o.
Leave a long tail for sewing.
Assembly :
This assembly is only advice from me, you still need to use your imagination to make it look good in your eyes. Playing with the placement and get the best result.
1) Sew the whiskers and the cheeks to the head. I placed it between round 16th and 23th.
2) Sew the belly to the body. I placed the belly between round 20th and 32th.
3) Sew the arms and the foots to the body.
4) Sew the ears onto the head.
5) Sew the tail spikes to the tail. I placed small spikes in between round 3th and 6th and for the big spikes I placed in between round 7th and 10th.
6) Sew/glue the body stripe to the body. I placed it in between round 13th and 31st.
Face
I’m using black and white felt for the eyes, I placed the eyes between round 12th and 16th. For the nose and the mouth I’m using black embroidery thread (see the picture). For the teeth I’m using felt (really small piece), I placed the teeth between the mouth.