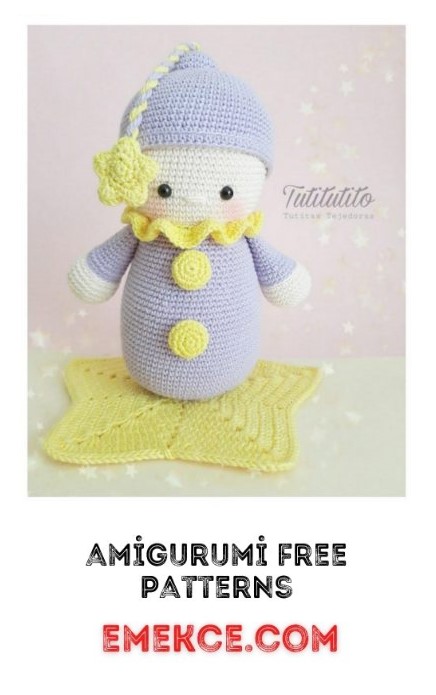
Amigurumi Doll Pago Free Crochet Pattern
The materials to use:
– 100% cotton yarn in colors: lilac, pastel yellow, nude
– Two 2cm diameter buttons
– 8mm safety eyes
– Needle
– Scissors
– Crochet 2.25mm
– Score marker
– And as always, a lot of love and dedication !!
First of all, I want to tell you that as a mom before I was a designer of
Amigurumi, I have thought of every detail to make it a safe and eye-catching toy, take care
Every detail to keep this line, the buttons, eyes and drawstring length are very
relevant if we are going to knit it for a baby, having said the above … to knit!
Body and head
We will start by weaving the base with lilac color and spiral weaving:
Row 1: we set up 7sc into magic ring. / 7pts
Row 2: 7 inc. / 14pts
Row 3: (1sc, 1 inc) x 7. / 21pts
Row 4: (2sc, 1 inc) x 7. / 28pts
Row 5: (3sc, 1 inc) x 7. / 35pts
Row 6: 2sc, 1 inc, (4sc, 1 inc) x 6, 2sc / 42pts
Row 7: (5sc, 1 inc) x 7. / 49pts
Row 8: 3sc, 1inc, (6sc, 1 inc) x 6, 3sc. / 56pts
Row 9: (7sc, 1 inc) x 7. / 63pts
Row 10: 4sc, 1 inc, (8sc, 1 inc) x 6, 4sc. / 70pts
Row 11: (9sc, 1 inc) x 7. / 77pts
Row 12-28: Hold 77 points
Row 29: (9sc, 1 dec) x 7. / 70pts
Row 30 and 31: keep 70 points
Row 32: 4sc, 1 dec, (8sc, 1 dec) x 6, 4sc / 63pts
Row 33 and 34: hold 63 points
Row 35: (7sc -1 dec) x 7 / 56pts
Row 36 and 37: hold 56 points
Row 38: 3sc, 1 dec, (6sc, 1 dec) x 6, 3sc / 49pts
Row 39 to 42: keep 49 points
• Change color to nude and knit a row of satin stitch through backloop
• Fill the base of the body as it will cost later
Row 43: 3sc, 1 inc, (6sc, 1 inc) x 6, 3sc / 56pts
Row 44: (7sc, 1 inc) x 7 / 63pts
Row 45: 4sc, 1 inc, (8sc, 1 inc) x 6, 4sc / 70pts
Row 46 to 62: keep 70 points
Row 63: 4sc, 1 dec (8sc, 1 dec) x 6, 4sc / 63pts
Row 64: (7sc, 1 dec) x 7 / 56pts
* put safety eyes between rows 48 and 49 with 7sc of separation
Row 65: 3sc, 1 dec, (6sc, 1 dec) x 6, 3sc / 49pts
Row 66: (5sc, 1 dec) x 7 / 42pts
Row 67: 2sc, 1 dec, (4sc, 1 dec) x 6, 2sc / 35pts
• Finish filling
Row 68: (3sc, 1 dec) x 7. / 28pts
Row 69: (2sc, 1 dec) x 7. / 21pts
Row 70: (1sc, 1dec) x 7. / 14pts
Row 71: 7 dec, needle close and hide the strand.
Hat
Row 1: we assemble 7sc into magic ring
Row 2: 7 inc. / 14pts
Row 3: (1sc, 1 inc) x 7 / 21pts
Row 4: (2sc, 1 inc) x 7 / 28pts
Row 5: (3sc, 1 inc) x 7 / 35pts
Row 6: 2sc, 1 inc, (4sc – 1 inc) x 6, 2sc / 42pts
Row 7: (5sc, 1 inc) x 7 / 49pts
Row 8: 3sc, 1inc, (6sc, 1 inc) x 6, 3sc / 56pts
Row 9: (7sc, 1 inc) x 7 / 63pts
Row 10: 4sc, 1 inc, (8sc, 1 inc) x 6, 4sc / 70pts
Row 11-22: Hold 70 points
Row 23: knit dc all the way around, close with satin stitch and hide the strand.
Cap rounding:
Row 1: we assemble 7sc into magic ring
• Now it is time to put the cord in before closing the ring.
• To make the cord we cut 5 lilac strands and 5 yellow strands of approx. 20 cm,
you knot at one end and wind each group of strands in one hand (yellow
in one and purple in another), turning them in the same direction, when you feel that
they put up resistance and before they start to fold put them together they are going to roll up
on themselves, knot the other end before releasing them, you will have in this
moment the cord knotted at both ends, one end lo
we go inside the magic ring and close it as the PHOTO shows:
• The cord must be left no more than 10 cm, at that height the external knot goes
which will be where we will later put the star. We continue weaving …
Row 2: 7 inc
Row 3: (1sc, 1 inc) x 7 / 14pts
Row 4: (2sc, 1 inc) x 7 / 21pts
Row 5 and 6: keep all 21 stitches, close with slip stitch and leave long thread for sewing
• We sew point by point to the base of the hat and before finishing sewing it
fill in.
Beanie star
With pastel yellow color we knit 2
Row 1: Magic Ring, 5 sc
Row 2: 5 inc
Row 3: * 3sc at 1 only point, slid point at next point * repeat 5 times
Row 4: * 1 sc, [2 dc, 2 ch 2 dc] all this in 1 point only, 1 sc, point slid in it
slipped stitch of round 3 * repeat this sequence 5 times. Close and cut.
Put the pieces with the rights out, you will put the knot of the cord inside and finish
to join with needle. Use the backloop of the star in front of you, and the frontloop of the
left behind.
Buttons
Knit 2 with pastel yellow color
Row 1: we assemble 6sc into magic ring
Row 2: 6 inc / 12pts
Row 3: (1sc, 1 inc) x 6 / 18pts
Row 4: keep 18 points
Row 5: (1sc, 1 dec) x 6 (when you have 5 dec enter the button inside.
• Close with a needle and sew firmly on the chest of our Tutitutito
Neck twist
This loop is mounted, it is not sewn directly, we put it once the
doll and before sewing the hat.
Row 1: Knit 49 chains, bind off in the first chain with slip stitch and knit 49
increases.
Row 2 and 3: hold 98 stitches, close with slip stitch and hide the thread with needle
• Now that you have the twist, mount it in the tutitutito and then put the cap giving
some needle stitches to fix it on the head
arms
We start with nude color and spiral weaving
Row 1: we assemble 6sc into magic ring
Row 2: 6 inc. / 12pts
Row 3: (1sc, 1 inc) x 6. / 18pts
Row 4: (2sc, 1 inc) x 6. / 24pts
Row 5: (3sc, 1 inc) x 6. / 30pts
Row 6 to 8: keep 30 points
Row 9: (3sc, 1dec) x 6 / 24pts
• Change to lilac color
Row 10: knit a round satin stitch down the backloop and 24sc
Row 11: keep 24 sc
Row 12: (2sc, 1 dec) x 6. / 18pts
Row 13 to 21: keep 18 sts.
• Close with slip stitch leaving the long strand, fill 1/3 of the arm and then
close with needle in a flat way, join the sides of the tutitutito at the height of the
neck color change.
Now that we have it ready we boRowmos his small nose with two stitches helping us
of a needle as the PHOTO shows
To make the star blanket that accompanies the Tutitutito, I recommend you visit
our video from the youtube channel Tutitas Tejedoras. Click below.
Ready!!! You finished the Tutitutito, now to enjoy it !!