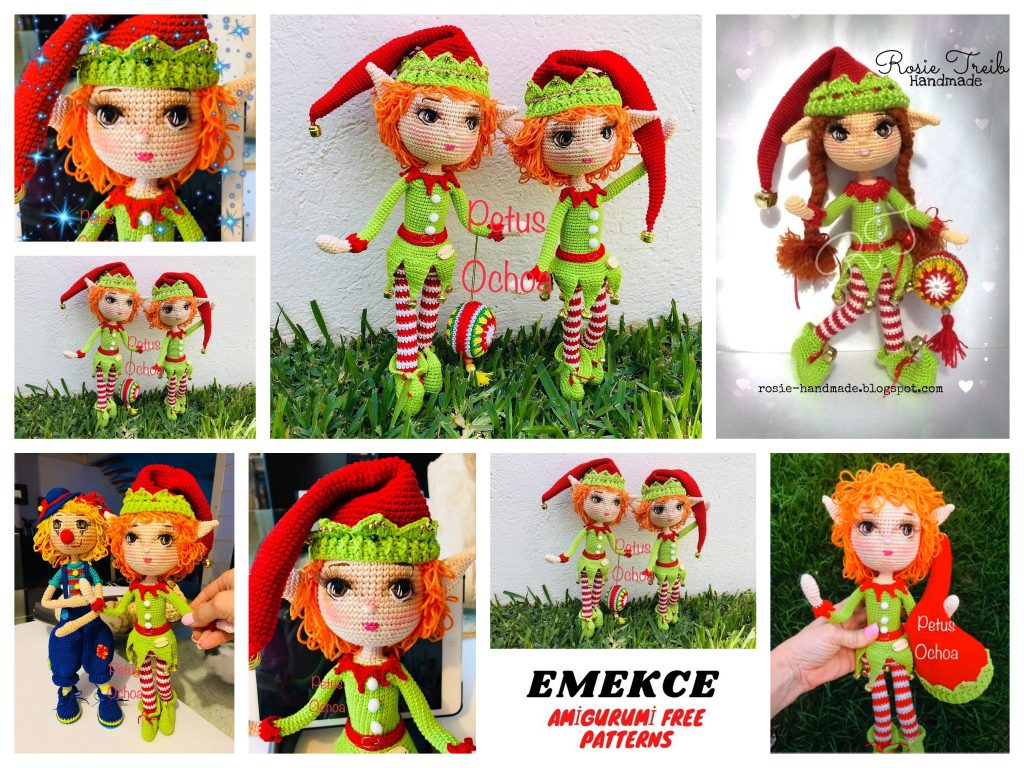
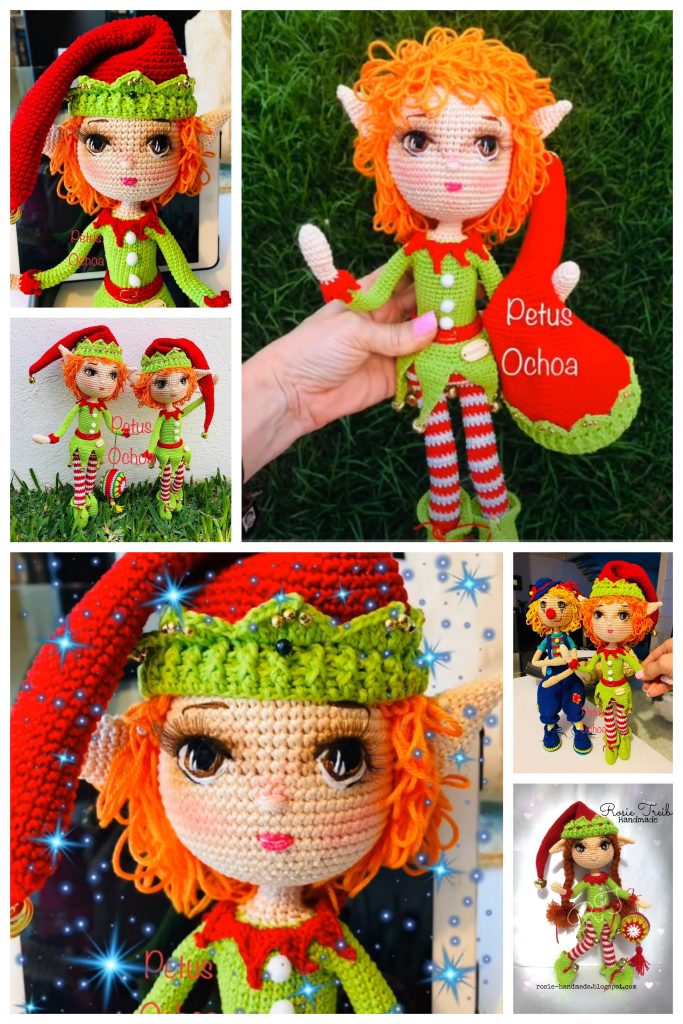
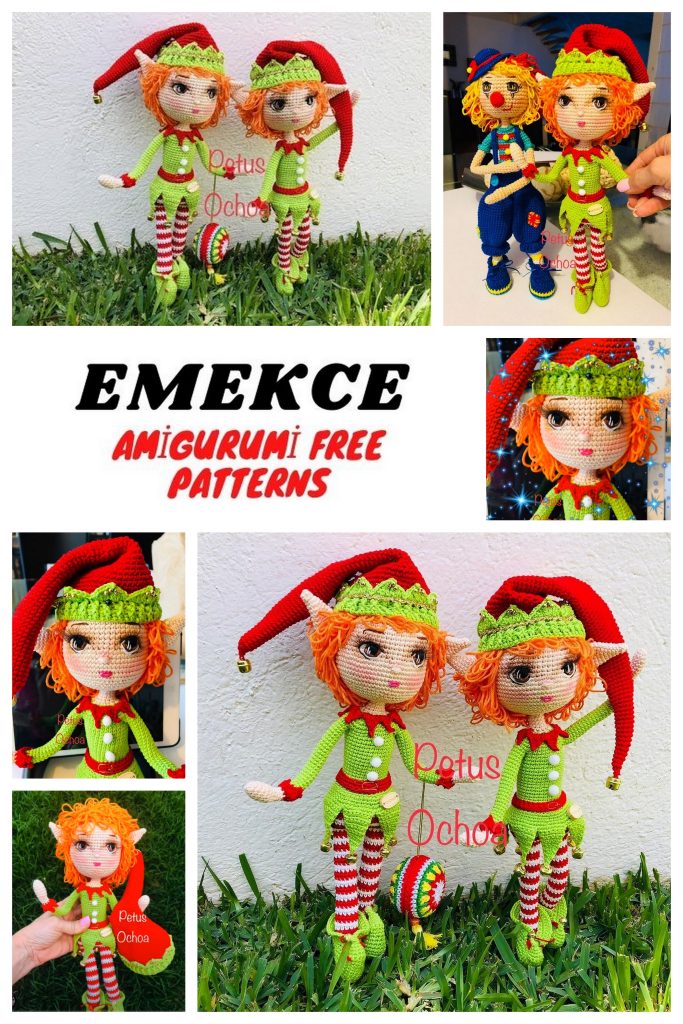
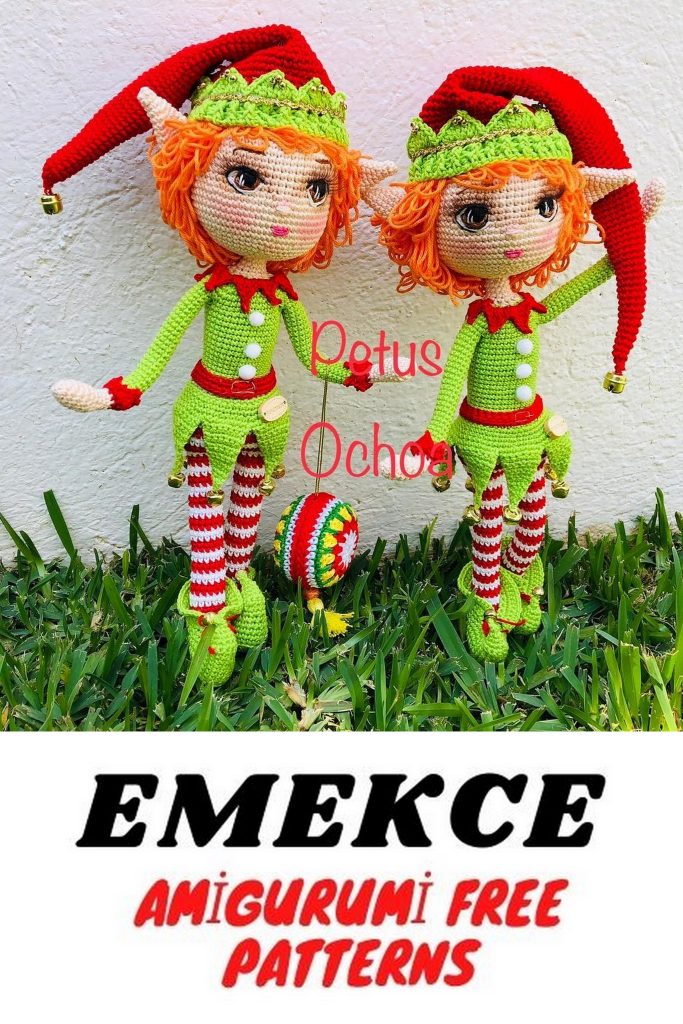
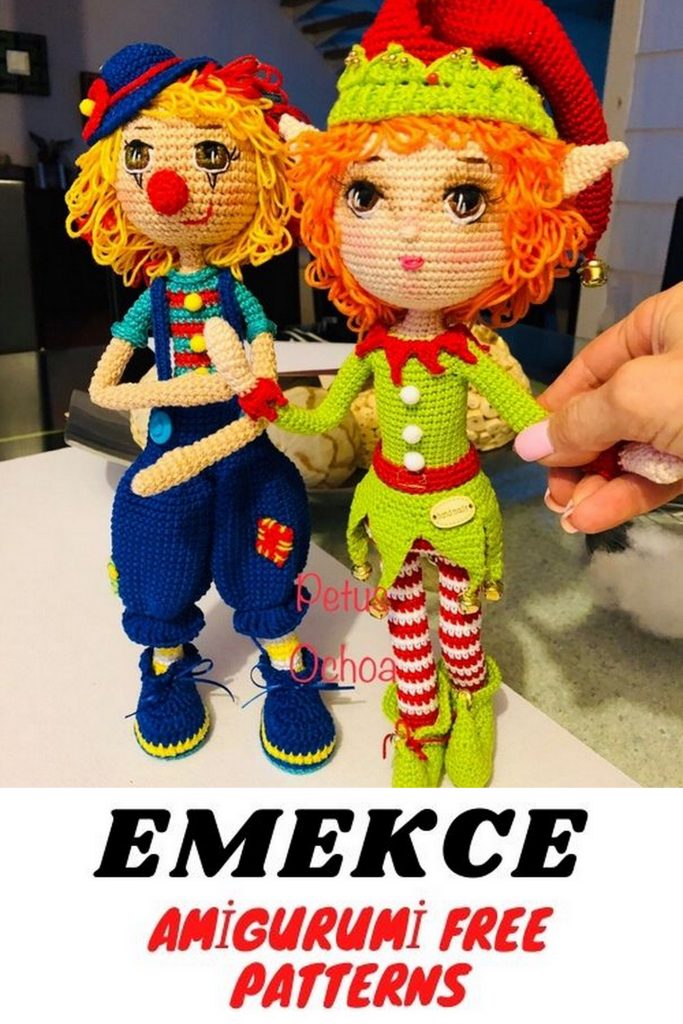
Amigurumi Elf Doll Free Crochet Pattern – Whimsical DIY Toy Tutorial
Step into the realm of enchantment with our Amigurumi Elf Doll Free Crochet Pattern. This whimsical and free DIY crochet tutorial is your gateway to crafting a charming elf doll that adds a touch of magic to your handmade creations. Whether you’re a seasoned crocheter or just starting, this amigurumi project offers a delightful crafting experience for all.
Our detailed instructions and amigurumi free pattern make it easy for you to crochet this adorable elf doll, complete with all the magical details. Perfect for gifting or as a unique addition to your own collection, this elf doll is sure to bring a smile to anyone who encounters its whimsy.
As you embark on this crochet journey, you’ll find joy in the process and the satisfaction of creating a magical companion. Share your finished elf doll with fellow crafters, and let the magic of handmade crochet spread far and wide.
Ready to bring a touch of fantasy to your crochet repertoire? Gather your yarn, hook, and imagination, follow our free pattern, and let the crafting magic begin. Happy crocheting!
Designer By: Petus Ochoa
MATERIALS
• Wool or thread red, white, green, orange and skin color.
• For the eyes thread black, brown, white and the mouth pink (if you do not want
embroider the eyes, you must use safety eyes).
• Hook.
• Wool needle with tip.
• Golden pearls and small pompoms to decorate.
• Wire (optional, if you want your wrist to be articulated)
• False eyelashes (optional)
Abbreviations:
sc: single crochet
ch: chain
dec: decrease
inc: increase
BLO: back loop only
sk: skip
sl st: slip stitch
dc: double crochet
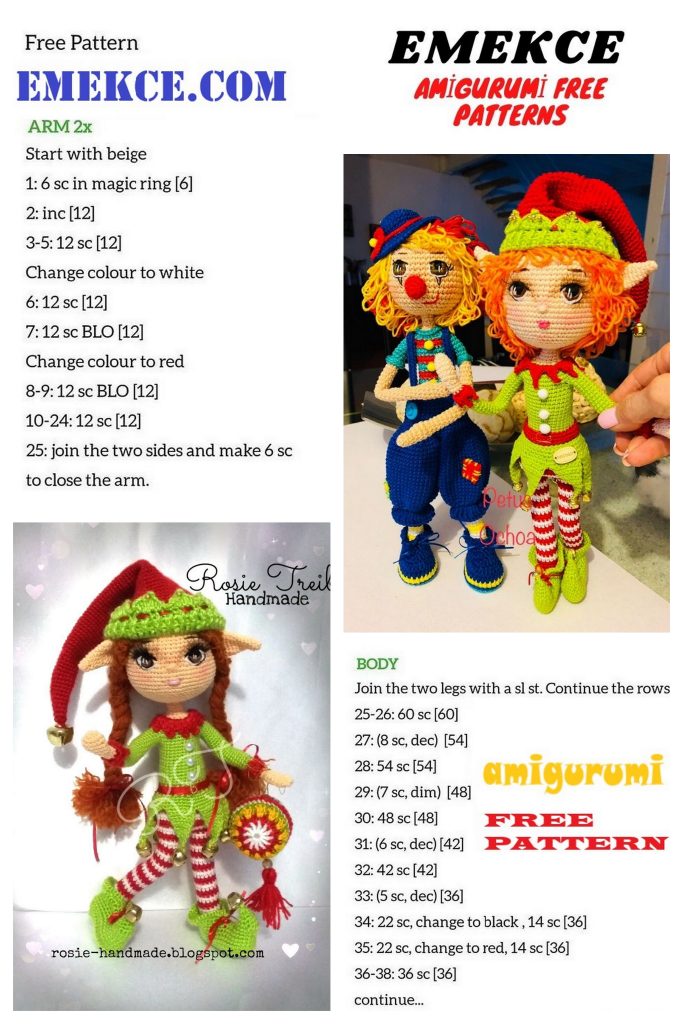
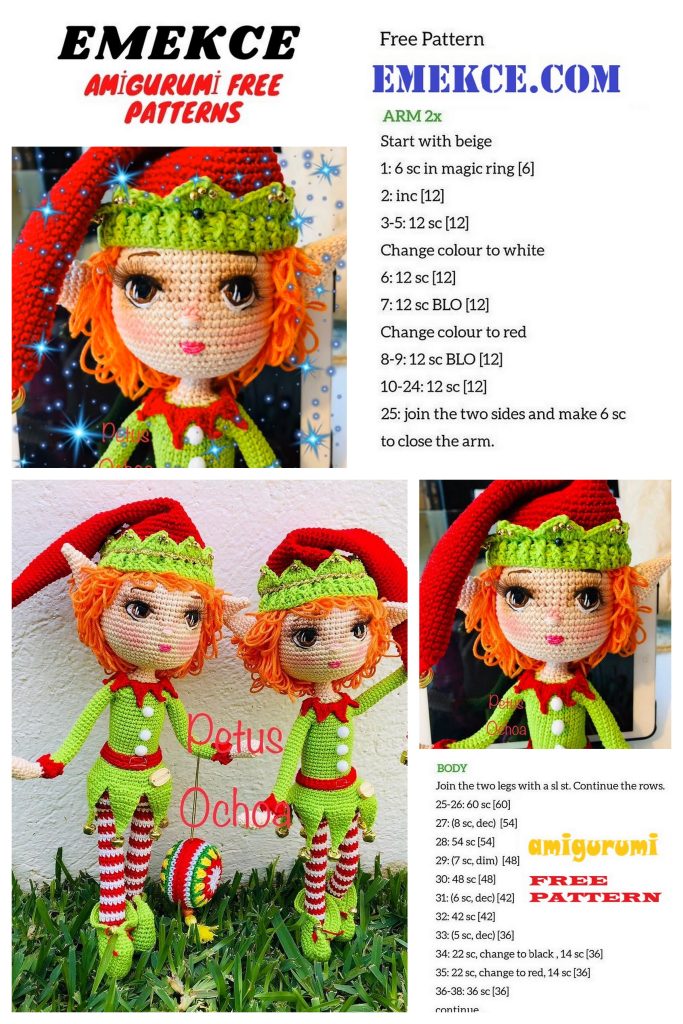
ARMS (2 PIECES)
We start in skin color.
R 1: 6sc into magic ring
R 2: 3sc at the same point, 2sc, 3sc at the same point
point, 2sc = 10sc
R 3: 1sc, inc, 4sc, inc, 3sc = 12sc
R 4-7: 12sc (4 laps)
R 8: 3sc, 2dec three-point, 3sc = 8sc
R 9-10: 8sc (2 laps) The last point is closed with
the Red color
R 11: 8sc
R 12: 8sc knit the back strand alone
R 13: 1sc, inc, 2sc, inc, 2sc, inc = 11sc
We change to green
R 14-36: 11sc (23 laps)
Close, cut and fill.
LEGS (2 PIECES)
EVERY RETURN WILL BE WORKED IN ROUNDS, FOR THIS AT THE END OF
EVERY RETURN MUST CLOSE WITH SLIP POINT AND UP WITH A
CHAIN.
We start in red
R1: make 4 ch, in the second from where the
crochet we will knit 2sc in the same spot, sc, 4 sc in
the same point, on the other hand sc, inc (close with
SL-ST and come up with 1ch) = 10sc
R 2: inc, sc, inc, 4inc, sc, inc, sc = 16sc
R 3: (7sc, inc) x2 = 18sc
R 4-8: 18sc
R 9: (dec, 7sc) x2 = 16sc
R 10-11: 16sc
R 12: sc, 6ch, skip 6 knitting points 9sc = 16sc
R 13: 16sc
R 14: sc, (dec, 2sc) x3, dec, sc = 12sc
R 15: 6 dec
We leave thread and with a needle we are taking the thread
front of each point to close our heel well.
We change to white
R 1: 8sc in the front and 6sc in the part of the
heel = 14sc
LEGS (2 PIECES)
EVERY RETURN WILL BE WORKED IN ROUNDS, FOR THIS AT THE END OF
EVERY RETURN MUST CLOSE WITH SLIP POINT AND UP WITH A
CHAIN.
It is recommended to work in rounds, so that the color change is not visible. To the
end of each turn close with a slip stitch and climb with a chain.
Put some padding on the foot.
R 2: 14sc (before closing the last point, change to
Red color)
R 3 – 4: 14sc (Change to White)
R 5 – 6: 14sc (Change to red color)
R 7 – 8: 14sc (Change to White)
R 9 – 10: 14sc (Change to red color)
R 11 – 12: 14sc (Change to White)
R 13 – 14: 14sc (Change to red color)
R 15 – 16: 14sc (Change to White)
R 17 – 18: 14sc (Change to red color)
R 19 – 20: 14sc (Change to White)
R 21 – 22: 14sc (Change to red color)
R 23 – 24: 14sc (Change to White)
R 25 – 26: 14sc (Change to red color)
R 27 – 28: 14sc (Change to White)
R 29-30: 14sc
In the first leg we cut the thread, and in the second we will continue to weave the
Body. We will change to red thread.
SKIRT
To make the skirt, we will take the FLO that we have left on lap 15 and
We will work in rounds, for this you must close with SL-ST and come up with 1cad.
We will start knitting with green thread, we pass the thread and we climb with 1ch.
We start at the same point:
R 1: (2sc, inc) x11 = 44sc
R 2-3: 44sc (2 lap)
R 4: (3sc, inc) x10 = 56sc
R 5: 56sc
R 6: In this round we will start with the
skirt spikes:
8sc, rotate the fabric, 3sc, jump 1 point and
finish with 4sc, rotate the fabric 7sc, rotate,
3sc, skip 1
point and do 3sc, turn, 6sc, turn, 2sc,
jump 1 point and make 3sc, turn, 5sc, turn,
2sc, jump 1 point and finish with 2sc,
turn, 4sc, turn, sc, skip 1 point, 2sc,
turn, 3sc, turn, 1sc, jump 1, 1sc, turn
2sc, turn, skip the first point and make
1sc, we make 1 ch. And we close Leave
thread to sew the rattle.
This process is repeated all the way around,
starting each peak at the last point
from the previous peak, there should be a total of 7
peaks

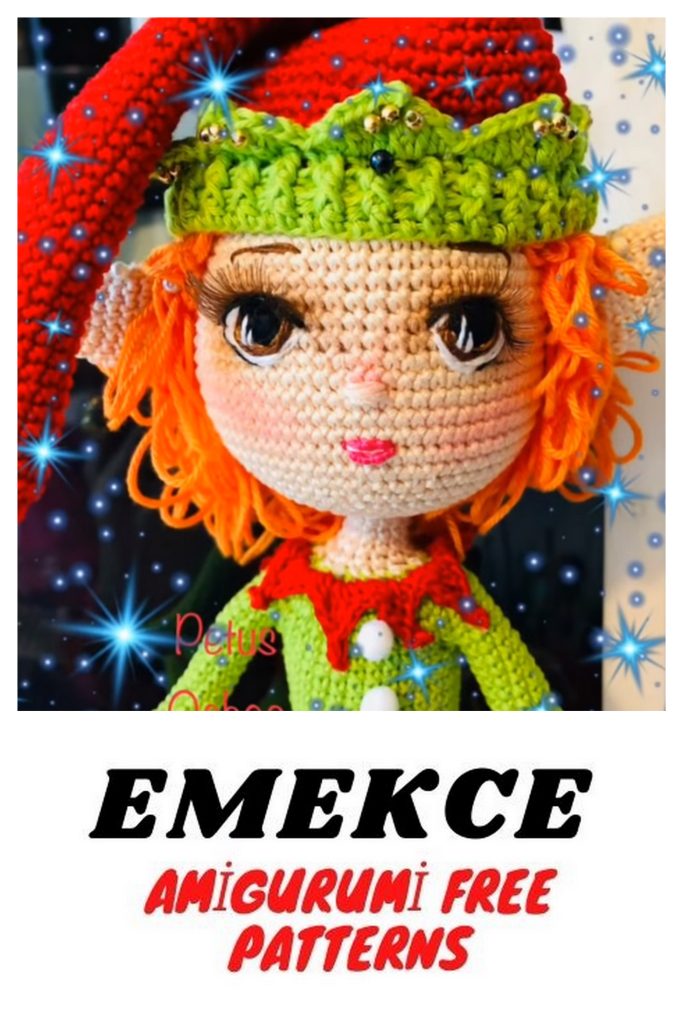
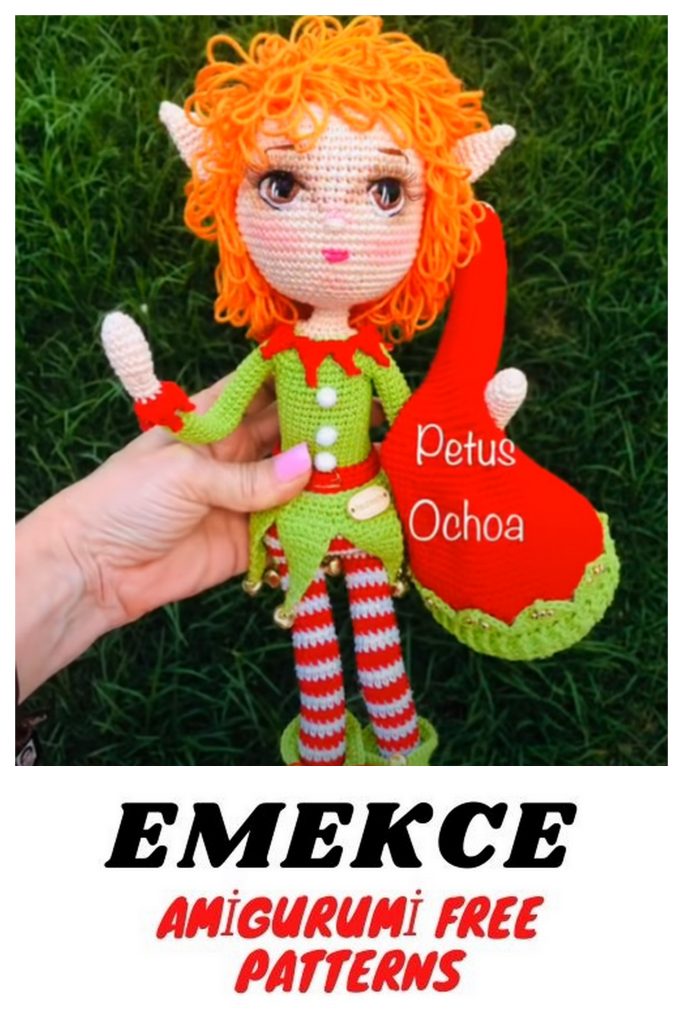
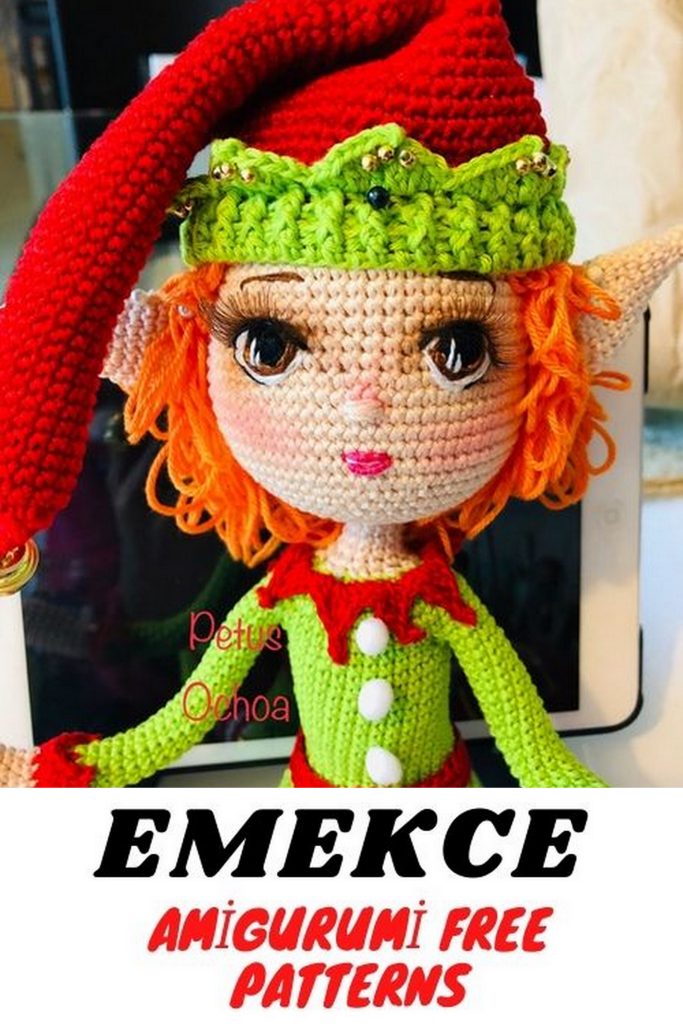
HEAD
Remember that we work in the round, therefore you must close
each lap with an SL-ST and come up with a chain.
R 1: 6sc into magic ring
R 2: 6inc = 12sc
R 3: (1sc, inc) x6 = 18sc
R 4: (2sc, inc) x6 = 24sc
R 5: (3sc, inc) x6 = 30sc
R 6: (4sc, inc) x6 = 36sc
R 7: (5sc, inc) x6 = 42sc
R 8: (6sc, inc) x6 = 48sc
R 9: (7sc, inc) x6 = 54sc
R 10: (8sc, inc) x6 = 60sc
R 11-18: 60sc (8 laps)
R 19: 15sc, (2sc, inc) x10, 15sc = 70sc
R 20-25: 70sc (6 laps)
R 26: 15sc, (dec, 2sc) x10, 15sc = 60sc
R 27: (8sc, dec) x6 = 54sc
R 28: (7sc, dec) x6 = 48sc
R 29: (6sc, dec) x6 = 42sc
R 30: (5sc, dec) x6 = 36sc
R 31: (4sc, dec) x6 = 30sc
R 32: (3sc, dec) x6 = 24sc Fill
R 33: (2sc, dec) x6 = 18sc
R 34: (sc, dec) x6 = 12sc
EARS (2 PIECES)
They will spiral
R 1: 5sc into magic ring
R 2: 5sc
R 3: (1sc, inc) x2, sc = 7sc
R 4: (1sc, inc) x3, sc = 10sc
R 5-6: 10sc (2 laps)
R 7: (2sc, inc) x3, sc = 13sc
R 8: 13sc
R 9: (3sc, inc) x3, sc = 16sc
R 10-12: 16sc (3 laps)
R 13: (1sc, dec) x3, 7sc = 13sc
Close and leave strand to sew to the head.
(DO NOT sew until the hair is placed)
HAT
To crochet the hat a crochet will be used a measure
larger.
In green color knit 64ch. Close on the first chain
with SL-ST. Upload with 3ch. IMPORTANT: The ring of
chains should be a little loose (loose) on the head,
since it will shrink a little with the embossed turns.
R 1: 64DC
R 2-3: It will work in relief: 3ch. 1DC ahead,
1DC behind, repeat all the way around. Close with SL-ST.
R 4: For the peaks of the hat, the FLO will work.
1ch., At the same point work 1SC, 1HDC; in the
next point 2DC; in the next point 1DC, 2ch.,
close the chains with SL-ST, 1DC; at the next point
2DC, at the following point 1HDC, 1SC; In the next
dot1SL-ST. Repeat all the way around.
Change to red color.
R 5: Knit for BLO 64sc
R 6-12: 64sc (7 laps)
R 13: (8sc, dec) x6, 4sc = 58
R 14-16: 58sc (3 laps)
R 17: (7sc, dec) x6 = 52
R 18-19: 52sc (2 laps)
R 20: (6sc, dec) x6 = 46
R 21-23: 46sc (3 laps)
R 24: (5sc, dec) x6 = 40
R 25-26: 40sc (2 laps)
R 27: (4sc, dec) x6 = 34
R 28-30: 34sc (3 laps)
R 31: (3sc, dec) x6 = 28
R 32-34: 28sc (3 turns)
R 35: dec, 1sc at each point until the end of the round.
R 36: 1sc at each point.
Repeat the sequence of lap No. 35 and 36 until
Let the hat close completely.