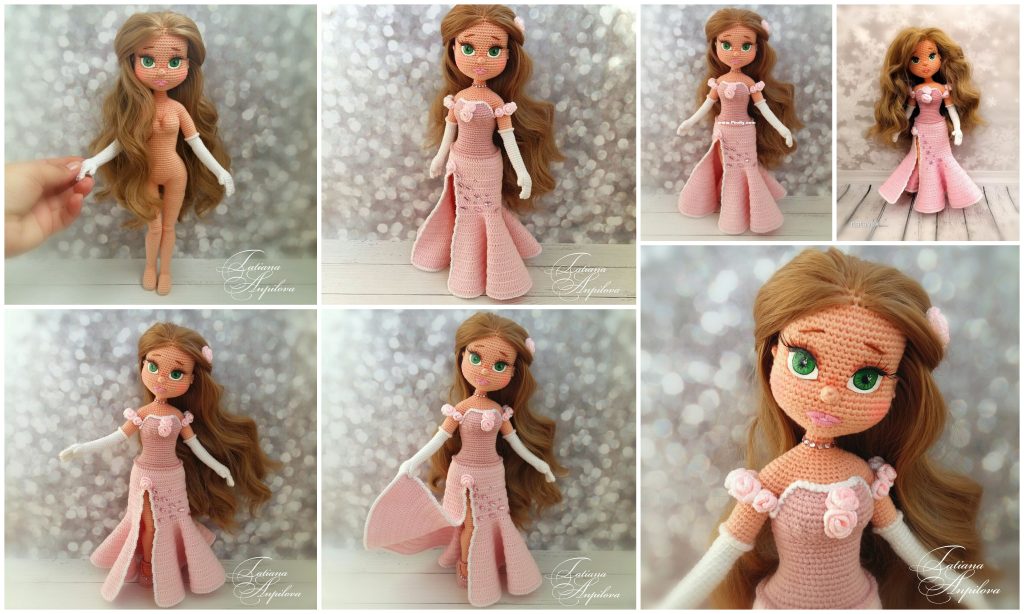
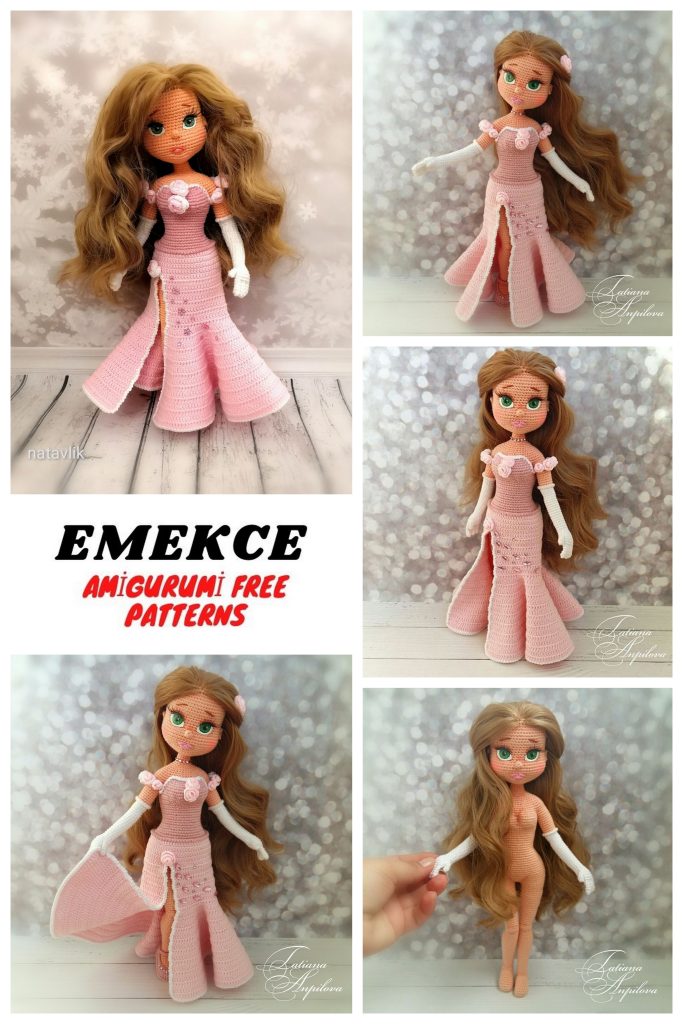
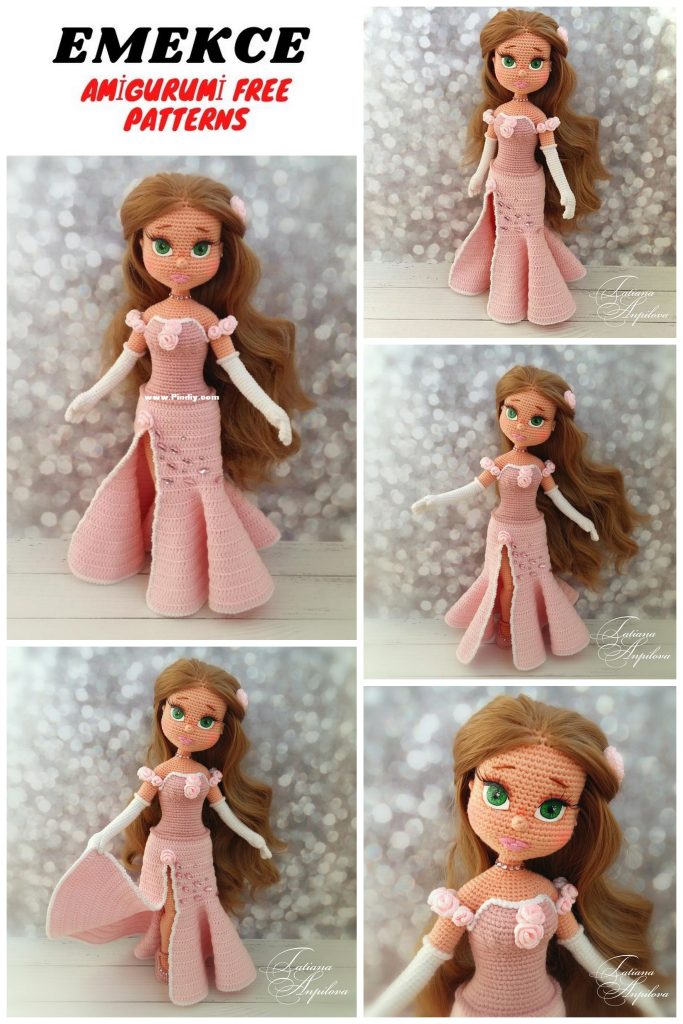
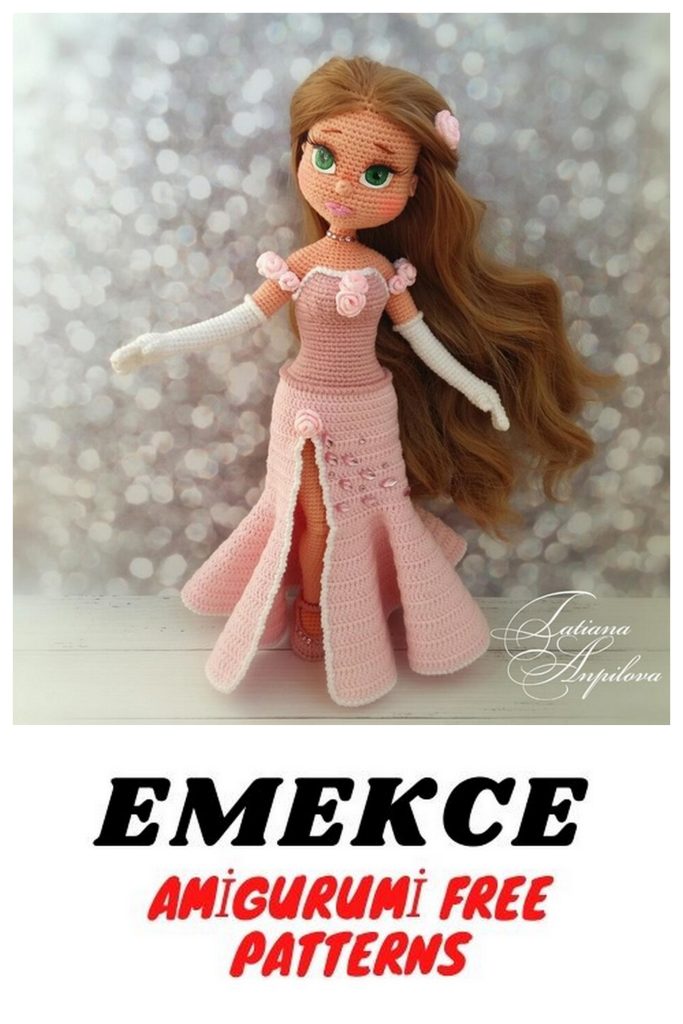
Amigurumi Doll Rosa Free Crochet Pattern – Create Your Own Adorable DIY Toy
Welcome to the heartwarming world of crochet with our Amigurumi Doll Rosa Free Crochet Pattern. This free and easy-to-follow DIY tutorial is your key to crafting a lovable doll named Rosa. Whether you’re a seasoned crocheter or a beginner, this amigurumi project offers a delightful crafting experience for everyone.
With our detailed instructions and free pattern, you’ll find it a breeze to crochet your own adorable Rosa doll. Perfect for gifting or as a cherished addition to your collection, Rosa is sure to capture hearts with her charm and handmade warmth.
As you embark on this crochet journey, you’ll discover the joy of creating a unique companion through the therapeutic art of crochet. Share your finished Rosa doll with the crafting community, and let the love for handmade amigurumi spread far and wide.
Ready to bring Rosa to life with your crochet skills? Grab your yarn, hook, and creativity, follow our free pattern, and let the crafting magic begin. Happy crocheting!
The pattern is for personal use only. You may not copy or distribute the pattern in any way in
Internet, totally or partially. When you publish the images of your work or sell your dolls,
indicate the following «Based on a pattern by Tatiana Anpilova»
Necessary materials:
Gazzal “Baby Cotton” (60% cotton, 40% acrylic, 165 m / 50 gr): color 3412 – peach (2 skeins);
color 3411 – light pink (2 skeins); color 3444 – dry rose; color 3432 – white. Clover needle № 1.75
and № 1.5.
“IRIS” Vita cotton (100% mercerized cotton, 125 m / 20 gr): color 2101 – white. Clover needle № 1 and
№ 1.25.
15 cm synthetic hair, light brown color – 2 meters.
To paint the eyes: a small piece of cotton cloth; Acrylic fabric paint (white,
black and green); fine brushes of № 000 and № 00000; matt and glossy acrylic varnish.
1.5 mm eyelets, silver color – 10 pieces. Machine to put eyelets.
Elastic rubber thread.
Pink satin ribbon 3 mm wide – length 60-70 cm
White, pink and brown Mouline thread.
False eyelashes.
Copper wire for the skeleton and insulating tape to cover the ends.
Stuffed.
Long sewing needle.
If you use these same materials, the doll will measure about 33 cm.
Difficulty level – upper average
Caution! The doll is spirally woven, without closing the turns or turning.
While weaving, you should control the symmetry of the piece, so every 4-5 rows
you must knit one or more extra pts to correct the marker. Points
extras are not indicated in the pattern.
TERMS USED
CH – chain
SC – single crochet;
İNC – increase
DEC – decrease
DC – double crochet;
PATTERN
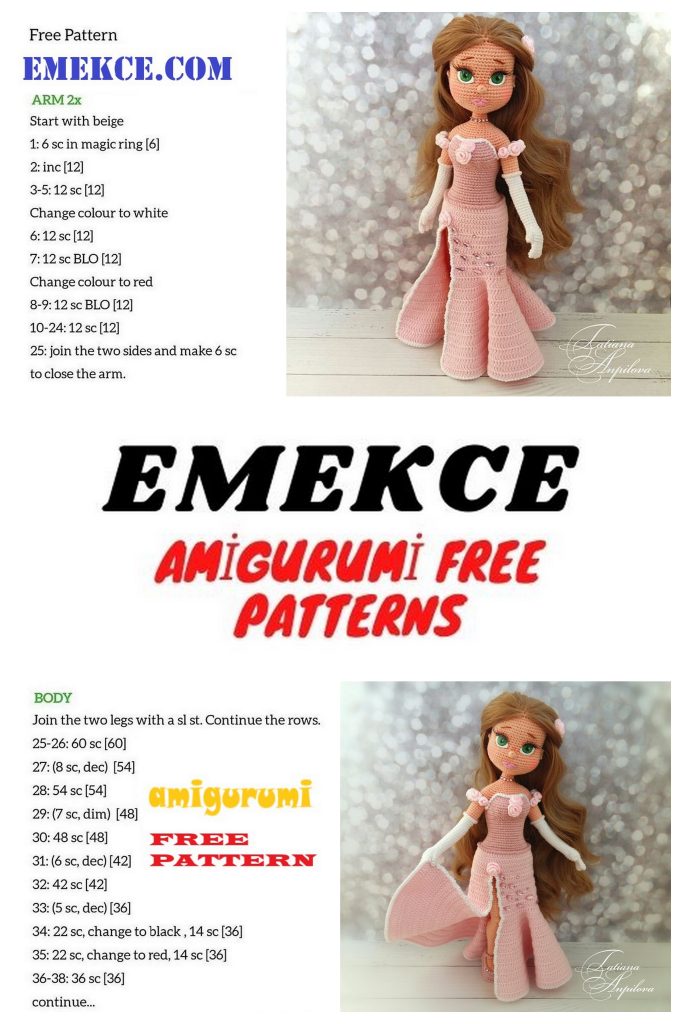
Arms.
The marker must go through the inner center of the palm.
We will weave the fingers with a strand, needle of № 1.5. Our
thread consists of 5 strands, to weave the fingers we will use only 4 of
they.
To knit the four fingers, cut a thread sufficiently
long to weave them. On the last finger, we separate the strand
while we weave, to continue weaving the palm with the
full thread
We knit the glove with white thread.
Thumb and little finger
1.5 sc in a MAGİC RİNG (5)
2-4. (3 rows) 5 sc (5)
Top off, cut the thread.
Index, middle and ring finger
1.5 sc in a MAGİC RİNG (5)
2-5. (4 rows) 5 sc (5)
Top off, cut the thread. On the last finger, do not cut the thread anymore
We will continue weaving the palm.
– two –
Right arm.
We continue weaving from the last finger with the complete thread.
Knit the hand with a needle of № 1.5.
1. 2 sc in the middle finger, 5 sc in the index,
3 sc on the middle finger, 3 sc on the ring, 5
sc in the pinky, 2 sc in the ring (20)
2-3. (2 rows) 20 sc (20)
4. 3 sc, 2 sc joining the thumb and palm (in the thumb count
two pts from the last woven pto), 15 sc (20)
5. 2 sc, dec (take the front strand of the thumb and the
palm, join them decreasing), 2 sc on the thumb, 4 sc, dec, 3
sc, dec, 4 sc (18)
6. 4 sc, dec, 7 sc, dec, 3 sc (16)
7. 1 sc, dec, (2 sc, dec) * 3, 1 sc (12)
Change to the needle of № 1.75
8-10. (3 rows) 12 sc (12)
11. 9 sc, inc, 2 sc (13)
12-13 (2 rows) 13 sc (13)
14. 9 sc, inc, 3 sc (14)
15-16. (2 rows) 14 sc (14)
17. 9 sc, inc, 4 sc (15)
Take the wire 25-30 cm long, bend the end along the length of the palm, cover it
With tape as in the picture. Insert the wire and fill the palm.
– 3 –
18-22. (5 rows) 15 sc (15)
23. 1 sc, dec, 6 sc, inc * 2, 2 sc, dec (15)
24. 15 sc (15)
25. 1 sc, inc, 6 sc, dec * 2, 2 sc, inc (15)
26. 15 sc (15)
27. 10 sc, inc, 4 sc (16)
Change from white thread to flesh color thread. Do not cut the white thread, leave it to the front.
28. knit by back strands 16 sc (16)
Go back to the white thread and we knit the upper part of the glove
the front strands of round 28: ch, eg at each point around.
Top off, cut the thread and hide it.
29. 11 sc, inc, 4 sc (17)
30. 17 sc (17)
31. 11 sc, inc, 5 sc (18)
32-37. (6 rows) 18 sc (18)
38. 15 sc. The last 3 pts are not woven.
Top off, cut the thread. Fill the arm to the end.
Left arm.
We continue knitting on the ring finger with the complete thread.
Knit the palm with a needle of № 1.5.
1. 2 sc in the ring, 5 sc in the pinky, 3 sc in the ring, 3 sc in the middle finger, 5 sc in the index, 2 sc in
the middle finger (20)
2-3. (2 rows) 20 sc (20)
4. 15 sc, 2 sc joining the thumb and palm (count 2 pts from the end of the round), 3 sc (20)
5. 4 sc, dec, 3 sc, dec, 4 sc, 2 sc in the thumb, dec (take the front strand of the thumb and the strand
front of the palm and join them to make the decrease), 2 sc (18)
6. 3 sc, dec, 7 sc, dec, 4 sc (16)
7. 1 sc, dec, (2 sc, dec) * 3, 1 sc (12)
Change to the needle of № 1.75
8-10. (3 rows) 12 sc (12)
11. 2 sc, inc, 9 sc (13)
12-13 (2 rows) 13 sc (13)
14. 3 sc, inc, 9 sc (14)
15-16. (2 rows) 14 sc (14)
17. 4 sc, inc, 9 sc (15)
Take the wire 25-30 cm long, bend the end along the length of the palm, cover it
With tape as in the picture. Insert the wire and fill the palm.
18-22. (5 rows) 15 sc (15)
23. dec, 2 sc, inc * 2, 6 sc, dec, 1 sc (15)
24. 15 sc (15)
25. inc, 2 sc, dec * 2, 6 sc, inc, 1 sc (15)
26. 15 sc (15)
27. 4 sc, inc, 10 sc (16)
Change from white thread to flesh color thread. Do not cut the white thread, leave it to the front.
28. knit by back strands 16 sc (16)
Go back to the white thread and we knit the upper part of the glove through the front strands of round 28: ch, sl-st
in each point around. Top off, cut the thread and hide it.
29. 4 sc, inc, 11 sc (17)
30. 17 sc (17)
31. 5 sc, inc, 11 sc (18)
32-37. (6 rows) 18 sc (18)
38. 15 sc. Do not knit the last 3 pts.
Top off, cut the thread. Fill the arm to the end.
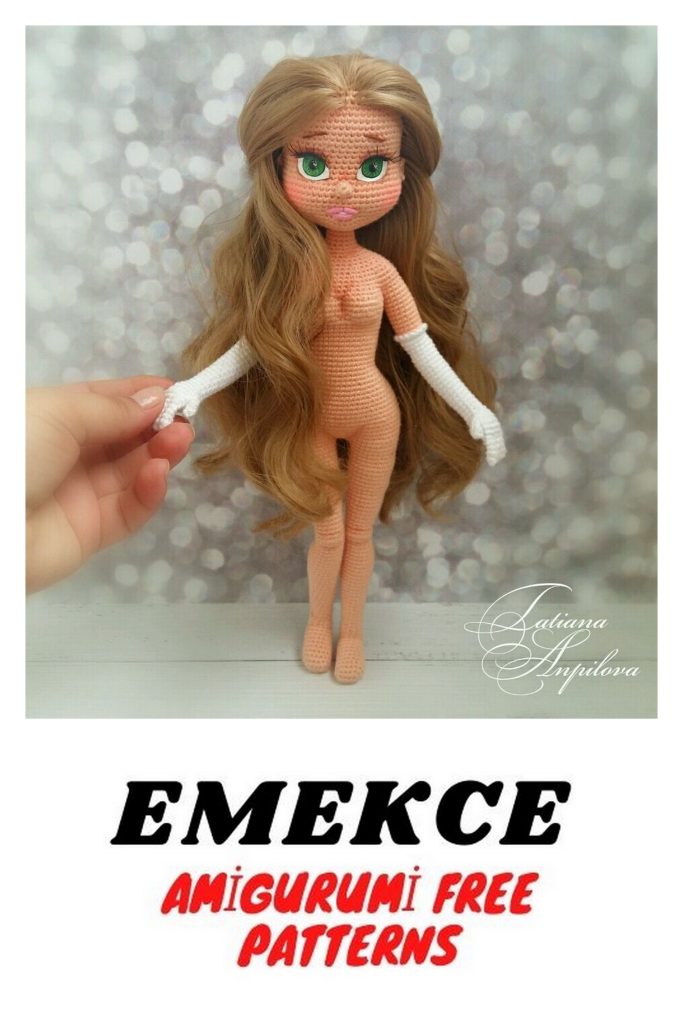
Legs.
The marker will go through the inner center of the leg.
Right leg.
We begin to knit the foot:
1. knit 5 ch, start in the 2nd ch: inc, 2 sc, 4 sc in the last one,
on the other hand, 2 sc, inc (12)
2. 5 sc, inc * 2, 5 sc (14)
3. 6 sc, inc * 2, 6 sc (16)
4-10. (7 rows) 16 sc (16)
11. 1 sc, 6 ch, jump 6 pts, 9 sc (16)
Knit heel:
1. 1 sc, 6 sc on the ch, 9 sc (16)
2. 1 sc, dec, (2 sc, dec) * 3, 1 sc (12)
3. dec * 6 (6)
Top off, cut the thread.
Attach the thread to the pto next to the marker and continue weaving the leg.
1. 6 sc per front strands, 6 sc over the ch (12)
2-4. (3 rows) 12 sc (12)
5. 9 sc, inc, 2 sc (13)
6. 13 sc (13)
7. 9 sc, inc, 3 sc (14)
8. 14 sc (14)
9. 10 sc, inc, 3 sc (15)
10. 15 sc (15)
Take a piece of wire about 40-45 cm long, bend a foot-shaped end and cover it with
Tape as seen in the picture. Insert the wire into the leg and fill.
11. 11 sc, inc, 3 sc (16)
12. 16 sc (16)
13. 11 sc, inc, 4 sc (17)
14. 17 sc (17)
15. 11 sc, inc, 1 sc, inc, 3 sc (19)
16-17. (2 rows) 19 sc (19)
18. 11 sc, inc, 3 sc, inc, 3 sc (21)
19-23. (5 rows) 21 sc (21)
24. 11 sc, dec, 3 sc, dec, 3 sc (19)
25. 19 sc (19)
26. 11 sc, dec, 1 sc, dec, 3 sc (17)
27. 12 sc, dec, 3 sc (16)
28. 11 sc, dec, 3 sc (15)
29. 3 sc, inc * 3, 9 sc (18)
30. 18 sc (18)
31. 3 sc, dec, 2 sc, dec, 9 sc (16)
32. 16 sc (16)
33. 8 sc, inc, 4 sc, inc, 2 sc (18)
34. 18 sc (18)
35. 11 sc, inc, 4 sc, inc, 1 sc (20)
36. 20 sc (20)
37. 14 sc, inc, 5 sc (21)
38. 21 sc (21)
39. 14 sc, inc, 6 sc (22)
40. 22 sc (22)
41. 11 sc, inc, 7 sc, inc, 2 sc (24)
42. 24 sc (24)
43. 17 sc, inc, 6 sc (25)
44. 25 sc (25)
45. 12 sc, inc, 12 sc (26)
46-51. (6 rows) 26 sc (26)
Top off, cut the thread. Fill the leg until the end.
Left leg.
Start weaving the foot:
1. knit 5 ch, start in the 2nd ch: inc, 2 sc, 4 sc in the last ch, on the other hand, 2 sc, inc (12)
2. 5 sc, inc * 2, 5 sc (14)
3. 6 sc, inc * 2, 6 sc (16)
4-10. (7 rows) 16 sc (16)
11. 9 sc, 6 ch, jump 6 pts, 1 sc (16)
Knit heel:
1. 9 sc, 6 sc on the ch, 1 sc (16)
2. 1 sc, dec, (2 sc, dec) * 3, 1 sc (12)
3. dec * 6 (6)
Top off, cut the thread.
Attach the thread to the ch that is next to the marker and knit the leg.
1. 6 sc on the ch, 6 sc for front strands (12)
2-4. (3 rows) 12 sc (12)
5. 3 sc, inc, 8 sc (13)
6. 13 sc (13)
7. 4 sc, inc, 8 sc (14)
8. 14 sc (14)
9. 4 sc, inc, 9 sc (15)
10. 15 sc (15)
Take a piece of wire about 40-45 cm long, bend a foot-shaped end and cover it with
Tape as seen in the picture. Insert the wire into the leg and fill.
11. 4 sc, inc, 10 sc (16)
12. 16 sc (16)
13. 5 sc, inc, 10 sc (17)
14. 17 sc (17)
15. 4 sc, inc, 1 sc, inc, 10 sc (19)
16-17. (2 rows) 19 sc (19)
18. 4 sc, inc, 3 sc, inc, 10 sc (21)
19-23. (5 rows) 21 sc (21)
24. 4 sc, dec, 3 sc, dec, 10 sc (19)
25. 19 sc (19)
26. 4 sc, dec, 1 sc, dec, 10 sc (17)
27. 4 sc, dec, 11 sc (16)
28. 4 sc, dec, 10 sc (15)
29. 10 sc, inc * 3, 2 sc (18)
30. 18 sc (18)
31. 10 sc, dec, 2 sc, dec, 2 sc (16)
32. 16 sc (16)
33. 3 sc, inc, 4 sc, inc, 7 sc (18)
34. 18 sc (18)
35. 2 sc, inc, 4 sc, inc, 10 sc (20)
36. 20 sc (20)
37. 6 sc, inc, 13 sc (21)
38. 21 sc (21)
39. 7 sc, inc, 13 sc (22)
40. 22 sc (22)
41. 3 sc, inc, 7 sc, inc, 10 sc (24)
42. 24 sc (24)
43. 7 sc, inc, 16 sc (25)
44. 25 sc (25)
45. 12 sc, inc, 12 sc (26)
46-51. (6 rows) 26 sc (26)
52. (1 sc, inc) * 4, 18 sc (30)
Do not cut the thread. Fill the leg until the end.
We continue weaving joining the legs and weaving the
Body.
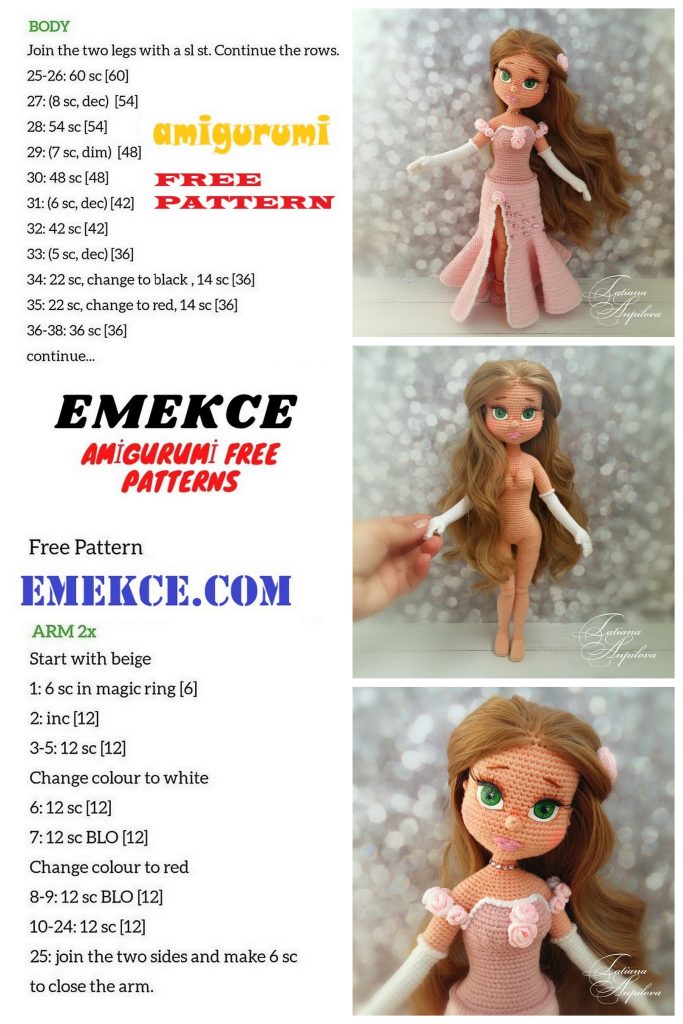
Body.
Join the legs together: 2 ch, 18 sc, (inc, 1 sc) * 4, 1 sc on the ch.
Put the marker, which will go through the center of the back.
You can put a marker through the center of the belly as well.
1. 1 sc on the ch, 1 sc, (inc, 2 sc) * 3, inc, 40 sc, (inc, 2 sc) * 4 (72)
Join the wire of both legs and cover it with tape.
13. 54 sc, jump 2 pts (54)
2-9. (8 rows) 72 sc (72)
Attention! Knit an extra low, if you have not already done so, and
we will continue weaving the next 5 rows without moving the
marker.
10. (2 sc, dec) * 4, 40 sc, (dec, 2 sc) * 4 (64)
11. 64 sc (64)
12. 2 sc, dec, (1 sc, dec) * 3, 38 sc, (dec, 1 sc) * 3, dec, 2
sc (56)
14. jump 2 pts, 12 sc, dec, 24 sc, dec, 12 sc (50)
Sew the pts we jumped with a sewing needle and thread.
15. (3 sc, dec) * 2, 30 sc, (dec, 3 sc) * 2 (46)
16. 11 sc, dec, 20 sc, dec, 11 sc (44)
17. 1 sc, dec, 2 sc, dec, 30 sc, dec, 2 sc, dec, 1 sc (40)
18. 9 sc, dec, 18 sc, dec, 9 sc (38)
19. 2 sc, dec, 30 sc, dec, 2 sc (36)
20. 36 sc (36)
Fill firmly.
21. 4 sc, inc, 26 sc, inc, 4 sc (38)
22. 38 sc (38)
23. 7 sc, inc, 22 sc, inc, 7 sc (40)
24. 40 sc (40)
25. 5 sc, inc, 28 sc, inc, 5 sc (42)
26. 42 sc (42)
27. 8 sc, inc, 24 sc, inc, 8 sc (44)
28. 44 sc (44)
29. 5 sc, inc, 10 sc, (inc, 1 sc) * 2, inc, 2 sc,
inc, (1 sc, inc) * 2, 10 sc, inc, 5 sc (52)
30. 18 sc, (inc, 2 sc) * 2, inc, 2 sl-st, inc, (2 sc, inc) *
2, 18 sc (58)
31-33. (3 rows) 58 sc (58)
34. 8 sc, 6 sc joining the body and the left arm (count in the arm 6 points from the last point), 4 sc,
(dec, 2 sc) * 2, dec, 2 sl-st, dec, (2 sc, dec) * 2, 4 sc, 6 sc joining the body and right arm (count in
the arm 6 points from the last point), 8 sc (52)
35. 8 sc, 12 sc in the left arm, 24 sc, 12 sc in the right arm, 8 sc (64)
Join the wire of the arms with that of the body and cover with tape.
36. 23 sc, (dec, 1 sc) * 2, dec, 2 sc, dec, (1 sc, dec) * 2, 23 sc (58)
37-38. (2 rows) 58 sc (58)
Fill the body shaping the breasts, you can place a needle between the breasts and fill the body
evenly.
39. 7 sc, dec, 1 sc, dec, 4 sc, dec, 1 sc, dec, (4 sc, dec) * 3, 1 sc, dec, 4 sc, dec, 1 sc, dec, 7 sc (48 )
40. 48 sc (48)
41. 6 sc, dec, 1 sc, dec, 2 sc, dec, 1 sc, dec, 2 sc, dec, 4 sc, dec, 2 sc, dec, 1 sc, dec, 2 sc, dec,
1 sc, dec, 6 sc (38)
42. 38 sc, (38)
43. 5 sc, dec, 1 sc, dec * 2, 1 sc, dec, 8 sc, dec, 1 sc, dec * 2, 1 sc, dec, 5 sc (30)
44. (3 sc, dec) * 6 (24)
45. 1 sc, dec, (2 sc, dec) * 5, 1 sc (18)
46. 2 sc, dec, (4 sc, dec) * 2, 2 sc (15)
Fill to the end.
47-49. (3 rows) 15 sc (15)
Top off, cut the thread, leave a long thread to sew the head.
Head.
The marker will go through the back center of the head.
1. 6 sc in a MAGİC RİNG (6)
2. inc * 6 (12)
3. (inc, 1 sc) * 6 (18)
4. 1 sc, inc, (2 sc, inc) * 5, 1 sc (24)
5. (3 sc, inc) * 6 (30)
6. 2 sc, inc, (4 sc, inc) * 5, 2 sc (36)
7. (5 sc, inc) * 6 (42)
8. 3 sc, inc, (6 sc, inc) * 5, 3 sc (48)
9. (7 sc, inc) * 6 (54)
10. 4 sc, inc, (8 sc, inc) * 5, 4 sc (60)
– fifteen –
For convenience, you can place an additional marker in the center of the forehead, counting 30
pts on each side.
11-17. (7 rows) 60 sc (60)
18. 20 sc, (dec, 4 sc) * 3, dec, 20 sc (56)
19-23. (5 rows) 56 sc (56)
24. 16 sc, (inc, 2 sc) * 3, inc, 4 sc, inc, (2 sc, inc) * 3, 16 sc (64)
25-27. (3 rows) 64 sc (64)
28. 9 sc, dec, 8 sc, dec, 22 sc, dec, 8 sc, dec, 9 sc (60)
29. 60 sc (60)
Leave the tissue aside, we will place the hair.
For this, we will mark the hairline with a thread.
We hold the hair until the 10th round inclusive (that is, we hold the
straight hair). From the center of the forehead, we count 11 points
on each side, in the back we have 8 pts from the scoreboard
between rows 28 and 29.
Hold the hair as follows: enter 2 at the top
tufts on each pto and on each round. Upon reaching the back of the
head, hold the spiral hair alternating 1-2 pts on each round. In the
Hair birth can be put on each pto.
Continue weaving the head.
30. 13 sc, (dec, 6 sc) * 2, inc * 2, (6 sc, dec) * 2, 13 sc (58)
31. (4 sc, dec) * 3, 22 sc, (dec, 4 sc) * 3 (52)
32. 6 sc, dec, 9 sc, dec, 14 sc, dec, 9 sc, dec, 6 sc (48)
33. 4 sc, dec, (5 sc, dec) * 2, 8 sc, (dec, 5 sc) * 2, dec, 4 sc (42)
34. 6 sc, (dec, 4 sc) * 2, dec, 2 sc, dec, (4 sc, dec) * 2, 6 sc (36)
35. 2 sc, dec, (4 sc, dec) * 5, 2 sc (30)
Fill the head.
36. (3 sc, dec) * 6 (24)
37. 1 sc, dec, (2 sc, dec) * 5, 1 sc (18)
38. 2 sc, dec, (4 sc, dec) * 2, 2 sc (15)
Top off, cut the thread. Fill the head to the end, do not fill very tightly, the bottom
It should be in the form of a triangle, see the image.
You can shape the hair with a hair dryer.
Nose.
We need 4 strands of thread instead of the 5 that
has, needle of № 1.5.
1. 6 sc in a MAGİC RİNG (6)
2. 6 sc (6)
Top off, cut the thread. Leave a long strand to
sew to the head.
Ears.
We need 4 threads instead of the 5 that has the thread, needle of № 1.5.
Left ear:
1. in a MAGİC RİNG: 1 sc, 4 hdc, 1 sc (6)
2. ch, turn, (1 sc, 1 hdc) * in 1 pto, 3 sc, inc, 1 sc (8)
Top off, cut the thread, leave a long thread to sew.
Right ear:
1. in a MAGİC RİNG: 1 sc, 4 hdc, 1 sc (6)
2. ch, turn, 1 sc, inc, 3 sc, (1 hdc, 1 sc) * in 1
pto (8)
Top off, cut the thread, leave a long strand to
sew.
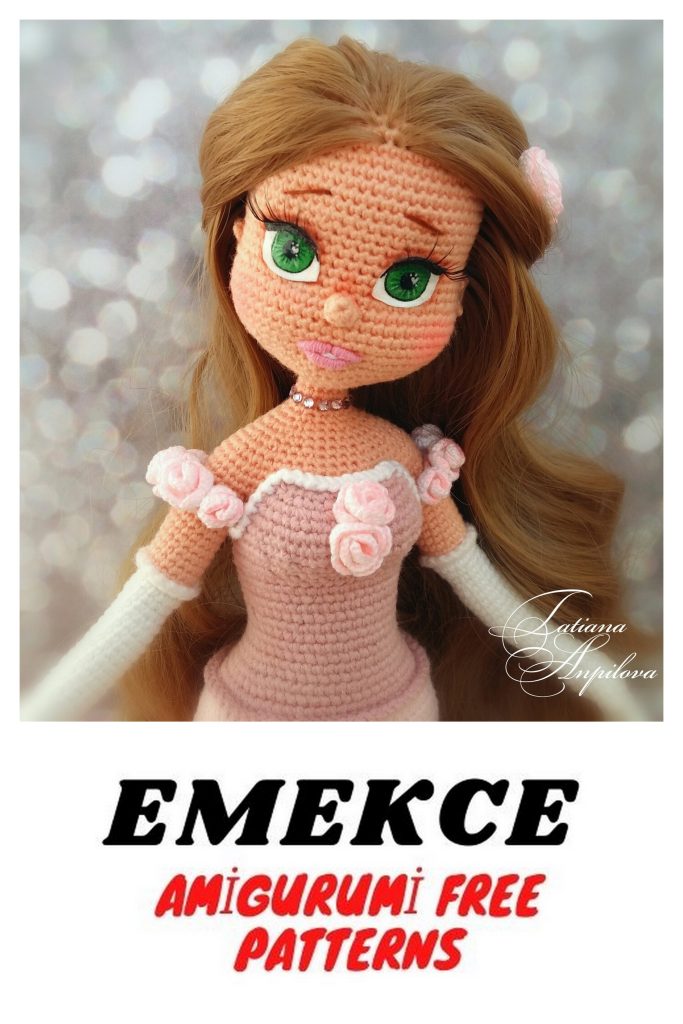
Eyes.
To draw the eyes we need: a small piece of canvas
cotton white, a pencil, acrylic paint in green, white and
black, brushes № 000 and № 00000, paper napkins, varnish
matte and shiny
First, transfer the eye pattern to the fabric. The eyes should not
be larger than 5.5 rows tall, that is, 5 straight rows
(between rows 19-23 of the head), on round 24 of increases, and
I got a size 13 mm high and 20 mm wide.
Don’t forget to wash the brush and dry it with a napkin every time you change color so you don’t have
excess of water.
We paint the eyes with white paint. To give depth to the eyes, add some paint
black on the tip of the brush to white paint, to achieve a light gray tone. We apply the color
that we obtained to the eyeball, under the eyelid, to give it depth.
To paint the iris, we need several shades of green.
With green, outline the iris as in the image.
Add some green paint to the white paint, to get a light green, and paint the contour
inside of the iris Add a drop of black paint to light green to darken a shade and apply
under the upper eyelid, thus giving some depth.
Add a little more green to white paint, so that the color becomes a little darker
Than the color of the iris. Apply the resulting color with a fine brush strokes, such as rays, on the
pupil direction at the edge of the iris, without reaching the edge of the contour. I could also apply a
little color under the upper eyelid, as if mixed.
Paint the pupil and upper eyelid with black paint.
With white paint, make the eye shine, pay attention that the shine should be the same in
Both eyes. Add rays with white paint on the iris.
Let the eye paint dry. To better fix the paint on the fabric, dry with a dryer or with a
griddle.
Apply two coats of varnish to them allowing it to dry between coats. To revitalize the eyes, apply
Bright varnish only in the eyeball, if the varnish is very dense, it can give volume only a few drops. Leave
dry for 24 hours. Trim your eyes carefully.
Folds.
We mark the fold points as pins
It shows in the photo. The points of the eyes meet
between rows 23 and 24, at a distance of 4 pts. Points
of the mouth are between rows 29 and 30, in parallel
to the points of the eyes with a distance of 6 rows towards
down.
To make the folds use fine thread, Pehorka
“Draft.”
Eye folds Insert the needle with the thread from the
head opening and take it out through the inner corner of the
eye, holding the end of the thread, we jump a point towards
on the side, we insert the needle at the outer point of the eye and the
we pull back through the opening of the head, pull the thread.
Repeat 1-2 times. For the right eye we do the same
shape. Top off, cut the thread.
Embroider mouth With an additional pin, we mark a row
above the center of the mouth. We embroider lips
Rococo, with silk thread, without separating the thread.
Insert the needle through the opening of the head and pull it out through the right corner of the mouth, insert the needle
by the central point and take it out again by the right point, winding the thread 10 times, grabbing the thread,
insert the needle through the central point and take it out through the opening of the head. Similarly, do the side
left of the lips. If necessary, distribute the thread with the needle.
For the lower lip, wind the thread 16 times. Attention: the distance between the upper and lower lip is
lower in the corners.
Embroider teeth with white thread.
Make folds of the mouth. Attention: it is not necessary to make the folds, do not pull the thread too much, just
We want to form small dimples in the cheeks.
To do this, insert the needle into the opening of the head and pull it out of the outer point of the right eye
pulling the thread, jump one point to the side, insert the needle and pull it out in the right corner of the mouth. Us
we withdraw a little towards the inner side of the mouth, insert the needle and take it out again by the point
external eye, we insert it and take it out again through the opening of the head. In the same way, do
The left side of the mouth. Top and hide the threads inside the head. If necessary, add a
little more stuffing to the chin.
Sew the ears and nose as shown in the photo.
Glue the eyes (pay attention to the photo, in what position they are glued), embroider the eyebrows, use three strands
Of thread. Bend the ends of the body wire at head level and cover with tape. Insert the
head and sew.
Paste the tabs from the corner of the eyeball
to the outer corner of the iris. If desired, color with
dry makeup or cake waxes, knees, cleavage
and the crotch. Be careful not to overdo it with the
makeup and spoil the wrist.
Braga
Knit the panties with “IRIS” Vita cotton thread, needle of № 1.25
Rear.
1. knit 4 ch, start in 2nd ch, inc, 1 sc, inc (5)
2. ch, turn, inc, 3 sc, inc (7)
3. ch, turn, 7 sc (7)
4. ch, turn, inc, 5 sc, inc (9)
5. ch, turn, inc, 7 sc, inc (11)
6. ch, turn, 11 sc (11)
7. ch, turn, inc, 9 sc, inc (13)
8. ch, turn, inc, 11 sc, inc (15)
9. ch, turn, 15 sc (15)
10. ch, turn, inc, 13 sc, inc (17)
11. ch, turn, inc, 15 sc, inc (19)
12. ch, turn, 19 sc (19)
13. ch, turn, inc, 17 sc, inc (21)
14. ch, turn, inc, 19 sc, inc (23)
15. ch, turn, 23 sc (23)
16. ch, turn, inc, 21 sc, inc (25)
17. ch, turn, inc, 23 sc, inc (27)
18. ch, turn, 27 sc (27)
19. ch, turn, inc, 25 sc, inc (29)
20. ch, turn, inc, 27 sc, inc (31)
Top off, cut the thread.
Front of.
Join the thread with 1 ch, continue weaving the part
lead.
1. ch, 3 sc (3)
2-4. (3 rows) ch, turn, 3 sc (3)
5. ch, turn, inc, 1 sc, inc (5)
6. ch, turn, 5 sc (5)
7. ch, turn, inc, 3 sc, inc (7)
8. ch, turn, 7 sc (7)
9. ch, turn, inc, 5 sc, inc (9)
10. ch, turn, 9 sc (9)
11. ch, turn, inc, 7 sc, inc (11)
12. ch, turn, 11 sc (11)
13. ch, turn, inc, 9 sc, inc (13)
14. ch, turn, inc, 11 sc, inc (15)
15. ch, turn, 15 sc (15)
16. ch, turn, inc, 13 sc, inc (17)
17. ch, turn, inc, 15 sc, inc (19)
18. ch, turn, 19 sc (19)
19. ch, turn, inc, 17 sc, inc (21)
Do not cut the thread, continue weaving.
20. join both halves: 15 ch, 31 sc in the back,
15 ch, eg in the first pto of the front.
21. ch, 21 sc in the front, 15 sc over the ch, 31 sc, 15 sc over the ch, sl-st (82)
22. ch, 82 sc (knit together with the rubber), eg (82)
Top off, cut the thread, hide it.
You can decorate the panties to your liking, put a bow, sew a flower, sew some beads, let your
imagination.
Shoe.
Knit with dry pink color.
Do not correct the marker.
1. knit 11 ch, start in the 2nd ch: 9 sc, on the last 4 sc, on the other hand, 8 sc, inc (23)
2. inc, 3 sc, 4 hdc, 1 dc, inc-dc * 4, 1 dc, 4 hdc, 3 sc, inc * 2 (30)
3. 1 sc, inc, 9 sc, (inc, 1 sc) * 3, inc, 9 sc, inc, 1 sc, inc (37)
4. knit by back strands: 9 sc, 17 hdc, 11 sc (37)
Lay aside. Remove the thread from the center of the skein, put the sole towards us and we weave the strands
front of round 4: ch, sl-st. Top off, cut the thread.
Continue knitting.
5. 10 sc, 15 hdc, 12 sc (37)
6. 10 sc, dec, 2 hdc, dec-hdc, 1 hdc, dec-db-hdc, 1 hdc, dec-hdc, 2 hdc, dec, 10 sc (31)
7. 2 sc, dec, 2 sc, 9 ch, skip 19, 2 sc, dec, 2 sc, sl-st.
8. auction: ch, sl-st
Top off, cut the thread and hide it. Decorate your shoes with rhinestones.
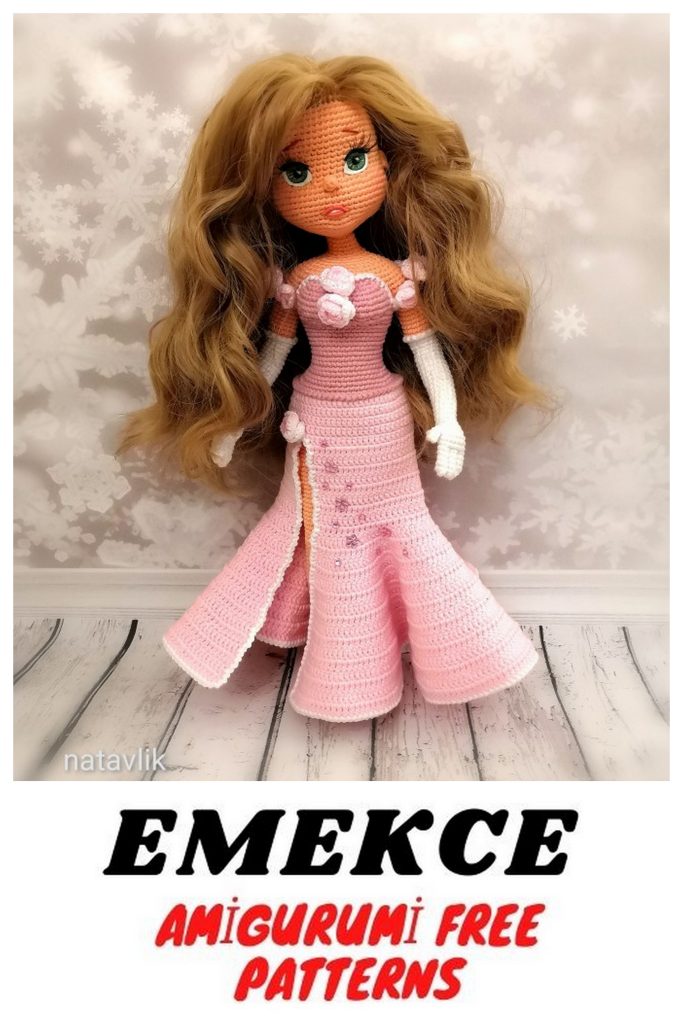
Dress.
We start knitting with dry pink thread.
Sleeves (2 pieces)
Knit 18 ch, start in the 2nd ch: 2 sl-st, 2 sc, 1 hdc, 7 dc,
1 hdc, 2 sc, 2 sl-st Top off, cut the thread
Bodice.
Work the rows upside down on the right. Note that the corset points should not be one
on top of the other, if you have one on top of the other, take a smaller needle.
1. knit 13 ch, start in the 2nd ch: (1 sc, inc)
* 2, 4 sc, (inc, 1 sc) * 2 (16)
2. ch, turn, 16 sc (16)
3. ch, turn, (1 sc, inc) * 3, 4 sc, (inc, 1 sc) * 3 (22)
4. ch, turn, 22 sc (22)
5. ch, turn, (2 sc, inc) * 3, 4 sc, (inc, 2 sc) * 3 (28)
Top off, cut the thread.
6. knit 8 ch, 1 sl-st on the corner of the sleeve, 5 ch, 1 sl-st on the other side of the sleeve, 1 ch, 28 sc
at the top front, 1 ch, 1 sl-st at the end of the other sleeve, 5 ch, 1 sl-st at the other
sleeve end, 8 ch (60)
In the next round we knit sc on the chains and sl-st of the sleeves.
7. ch, turn, 16 sc on the ch, 28 sc, 16 sc on the ch (60)
8. ch, turn, 18 sc, (dec, 2 sc) * 2, dec, 4 sc, dec, (2 sc, dec) * 2, 18 sc (54)
9. ch, turn, 54 sc (54)
10. ch, turn, 6 sc, dec, 9 sc, (dec, 1 sc) * 2, dec, 4 sc, dec, (1 sc, dec) * 2, 9 sc, dec, 6 sc (46)
11. ch, turn, 46 sc (46)
12. ch, turn, 10 sc, dec, 22 sc, dec, 10 sc (44)
13. ch, turn, 44 sc (44)
14. ch, turn, 6 sc, dec, 28 sc, dec, 6 sc (42)
15. ch, turn, 42 sc (42)
16. ch, turn, 9 sc, dec, 20 sc, dec, 9 sc (40)
17. ch, turn, 40 sc (40)
18. ch, turn, 5 sc, inc, 28 sc, inc, 5 sc (42)
19. ch, turn, 42 sc (42)
20. ch, turn, 3 sc, inc, 6 sc, inc, 20 sc, inc, 6 sc, inc, 3 sc (46)
21. ch, turn, 46 sc (46)
22. ch, turn, 4 sc, inc, 8 sc, inc, 18 sc, inc, 8 sc, inc, 4 sc (50)
23. ch, turn, 50 sc (50)
24. ch, turn, 3 sc, inc, (5 sc, inc) * 2, 18 sc, (inc, 5 sc) * 2, inc, 3 sc (56)
25. ch, turn, 56 sc (56)
Attach the light pink thread, do not cut the pink thread.
26. knit by back strands: 2 ch, 2 dc, (inc-dc, 4 dc) * 3, aumpa, 20 dc, inc-dc, (4 dc, inc-dc) * 3, 2 dc (64)
Stop knitting. Return to the pink thread and knit in the bodice with needle
№ 1.75 down, on the left side: ch, sl-st. Attach the thread
white and knit with a needle of № 1.5 on the top of the bodice:
ch, eg, passing the pink thread between the pts. Upon reaching the edge,
we continue weaving the side with pink thread and needle of № 1.75: ch,
eg We cut the pink and white thread, finish off and hide them.
If you are going to use buttons instead of buttonholes, on one side weave sc and on the
other knitting: ch, sl-st; weaving ch strip on the other side where you go to
Sew the buttons.
For convenience, you can install the buttonholes now or wait for the dress to be ready.
We continue to weave the skirt. To make the skirt look better, cut the thread and attach it to the front.
27. 2 CH, 64 AD (64). Join the other side with sl-st.
28-29. (2 rows) 2 ch, 64 dc, sl-st (64)
Finish and cut the thread. Next we will weave in rows. Join the thread to the 27th point.
30. 2 ch, knit 20 dc, dec-dc, 30 dc, dec-dc, 8 dc (60) do not knit the last stitch.
31-33. (3 rows) 2 ch, turn, 60 dc (60)
34. 2 ch, turn, 20 dc, inc-dc, 30 dc, inc-dc, 8 dc (62)
35. 2 ch, turn, 62 dc (62)
36. 2 ch, turn, 20 dc, inc-dc, 32 dc, inc-dc, 8 dc (64)
37. 2 ch, turn, 64 dc (64)
38. 2 ch, turn, 22 dc, inc-dc, 30 dc, inc-dc, 10dc (66)
39. 2 ch, turn, 66 dc (66)
40. 2 ch, turn, 3 dc, (inc-dc, 1 dc) * 30, inc-dc, 2dc (97)
41. 2 ch, turn, 97 dc (97)
42. 2 ch, rotate, 3 dc, (inc-dc, 2 dc) * 30, inc-dc, 3dc (128)
43. 2 ch, turn, 128 dc (128)
44. 2 ch, turn, 2 dc, (inc-dc, 3 dc) * 30, inc-dc, 5dc (159)
45. 2 ch, turn, 159 AD (159)
46. 2 ch, turn, 4 dc, (inc-dc, 4 dc) * 30, inc-dc, 4dc (190)
47. 2 ch, turn, 190dc (190)
48. 2 ch, turn, 7 dc, (inc-dc, 5 dc) * 30, inc-dc, 2dc (221)
49. 2 ch, turn, 221dc (221)
50. 2 ch, turn, 5 dc, (inc-dc, 6 dc) * 30,
inc-dc, 5dc (252)
51. 2 ch, rotate, 252dc (252)
52. 2 ch, turn, 3 dc, (inc-dc, 7 dc) * 30,
inc-dc, 8 dc (283)
53. 2 ch, turn, 283dc (283)
54. 2 ch, turn, 6 dc, (inc-dc, 8 dc) * 30,
inc-dc, 6dc (314)
55. 2 ch, turn, 314dc (314)
Top off, cut the thread.
We attach the lanco thread in the center of the
skirt of the skirt and we knit with knitting with needle
of № 1.5.
For the skirt to keep the way you
you want, you can iron it with a little steam and
make folds where you want, to give the
way you need.
Rositas
We will weave the roses with “IRIS” Vita cotton, needle of № 1.
For decoration, we need several sizes of roses: small, medium and large.
For 5 petals (4 roses) – knit 11 ch
For 7 petals (4 roses) – knit 15 ch
For 9 petals (4 roses) – knit 19 ch
For 11 petals (1 pink) – knit 23 ch
1. knit ch number and start in the 3rd ch: (1 dc, 2 ch,
1 dc) * in 1 point, [skip 1 point, (1 dc, 2 ch, 1 dc) * in 1
pto] * until the end of the ch strip
2. 2 ch, turn, 5 dc * over 2 ch, (eg between dc of
the previous round, 5 dc * about 2 ch) * around, eg
Top off, cut the thread. Form the roses while we go
sewing with thread so that they do not fall apart. Color the
edge of the petals with pastel waxes.
Sew five roses on the sleeves as follows:
In the center a rose with 9 petals, then, on both sides a rose with 7 petals and on the ends a rose with 5 petals
petals
On the front of the bodice, sew two 9-petal roses and an 11-petal rose on the
skirt. Optionally, the skirt can be decorated with rhinestones.
For the hair, I knitted a larger rose and sewed it on a small hair clip, 2 cm long.
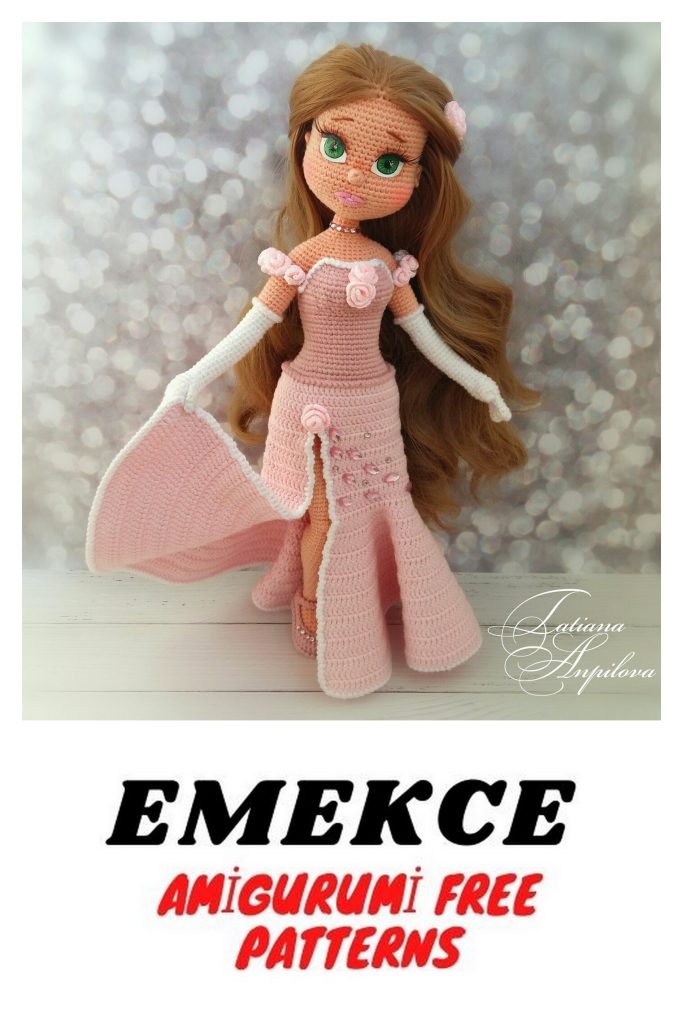
This is it, our tender Rosa is ready.
I hope you enjoyed knitting with me.
Until we meet again!