Amigurumi New Little Bunny Free Crochet Pattern
Welcome to our website where you can find the most beautiful and highest quality samples of Amigurumi patterns. All the amigurumi patterns you can’t find are available on our website. Every day we continue to share new amigurumi patterns for you. Stay tuned to reach these amigurumi patterns before anyone else
Abbreviations:
SC – single crochet
İNC – increase
DEC – decrease
CH – chain


Pens. Link 2 details.
1 row: 6 sc into magic ring
2 row: (1 inc, 2 sc) x 2 (8)
3 row: 8 sc
4 row: 1 dec, 6 sc (7)
5-9 rows: 7 sc
Put a little filler in the very
start pens.
10 row: 2 dec (5)
Trim the thread, tighten the hole incand
using a needle, pinch the thread inside
the details.
Legs. Link 2 details.
1 row: 6 sc into magic ring
2 row: (1 sc 1 inc) x 3 (9)
3-4 rows: 9 sc
5 row: 7 sc, 1 dec (8)
6 row: 8 sc
7 row: 4 hdc, 4 sl-st (8) (here formed heel)
8-13 rows: 8 sc
Tightly fill half of the leg to the fold,
the rest is only slightly.
14 row: 3 dec (5)
Trim the thread, tighten the hole inc and using the needle, snap the thread inside the part.
The ears. Link two details.
1 row: 6 sc into magic ring
2 row: 6 inc (12)
3-4 rows: 12 sc
5 row: (1 inc, 5 sc) x 2 (14)
6-9 rows: 14 sc
10 row: (1 dec, 5 sc) x 2 (12)
11-13 rows: 12 sc
14 row: (1 dec, 4 sc) x 2 (10)
15-16 rows: 10 sc
17 row: (1 dec, 3 sc) x 2 (8)
18-21 rows: 8 sc
Leave thread for incis
Tail
1 row: 6 sc into magic ring
2 row: 6 inc (12)
3 row: (1 sc, 1 inc) x 6 (18)
4-5 rows 18 sc
6 row: (1 sc, 1 dec) x 6 (12)
Leave the thread for embedding.
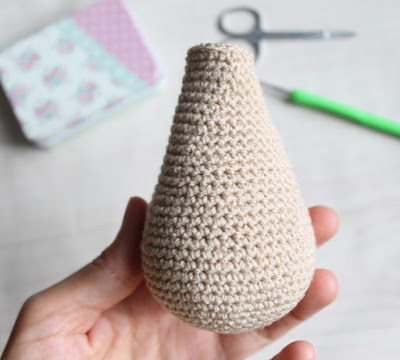
Body
1 row: dial 9 ch
2 row: starting from the second loop from the hook: 1 inc, 6 sc, 3
sc into the last loop, turn, then follow the second
side of the chain: 7 sc (18). Next, we knit in a spiral.
3 row: 18 sc
4 row: 2 inc, 6 sc, 3 inc, 6 sc, 1 inc (24)
5 row: (1 sc, 1 inc) x2, 6 sc, (1 sc, 1 inc) x3, 7 sc, 1 inc (thirty)
6 row: 30 sc
7 row: (2 sc, 1 inc) x2, 6 sc, (2 sc, 1 inc) x3, 8 sc, 1 inc (36)
8 row: 36 sc
9 row: (3 sc, 1 inc) x2, 6 sc, (3 sc, 1 inc) x3, 9 sc, 1 inc (42)
10 row: 42 sc
11 row: 4 sc, 1 inc, 20 sc, 1 inc, 16 sc (44)
12 row: 44 sc
13 row: 5 sc, 1 inc, 21 sc, 1 inc, 16 sc (46)
14 row: 46 sc
15 row: 6 sc 1 inc, 22 sc, 1 inc, 16 sc (48)
16 row: 48 sc (48)
17 row: 7 sc, 1 inc, 23 sc, 1 inc, 16 sc (50)
18 – 22 rows: 50 sc
23 row: 7 sc, 1 dec, 23 sc, 1 dec, 16 sc (48)
24-25 rows: 48 sc
26 row: 7 sc, 1 dec, 22 sc, 1 dec, 15 sc (46)
27 row: 46 sc
28 row: 2 sc, (1 dec, 3 sc) x3, 8 sc, (1 dec, 3 sc) x3, 6 sc (40)
29-30 rows: 40 sc
31 row: (3 sc, 1 dec) x8 (32)
32 row: (2 sc, 1 dec) x8 (24)
33 row: (1 sc, 1 dec) x8 (16)
Tightly fill the body.
34 row: 8 dec (8) Add filler if necessary.
35 row: 4 dec., Tighten the hole inc and using the needle, fasten the thread, snap it inside
the details.
When you incase the thread, with its help it is advisable to pull the bottom inside the carcass,
so that the surface on which the rabbit will sit, was flat
Assembly
Ears incis on the sides of the crown. Pens
between the 14th and 15th rows, not exactly on the sides, but closer to
to the puss. Legs on the sides flush
with ears inc is between 27-28 rows (see photo).
For fastening handles and legs, use thread
or button fastening, then they will be funny
move. İnc write the tail in the center back, it will
serve as additional support.
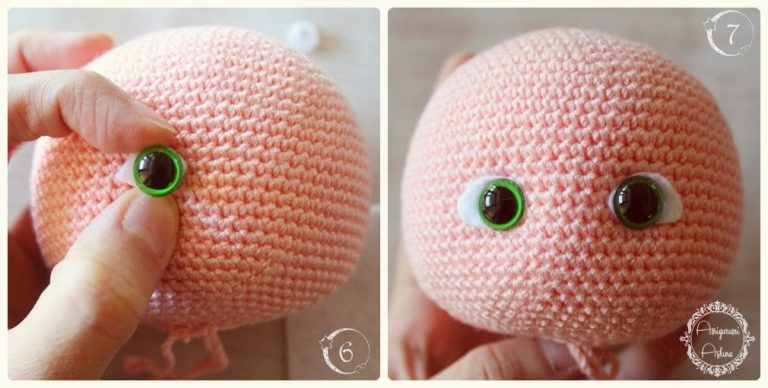
Embroider a nose between 11 and 12 rows (length about 3-4
loops). Eyes inc write at the same level, after 2
a column on the sides of the spout. If you knitted from
fluffy inc, make the rabbit comb inc and help
Velcro tapes. the bunny is ready!