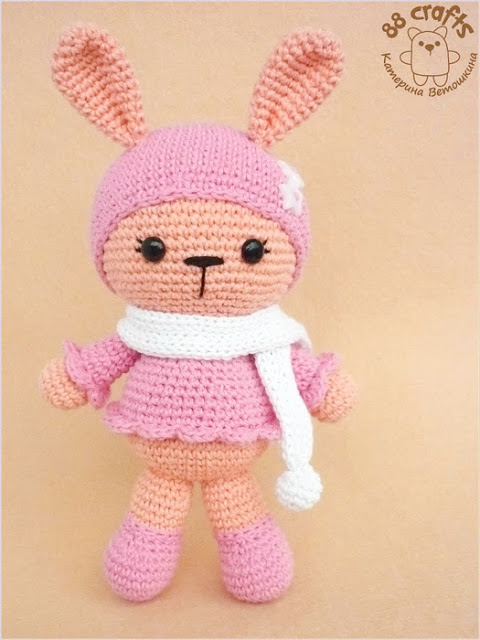
Amigurumi Pacifier Baby Free Crochet Pattern
Materials:
• any wool can be used, for the doll in the photos I have used: cotton (e.g.
Scheepjes Catona/Schachenmayr Catania – skin color, no. 263 or 255, some
white, black and e.g. blue, green or brown for the eyes, some yarn for the
pacifier), Scheepjes Eliza for body and hat
• Crochet hook in suitable size (with me: 2.0 mm for all)
• Stuffing
Abbreviations (US Terms):
MR = magic ring inc = increase
sc = single crochet dec = decrease
ch = chain BLO = back loop only
slst = slip stitch FLO = front loop only
st = stitch fpdc = front post double crochet
hdc = half double crochet bpdc = back post double crochet
dc = double crochet
(-) x = repeat inside of () for x nr of times


Crochet in continuous rounds (spirals), unless otherwise stated.
For help with invisible color changes, increases and decreases, please visit the
This doll is crocheted from bottom up in one piece. The face is formed by crocheting
and stuffing according to the shape of the fabric.

Hand/Arm (make 2):
Skin color
You will start with an oval (see the diagram).
1. ch 5, starting in 2nd chain from hook: sc 3, sc 3 in
last st, rotate 180 degrees and crochet along the
opposite side of the foundation chain: sc 2, sc 2 in
last st (10)
2. inc, sc 2, inc x3, sc 2, inc x2 (16)
3. (sc 7, inc) x2 (18)
4.-5. (2 Rounds) sc in each st around (18)
6. (sc 1, dec) x6 (12)
Color change to clothing color
7.-19. (13 Rounds) sc in each st around (12)
Fasten off, weave in loose ends.
Stuff and shape the hand, do not stuff the arm.
Mouth:
Pink or red
The ” nice ” side is inside this time, so this time crochet along the inside or turn it
around later.
1. sc 6 in MR (6)
2. inc x6 (12)
3.-6. (4 Rounds) sc in each st around (12)
Fasten off, weave in loose ends.
Leg (make 2):
Clothing color
1. sc 6 in MR (6)
2. inc x6 (12)
3. (sc 1, inc) x6 (18)
4.-12. (9 Rounds) sc in each st around (18)
Fasten off the first leg, weave in loose ends. Do not fasten off the second leg.
Insert hook through a
stitch on the first leg from
the inside to the outside
and pull the loop from the
second leg through, from
here begins the:
First published: 9. Mai 2019
Body:
IMPORTANT: From here on, keep the round marker straight in the middle of the back,
i.e. move the beginning of the round one stitch to the left or right as needed.
13. sc 18 along the first crocheted leg, sc 18 along the second leg (36) – place your
round marker here
14. sc in each st around (36)
15. (inc, sc 17) x2 (38)
16. sc in each st around (38)
17. inc, sc 18, inc, sc 18 (40)
18.-20. (3 Rounds) sc in each st around (40)
Stuff and shape the legs.
21. sc 13, dec, (sc 2, dec) x3, sc 13 (36)
22.-24. (3 Rounds) sc in each st around (36)
25. (sc 4, dec) x6 (30)
26. sc in each st around (30)
27. (sc 3, dec) x6 (24)
28. sc 3, insert hook from inside to outside through a stitch on the arm and through
the next stitch on the body: sc 6 through both layers (arm and body), sc 6,
attach the second arm like the first arm with sc 6, sc 3 (24)
29. sc 3, sc 6 using the free stitches along the arm, sc 6, sc 6 using the free
stitches along the arm, sc 3 (24)
30. (sc 2, dec) x6 (18)
31. ch 1 (loose) in each st around (18)
Stuff and shape the body, don’t fasten off, don’t close, it goes on with the:
Head:
Color change to skin color
Keep the round marker straight, it runs along the back of the head in the middle.
32. BLO: (sc 2, inc) x6 (24)
33. (sc 3, inc) x6 (30)
34. (sc 4, inc) x6 (36)
35. (sc 5, inc) x6 (42)
36. (sc 6, inc) x6 (48)
37. (sc 7, inc) x6 (54)
38.-39. (2 Rounds) sc in each st around (54)
40. sc 24, insert hook through the next stitch and through
a stitch of the mouth (see photo), sc 6fM through both
layers, sc 24 (54)
41. sc 24, sc 6 using the free stitches on the mouth, sc 24 (54)
42. sc 24, BLO: sc 6, again through both loops: sc 24 (54)
43. sc in each st around (54)
44. sc 27, hdc 7 in next st, sc 26 (60)
45. sc 24, dec x6, sc 24 (54)
46. sc 18, dec x3, sc 6, dec x3, sc 18 (48)
47.-51. (5 Rounds) sc in each st around (48)
Stuff and shape the head, Take care of mouth, nose and eye area. I put a crochet
hook or a pencil into the mouth during stuffing, which makes it much easier..
48. (sc 6, dec) x6 (42)
49. (sc 5, dec) x6 (36)
50. (sc 4, dec) x6 (30)
51. (sc 3, dec) x6 (24)
52. (sc 2, dec) x6 (18)
53. (sc 1, dec) x6 (12)
Finish stuffing.
54. dec x6 (6)
Fasten off, close, weave in loose ends.
Eye (make 2):
The eyes will be most beautiful in joined rounds, Crochet in joined rounds (join each
round with a slst and chain 1), but continuous rounds as well.
If the eyes should be crocheted with thicker or thinner yarn than the rest of the doll,
they must be adapted if necessary.
Iris:
Color of choice (e. g. blue, green or brown)
1. sc 6 in MR (6)
Color change to white
2.a) inc x3
Color change to black
2.b) inc x3 (12)
Fasten off, leave a long tail for sewing.
Pupil:
Black
1. sc 6 in MR (6)
Fasten off, leave a long tail for sewing.
Knot most of the threads well at the back, leave a longer black and white one for
sewing on and for the highlights.
Place the pupil in the eye and sew on all around.
Embroider one or two highlights with white.
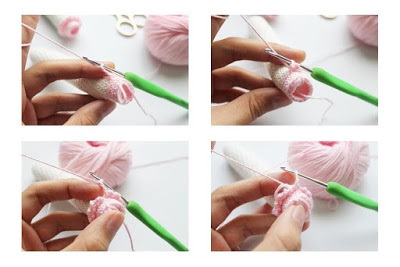
Pacifier (Part 1):
Color of choice
1. sc 6 in MR (6)
2.-4. (3 Rounds) sc in each st around (6)
Color change to second color if desired.
5. FLO: inc x6 (12)
Fasten off, weave in loose ends.
Pacifier (Part 2):
Second color (same as round 5 of part 1)
1. sc 6 in MR (6)
2. inc x6 (12)
Don’t fasten off. Insert hook in a stitch of part 1 (first round is pointing you) and pull
the loop of part 2 through. Now crochet both parts together as follows (alternatively
you can crochet one more round each for part 1 and 2 and then sew both parts
together):
3. ch 1, start in the loop where the loop was pulled through: (sc 1, inc) x6, crochet
through both layers (18)
Fasten off, weave in loose ends.
For the handle of the pacifier, crochet a sufficiently long chain with the same color
and go back with slip stitches or single crochet stitches, fasten off, leave a long tail
First published: 9. Mai 2019
for sewing. Now sew the handle to the pacifier (both ends opposite each other at the
edge).
If you like, you can also crochet a chain for the pacifier, just like the handle before, of
course in sufficient length to reach around the neck. Then thread the chain through
the handle of the pacifier, place it around the neck and sew the ends together.
Now the cap is still missing, here you can either use the caps from the previous
versions of the doll ( can be found here: https://www.zhaya.de/dolls.html) or this
version:
Cap:
Clothing color
Since I have no idea how to increase alternating front and back post double crochet
stitches, I crocheted the increase phase only with front post double crochet stitches.
If you know if and how this works, you can of course crochet one front and one back
alternately right from the start.
The size of the cap may have to be adapted to the size of the head.
1. dc 12 in MR (12)
From here it continues with front post double crochet stitches.
2. fpdc 2 in each st around (24)
3. (fpdc 1, inc) x12 (36)
4. (fpdc 2, inc) x12 (48)
5. (fpdc 3, inc) x12 (60)
If you need more increases, because your doll head is bigger, just keep increasing in
this way.
6. (fpdc 1, bpdc 1) x30 (60)
Again, it may be necessary to adapt the size, so just crochet more or less rounds.
Finally crochet a round of single crochet stitches
Fasten off, leave a long tail for sewing.
Finishing:
The doll is already nearly finished, if you haven’t already done so, pin the eyes in
position and sew them on carefully (always use the respective color for sewing on,
then you won’t see any seam), possibly embroider eyebrows with black. Now put on
the cap and sew all around.