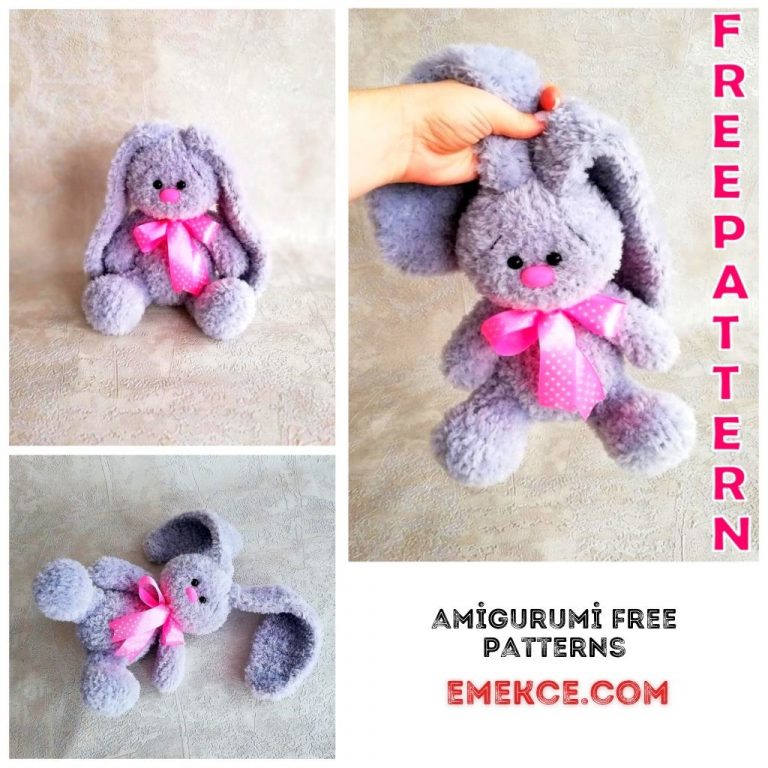
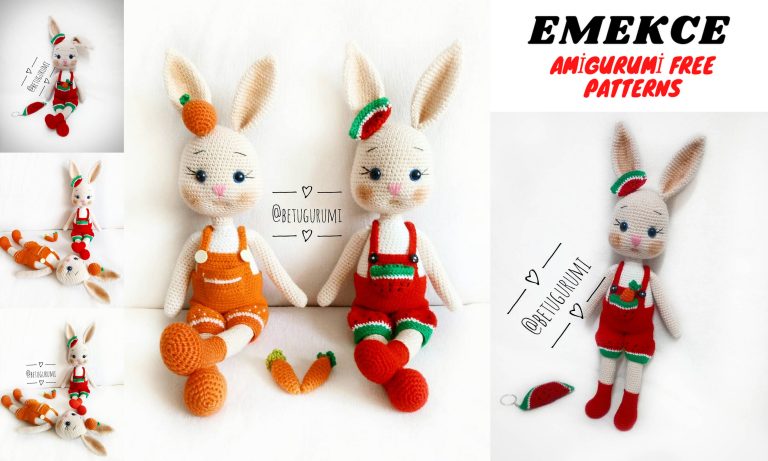
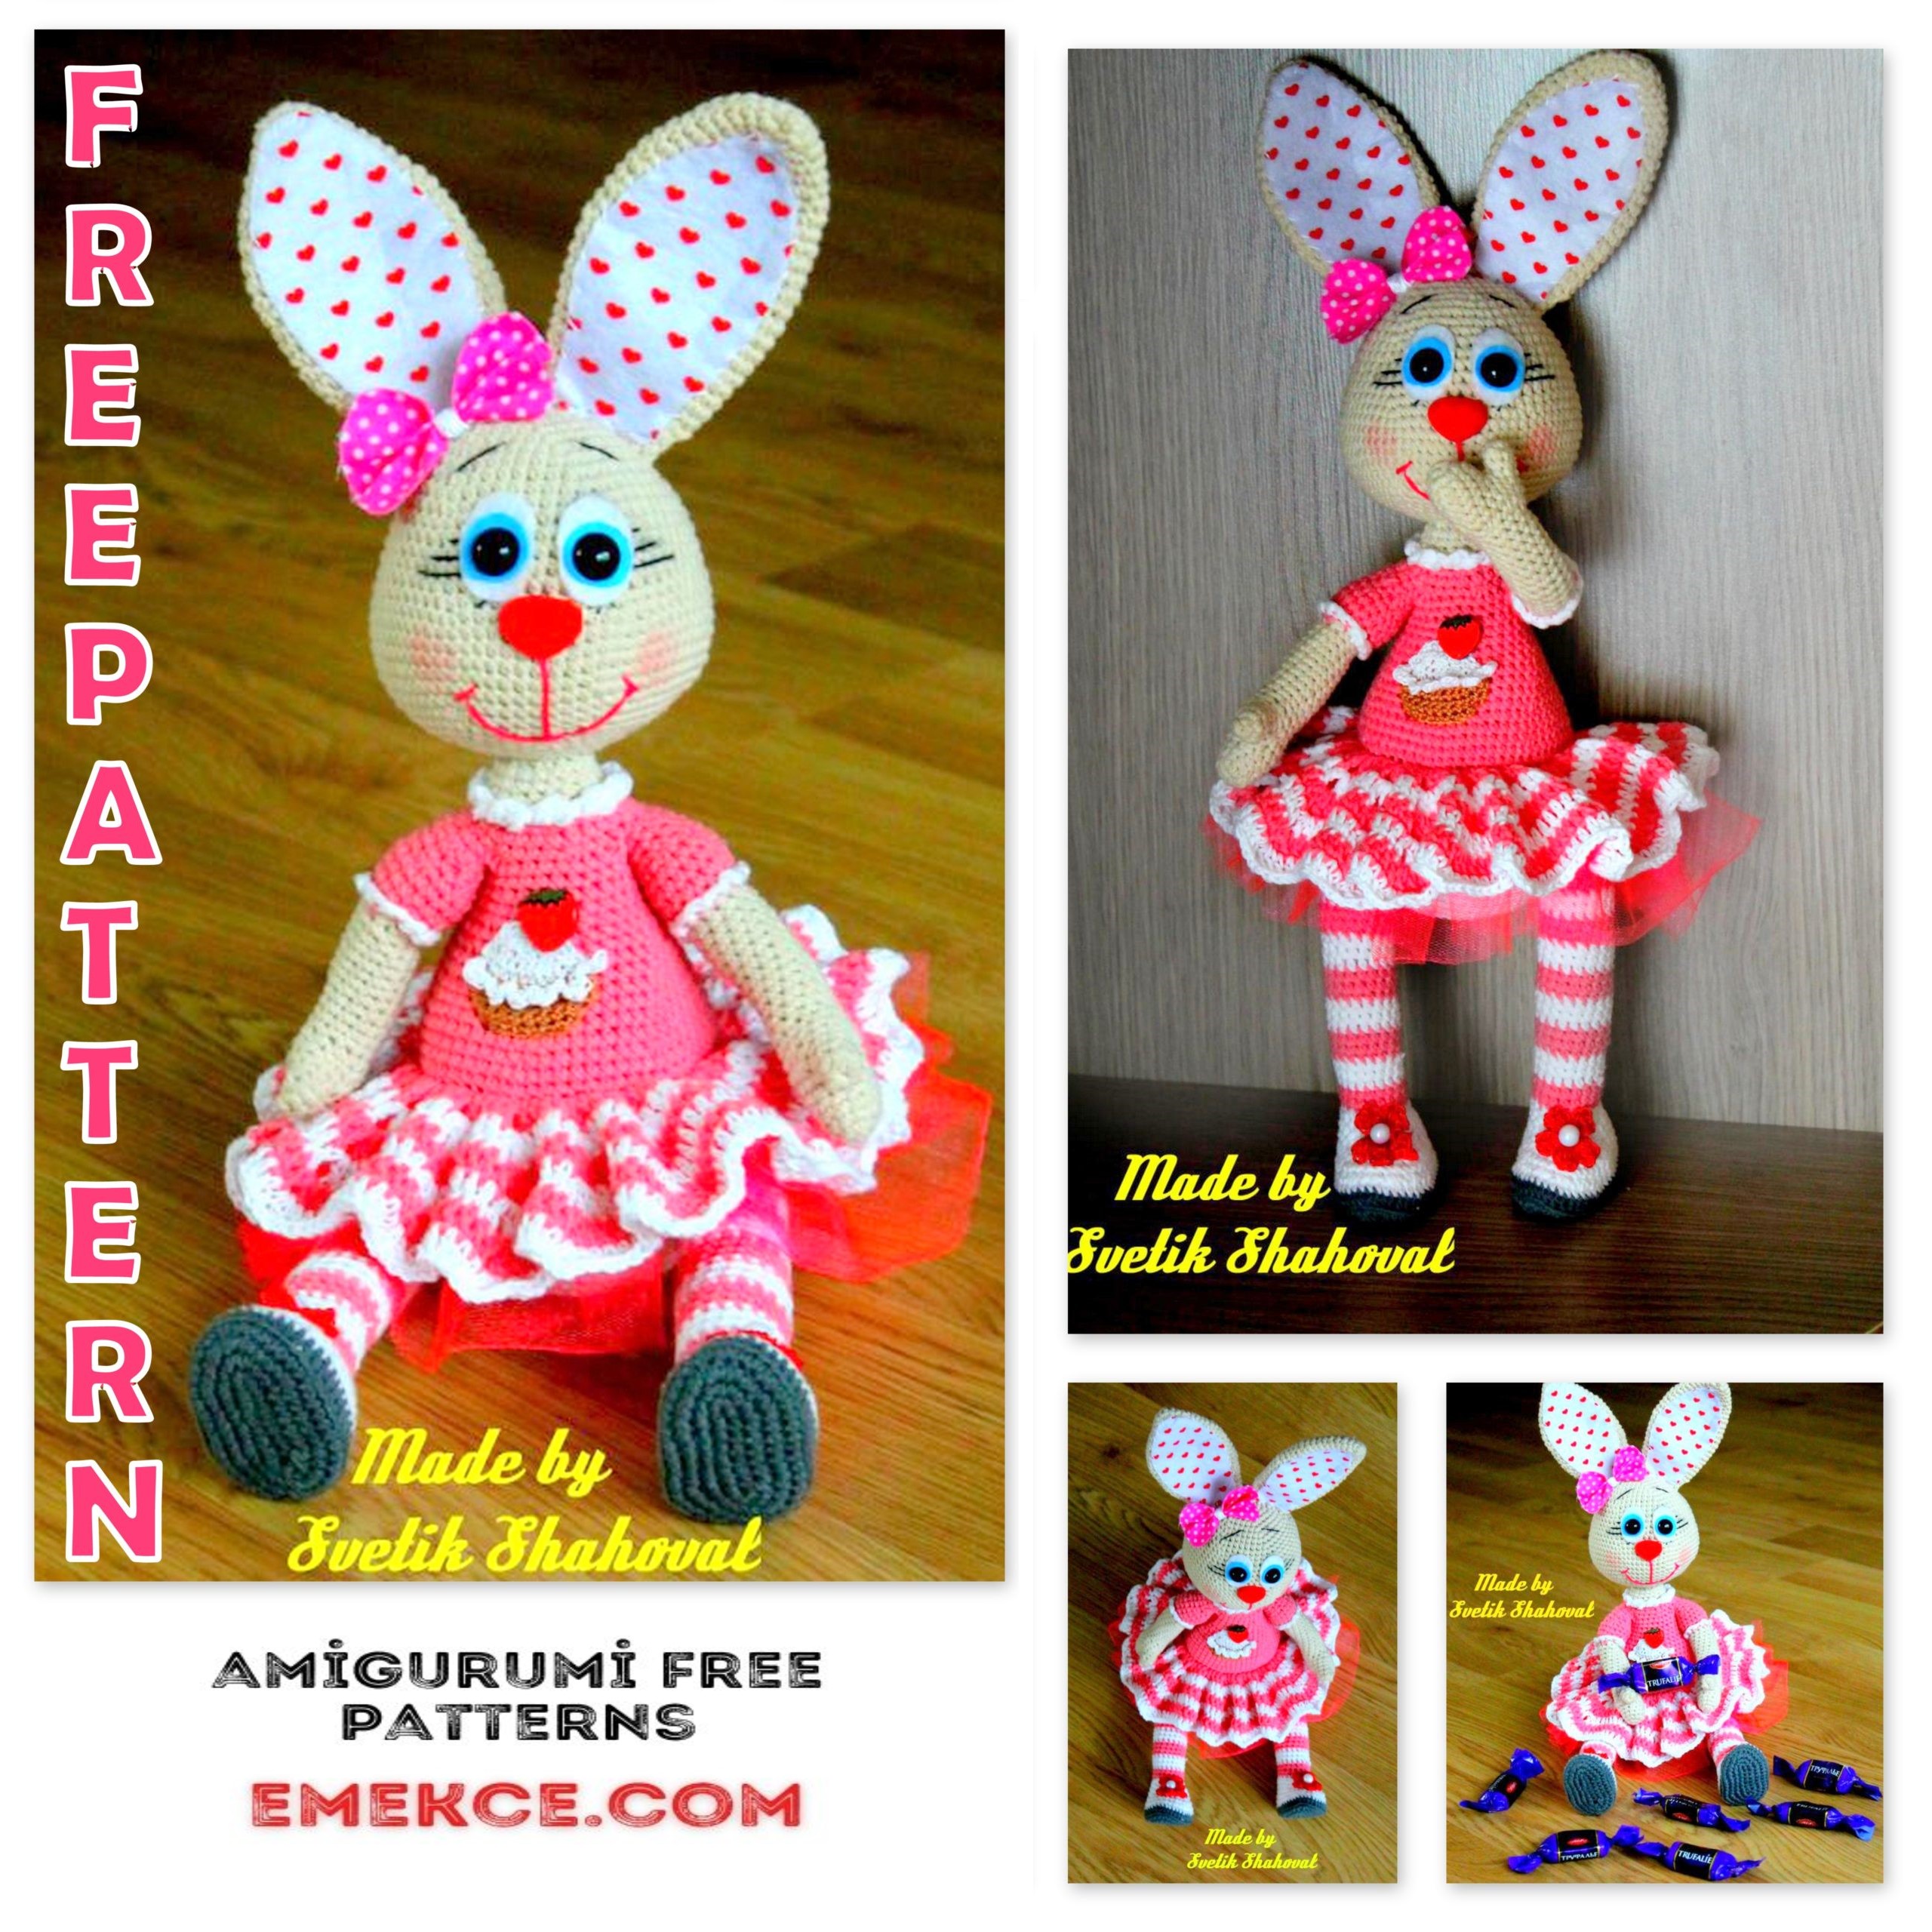
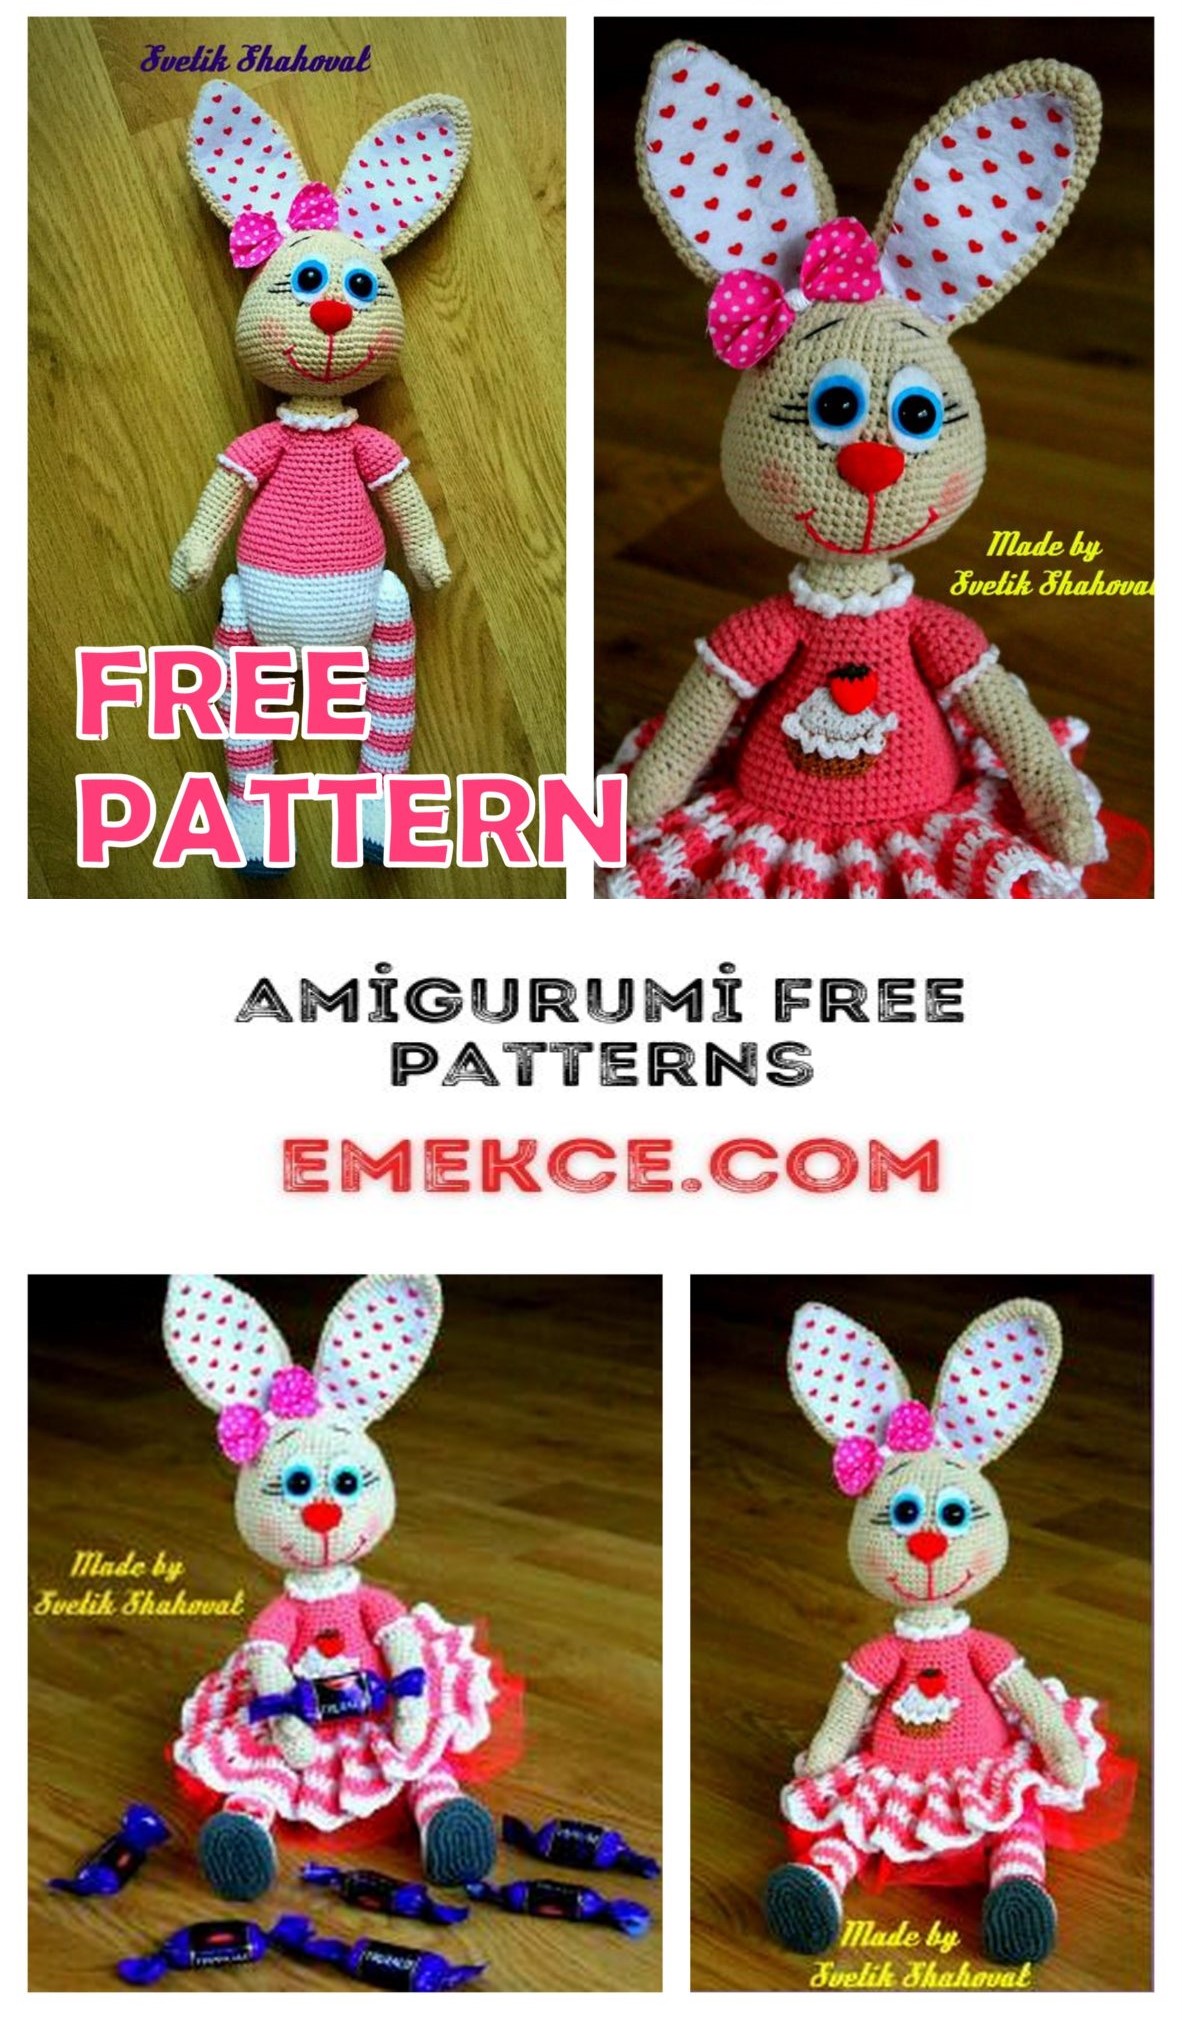
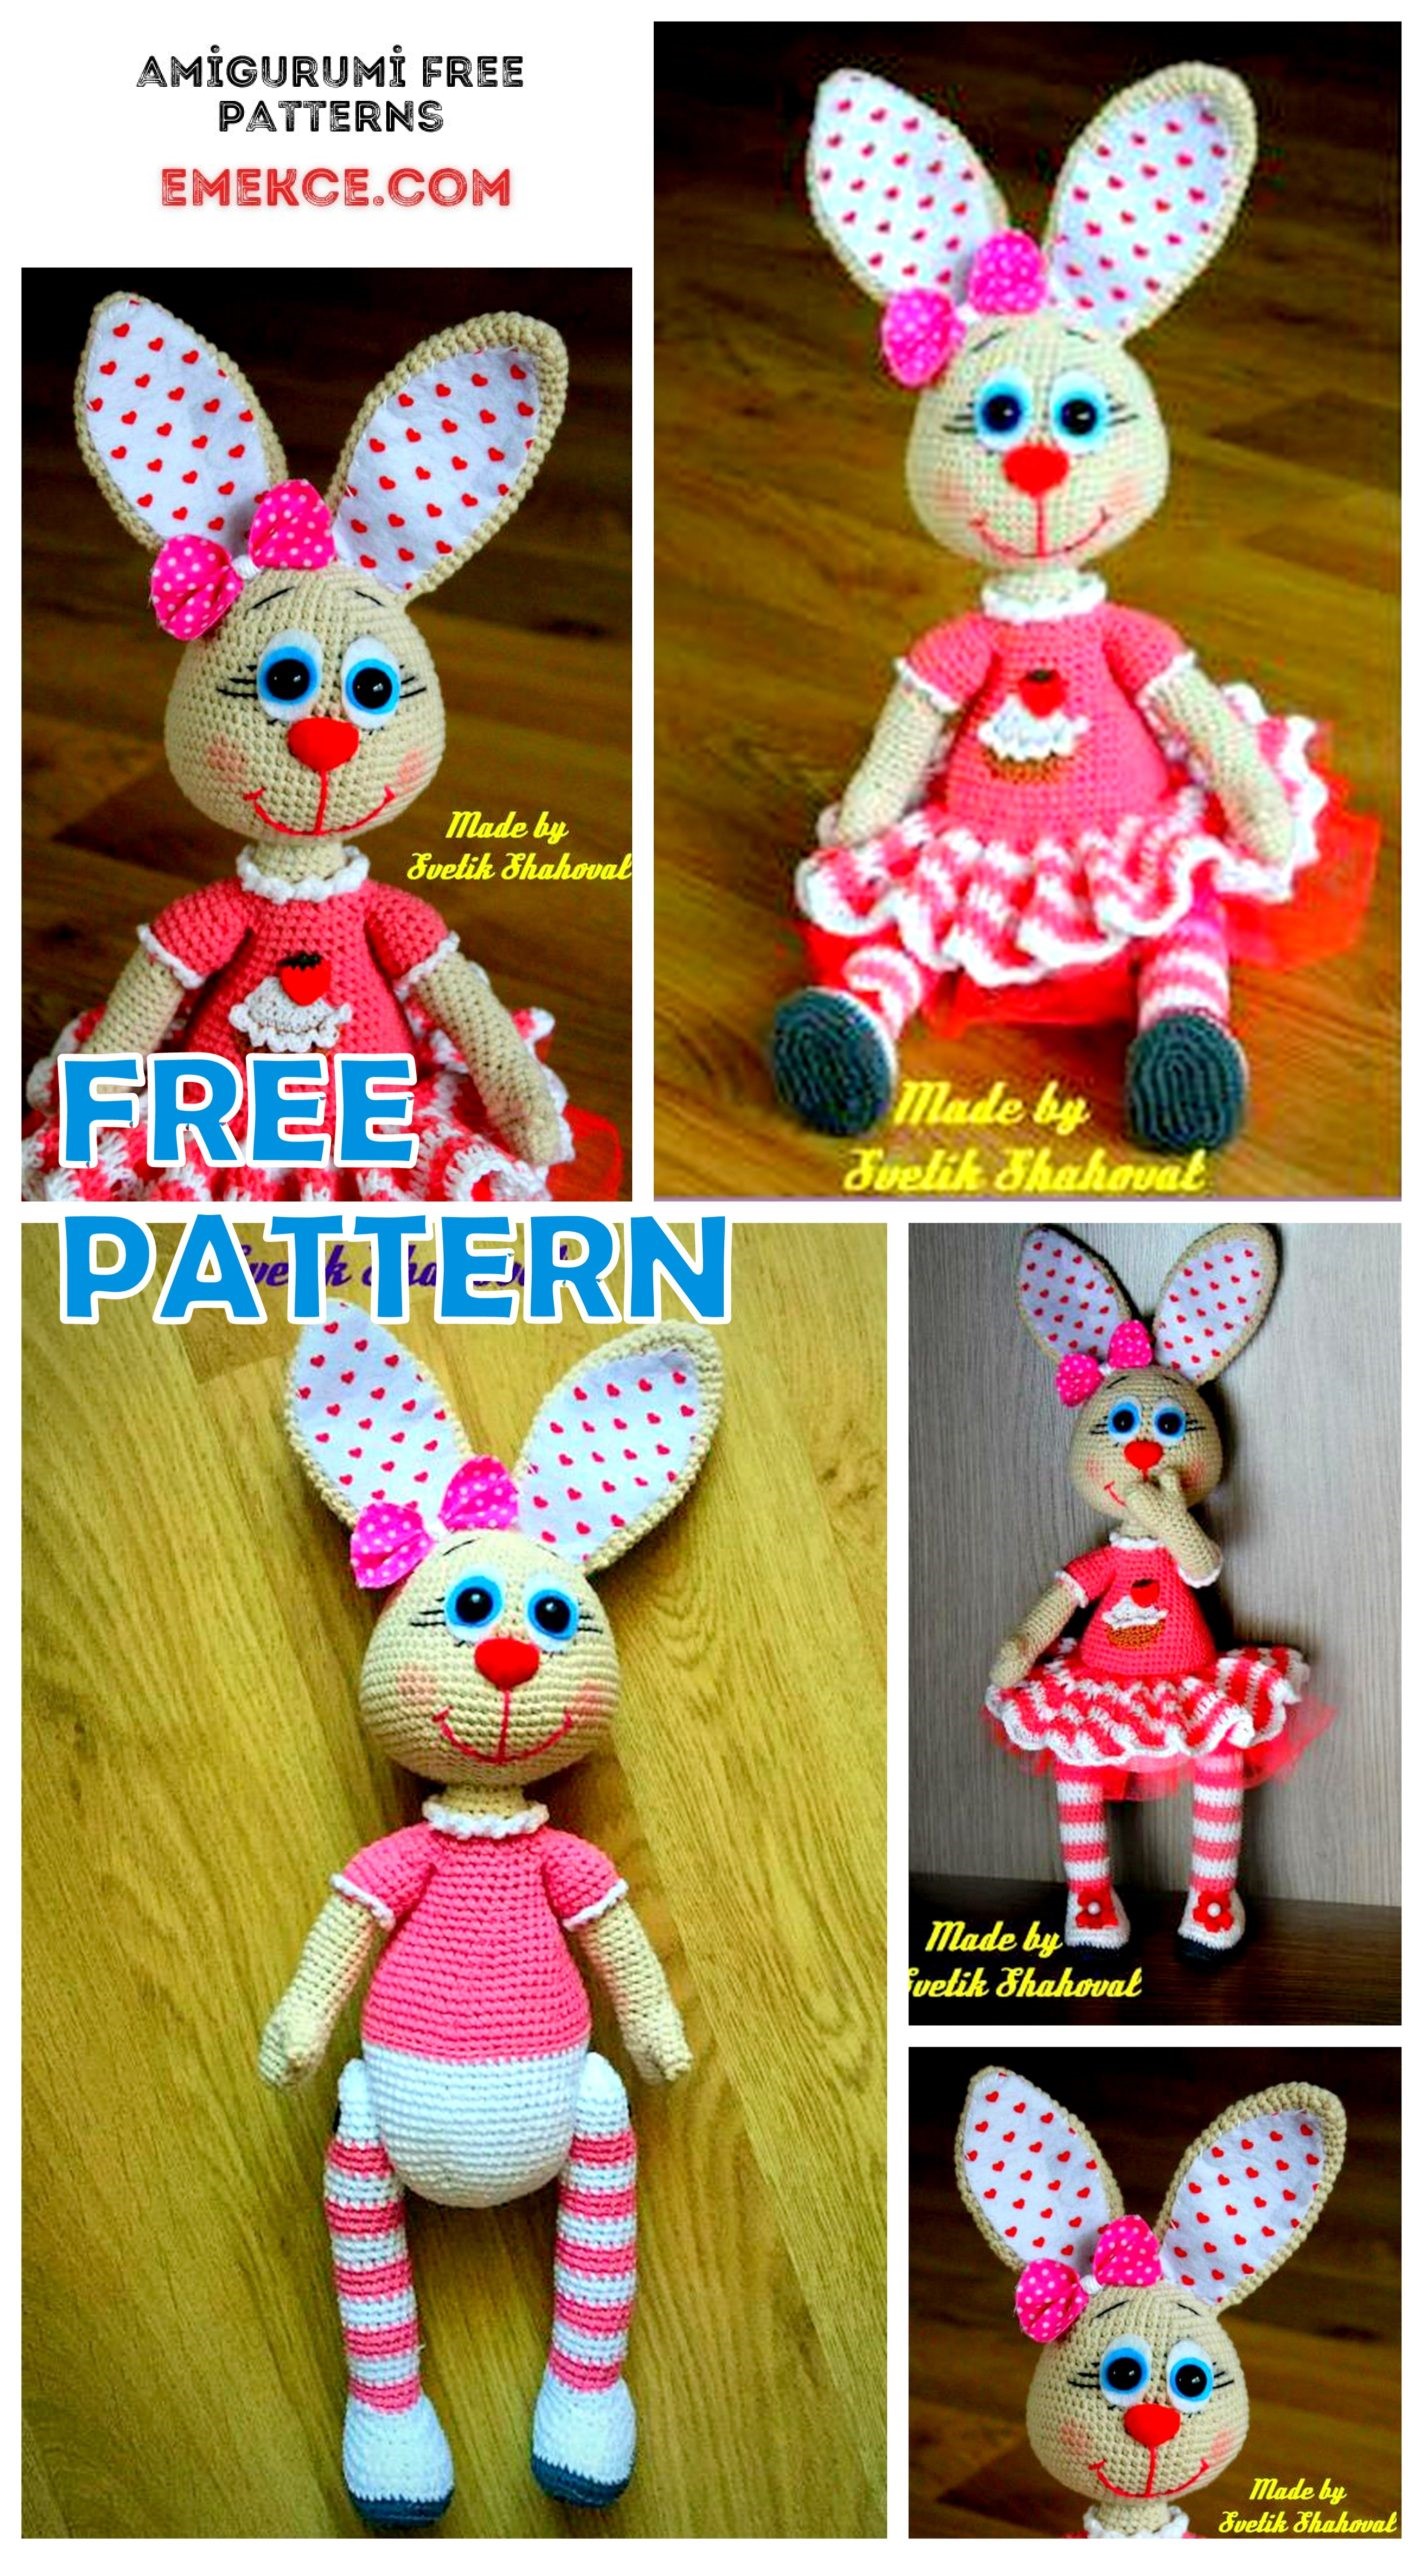
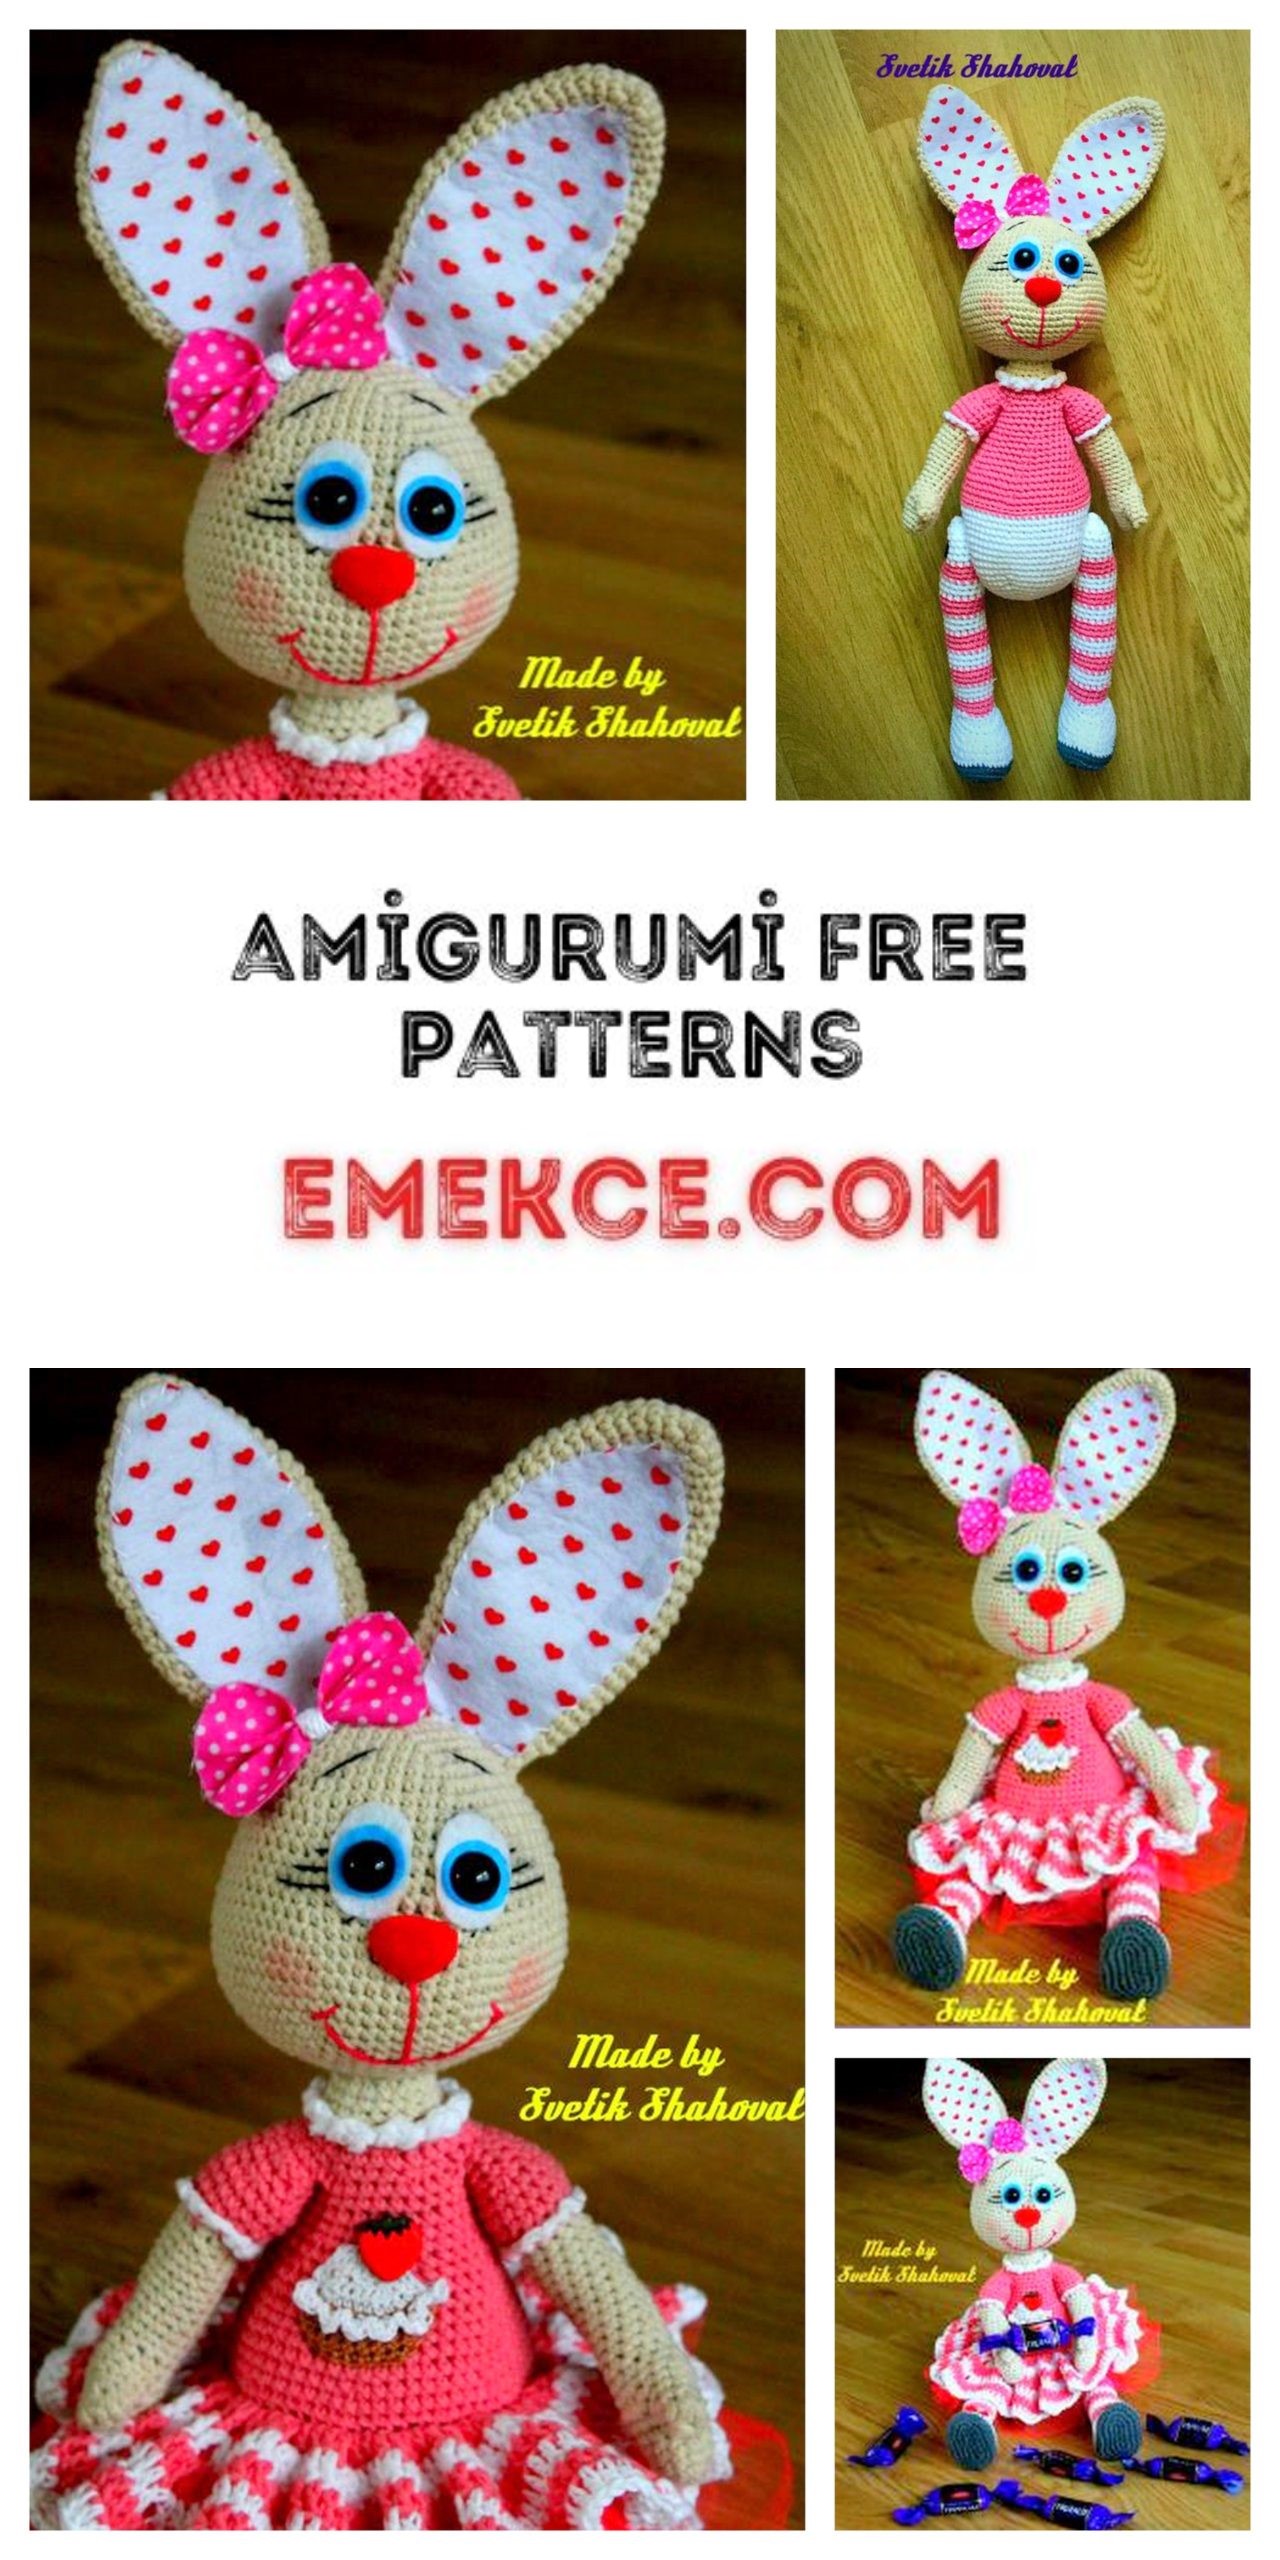
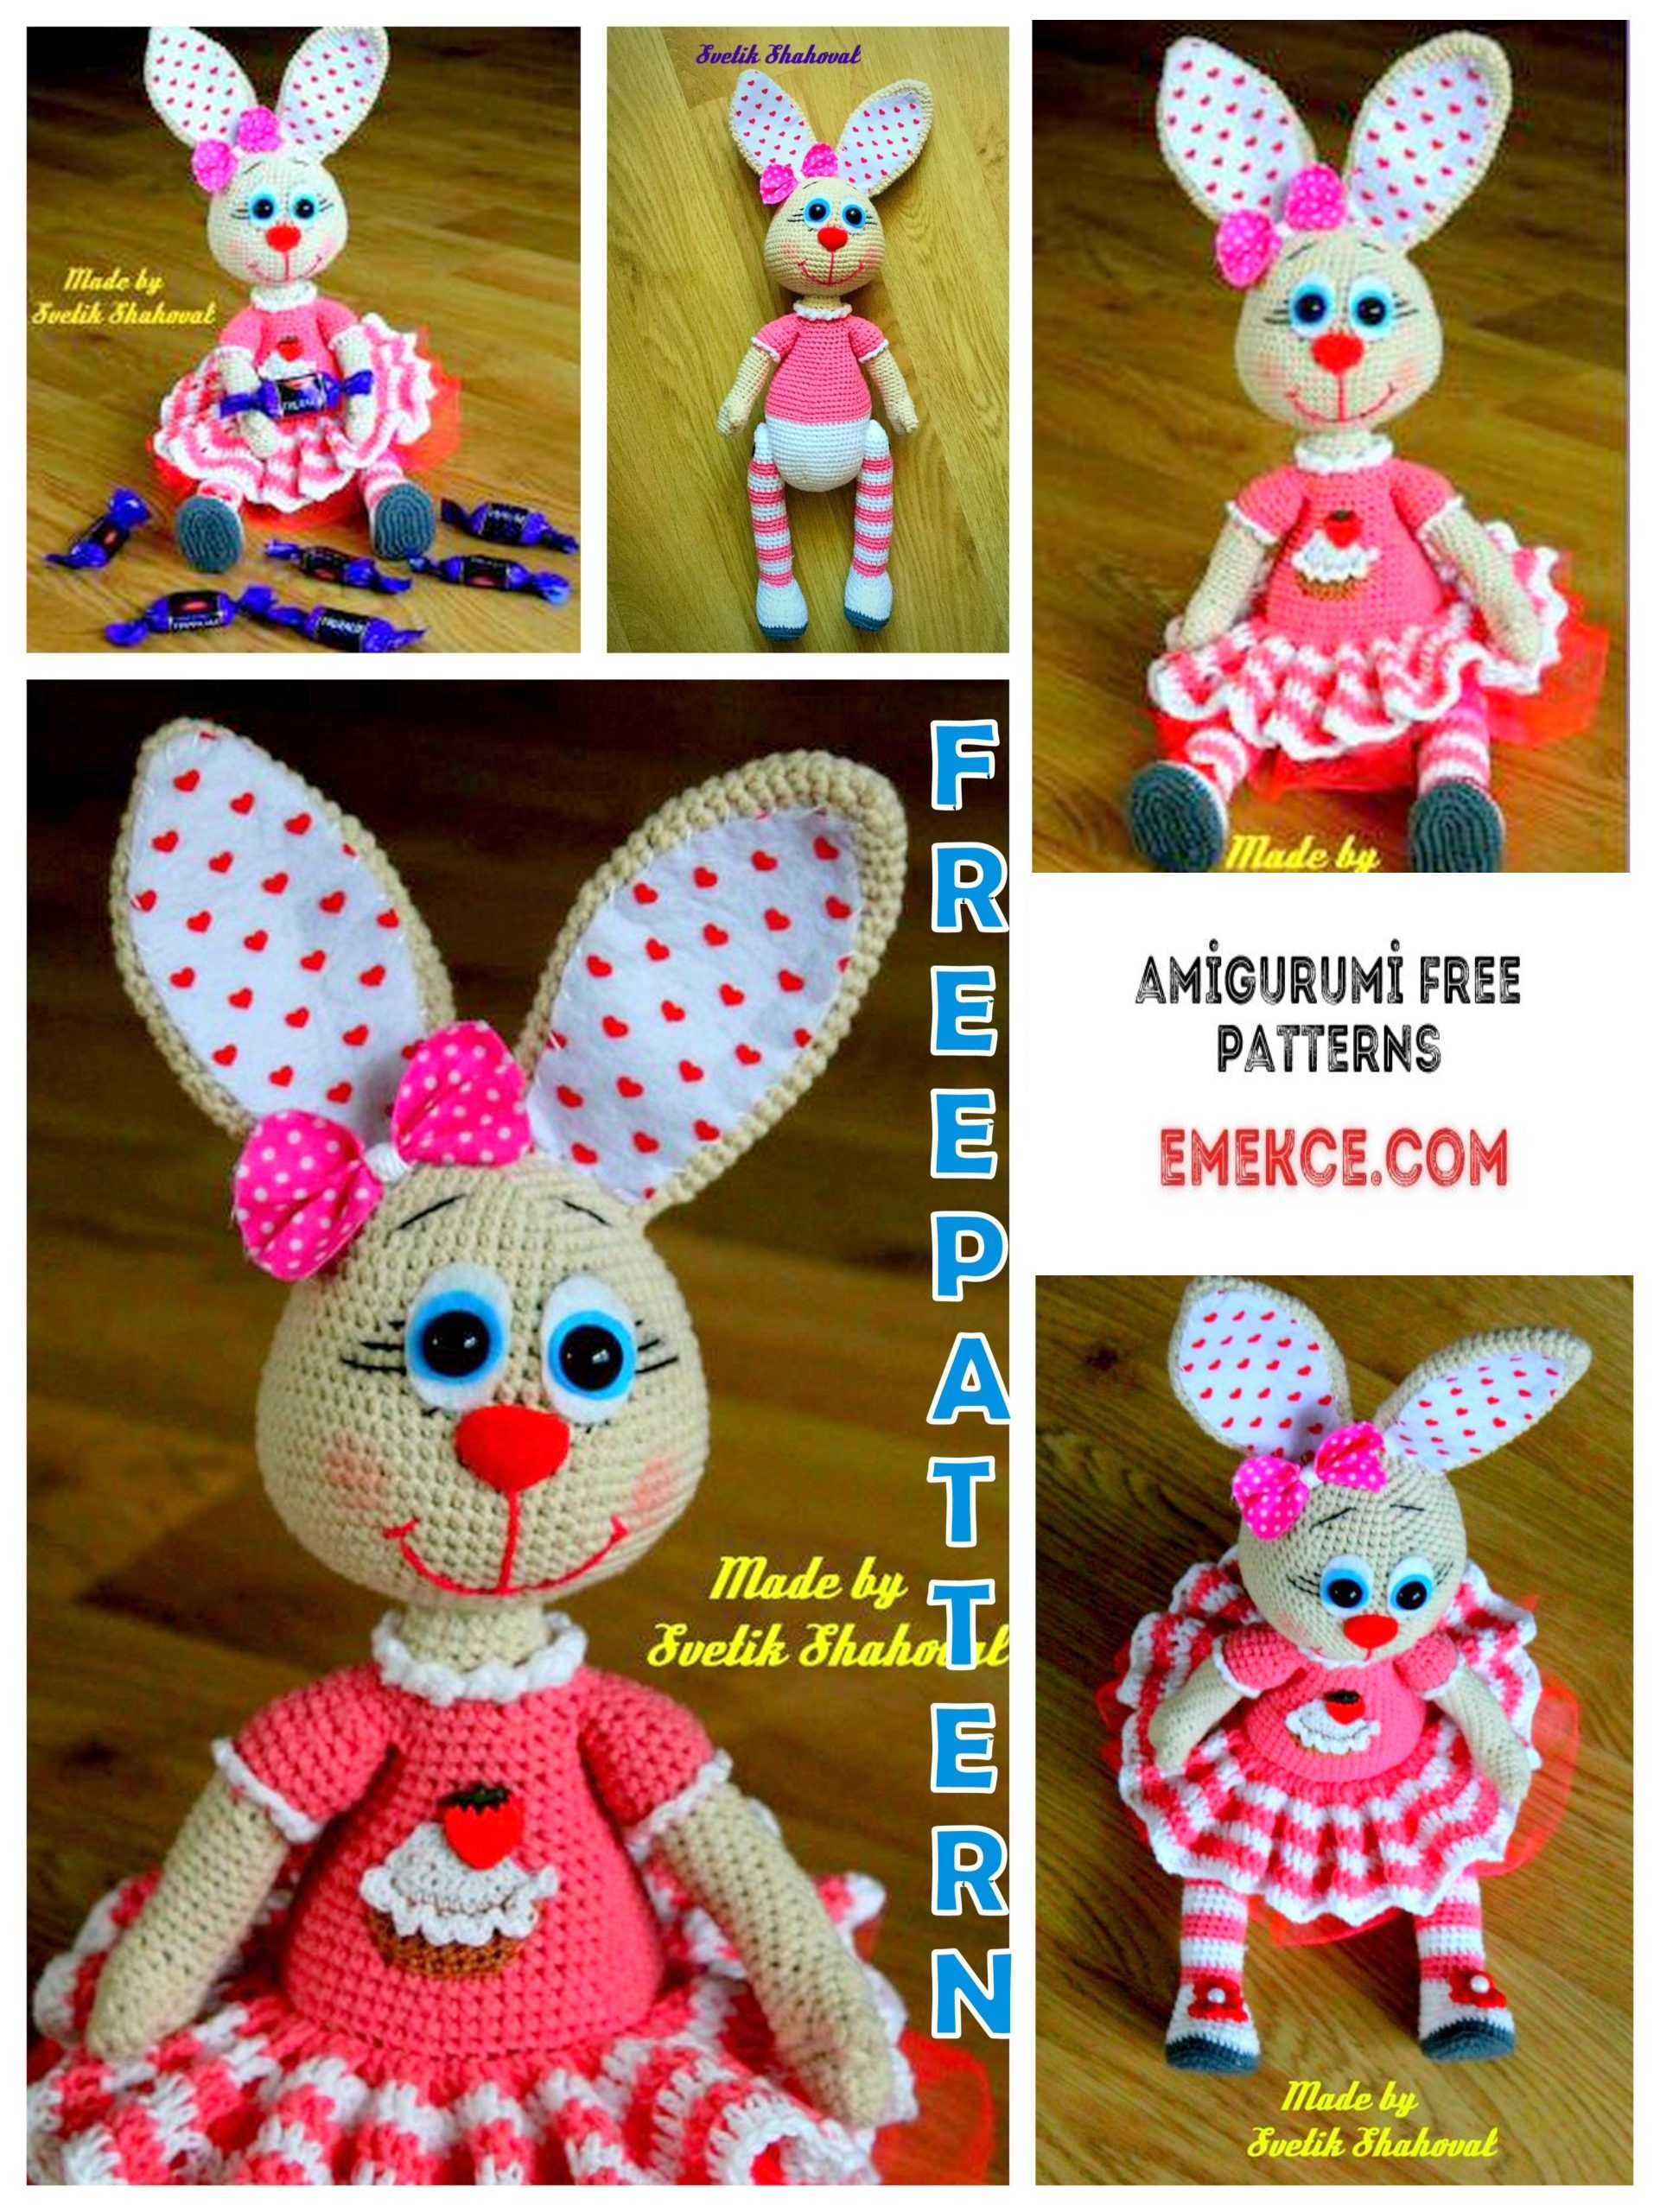
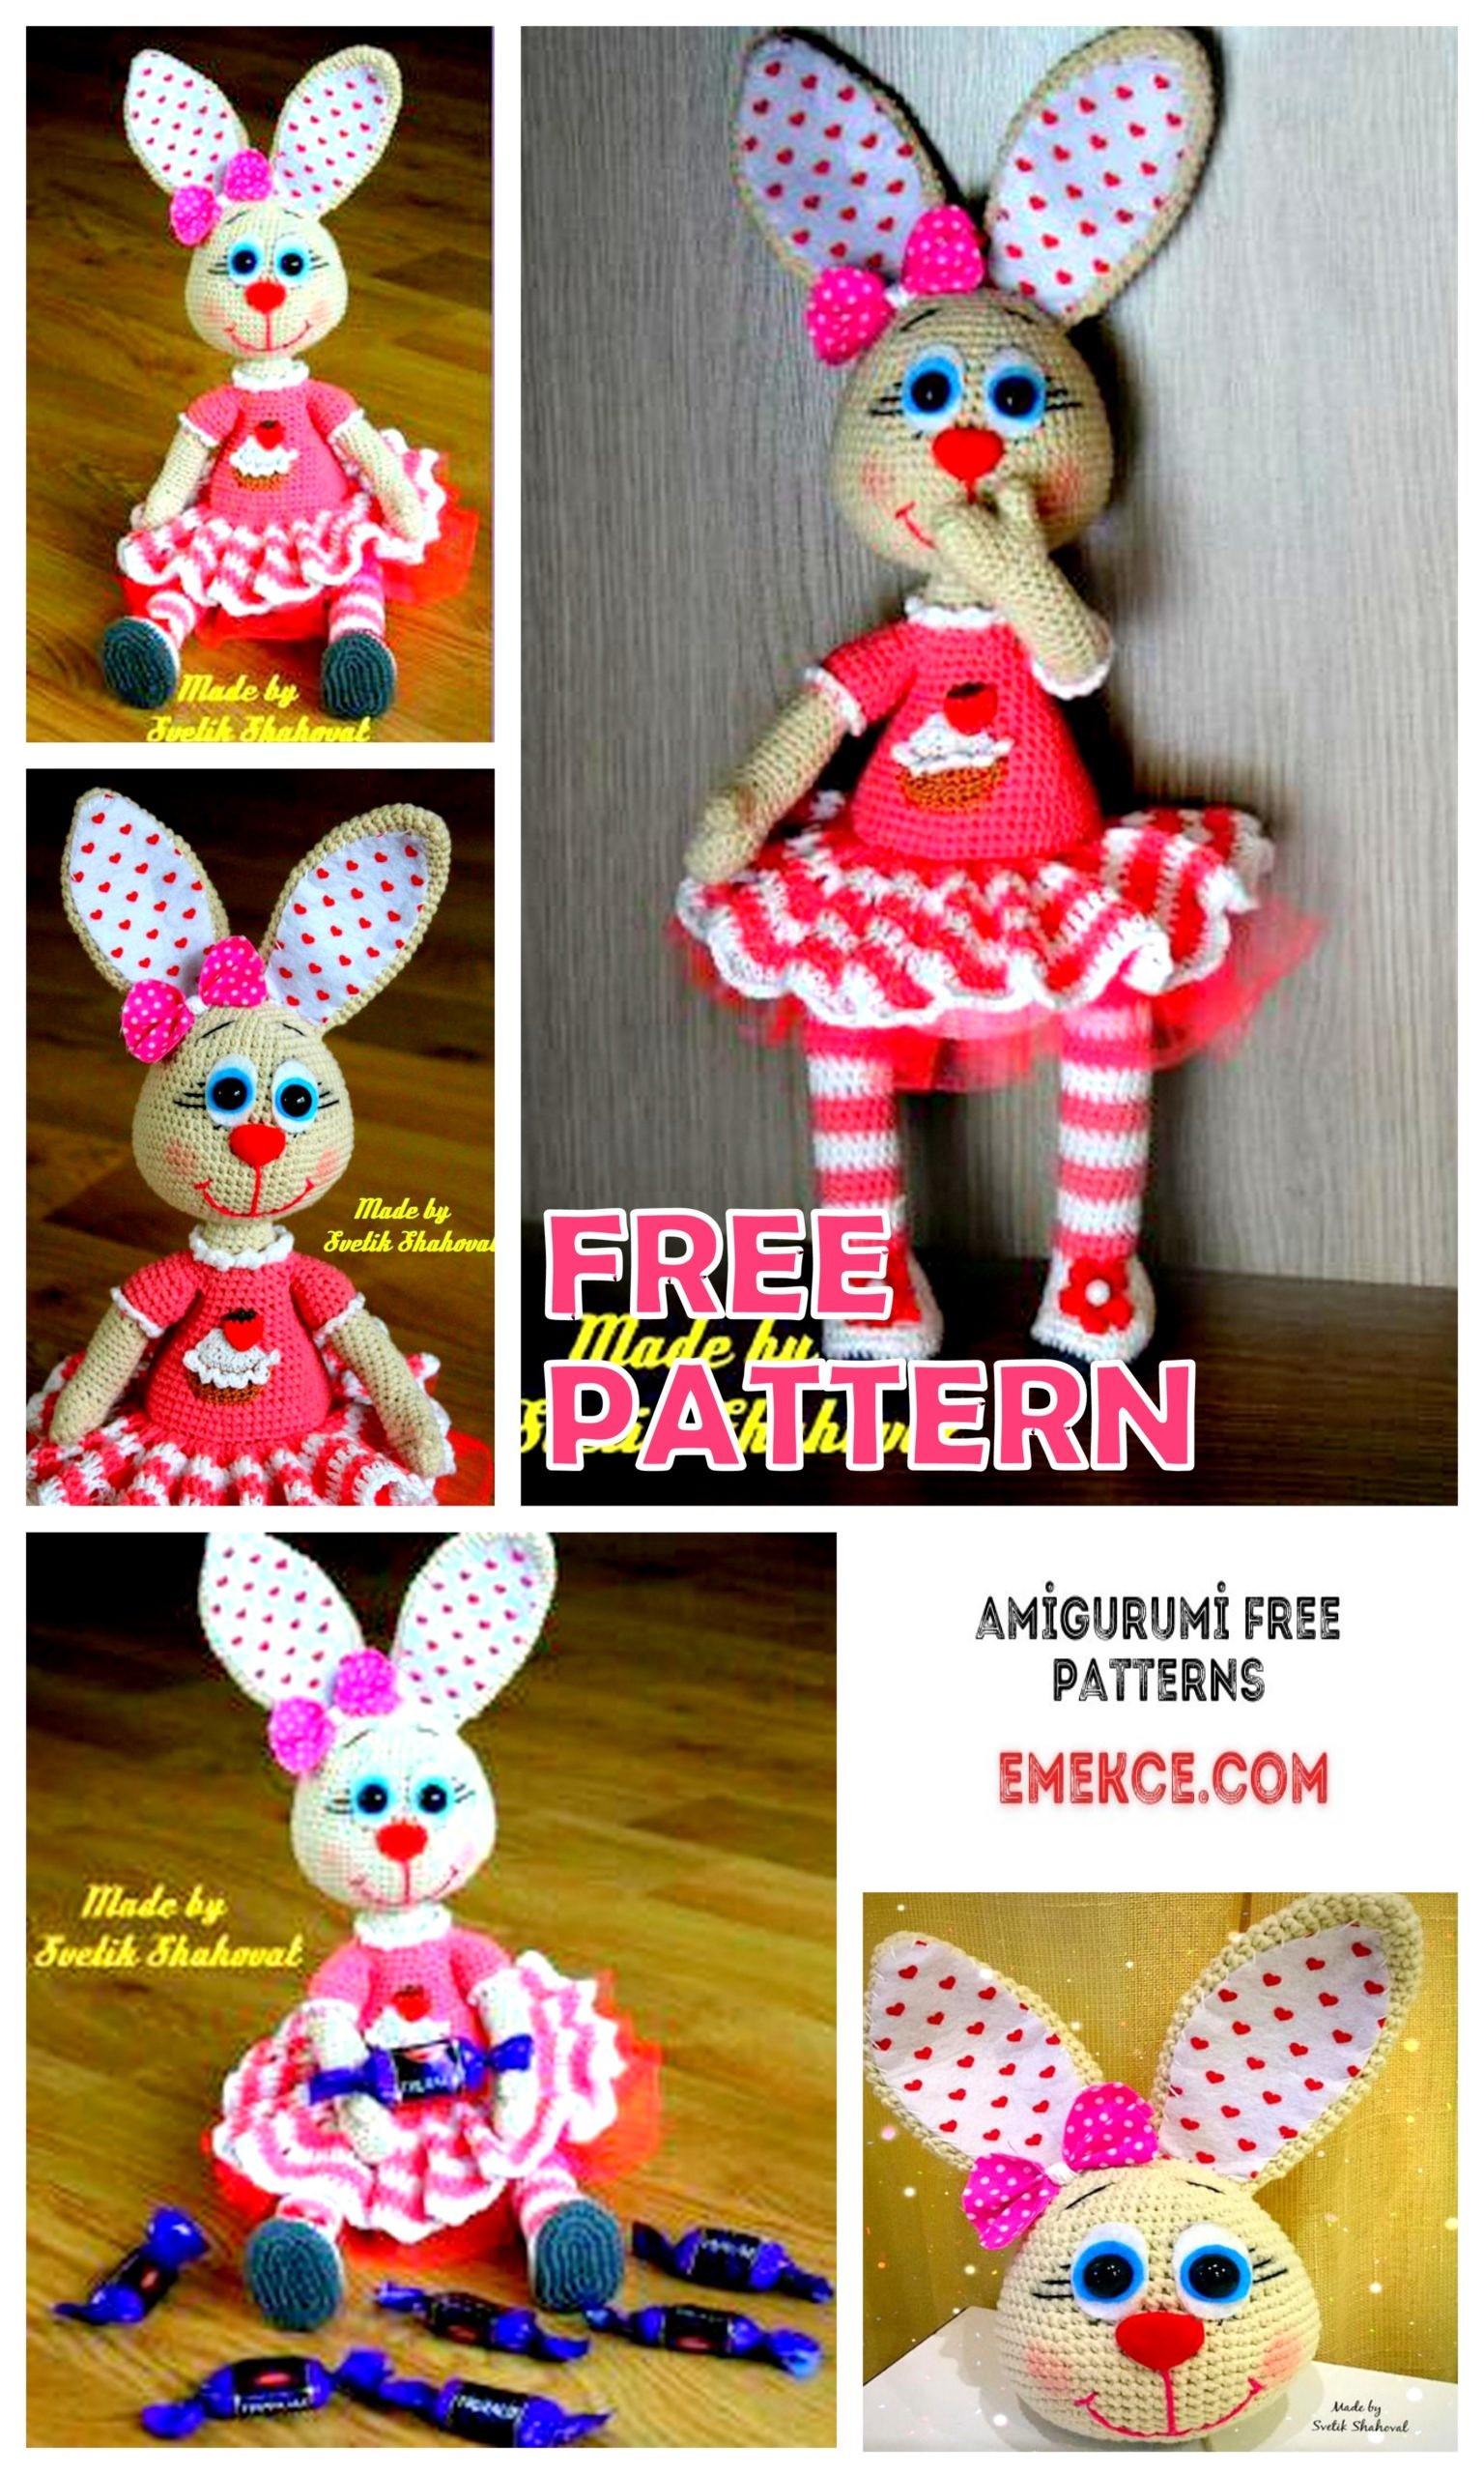
Amigurumi Spring Bunny Free Crochet Pattern
TOOLS AND MATERIALS:
– the main yarn of Alize Cotton Gold, milk
and pink. Hook number 2, her calmly
can replace Yarn Art Jeans;
– Extra Alize Cotton Gold Yarn
white, Hook number 2, thin cotton color:
white, red, brown
– a little white and blue felt for the eyes;
– two black plastic beads for the eyes
diameter 16. Pink nose diameter 15 * 19
– cotton fabric for ears or felt;
– buttons 2 for legs
– black floss thread for embroidery eyebrows and
eyelashes pink for mouth.
– wire for the frame, adhesive tape
– thick cardboard, or plastic
– Button “Strawberry” 1 piece
– tulle pink
– Hollofiber filler)
ABBREVATİONS
CH – chain
SC – single crochet
DC – double crochet
HDC – half double crochet
HSC – half single crochet
İNC – increase (two columns are knitted in one loop)
DEC – decrease (two columns are connected together)
SL-ST – slip stitch
PATTERN
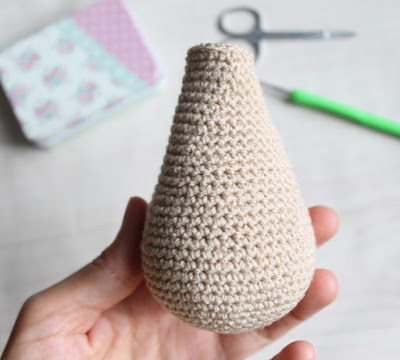
HEAD
Knit in a spiral. We use the main color yarn.
Hook number 2.00
Row 1: 6 SC in Amigurumi Ring
Row 2: 6 İNC (12)
Row 3: (1 SC, İNC) * 6 times (18)
Row 4: (2 SC, İNC) * 6 times (24)
Row 5: (3 SC, İNC) * 6 times (30)
Row 6: (4 SC, İNC) * 6 times (36)
Row 7: (5 SC, İNC) * 6 times (42)
Row 8: 42 SC (42)
Row 9: (6 SC, İNC) * 6 times (48)
Row 10: 48 SC (48)
Row 11: (7 SC, İNC) * 6 times (54)
Rows 12-14: 54 SC (3 rows)
We cut out two small circles from blue felt, and from white
two big ones. Between the 14-15 rows insert the eyes, leaving
spacing 4 columns.
Row 15: (8 SC, İNC) * 6 times (60)
We begin to fill.
Rows 16-17: 60 SC (2 rows)
Row 18: (9 SC, İNC) * 6 times (66)
Between 17-18 we insert the nose in the middle between the eyes.
Focusing on the photo.
Row 19: (10 SC, İNC) * 6 times (72)
Rows 20-26: 72 SC (7 rows)
We fill.
Row 27: (10 SC, DEC) * 6 times (66)
Row 28: (9 SC, DEC) * 6 times (60)
Row 29: (8 SC, DEC) * 6 times (54)
Row 30: (7 SC, DEC) * 6 times (48)
Row 31: (6 SC, DEC) * 6 times (42)
Row 32: (5 SC, DEC) * 6 times (36)
Row 33: (4 SC, DEC) * 6 times (30)
Row 34: (3 SC, DEC) * 6 times (24)
Fill to the end.
Row 35: (2 SC, DEC) * 6 times (18)
Row 36: (1 SC, DEC) * 6 times (12)
Cut the thread, hide the end of the thread inside the head.
EARS (2 details)
Row 1: 2 CH, 5 SC in the second from the hook loop
Row 2: İNC * 5 times (10)
Row 3: (1 SC, İNC) * 5 times (15)
Row 4: 15 SC (15)
Row 5: (2 SC, İNC) * 5 times (20)
Row 6: 20 SC (20)
Row 7: (3 SC, İNC) * 5 times (25)
Rows 8: 25 SC (25)
Row 9: (4 SC, İNC) * 5 times (30)
Rows 10 – 17: 30 SC (8 rows)
Row 18: (13 SC, DEC) * 2 times (28)
Row 19: 28 SC (28)
Row 20: (12 SC, DEC) * 2 times (26)
Row 21: 26 SC (26)
Row 22: (11 SC, DEC) * 2 times (24)
Row 23: 24 SC (24)
Row 24: (10 SC, DEC) * 2 times (22)
Row 25: (9 SC, DEC) * 2 times (20)
Row 26: (8 SC, DEC) * 2 times (18)
Row 27: 18 SC (18)
Do not fill. Fold the edges together, knit SC, leave the thread
for stitching.
Muzzle Design
Eye Design:
We use ready-made eyes with a diameter of 16mm. Cut out of felt
blue two small circles, and white two large.
Between the 14-15 rows insert the eyes, leaving a gap of 4
column
Make a little tightening based on the photo (points 1,2,3,4).
From the occipital part of the head from the neck, introduce the yoke to point 1
(thread inside), leave the tip for the nodule, bring the needle to point 2 (
thread outside) pull, insert the needle at point 3 (thread inside) and withdraw
to point 4 (thread outside). Pull to make a knot, hide the thread.
Nose:
Between 17-18 we insert the nose in the middle between the eyes. Can
also embroider. Focusing on the photo.
Embroider eyebrows, cilia, mouth and focusing on the photo. Make
tinted cheeks with dry pastels.
Ear Design:
Place the ears symmetrically on each side of the head. Sew on
1-7 row.
Before sewing on the ears, I trim the fabric. I do it like this:
On a cotton cloth or felt, circle a shape smaller than our ears,
and scissors cut the shape of the ears. Sew to knitted ears
HANDLES (2 parts)
We knit with milk thread in a circle. Hook number 2.0
We start with pens, they will get involved in the torso
Knit a finger:
Row 1: 6 SC in Amigurumi Ring
Rows 2-4: in a circle without changes 6 SC (6)
Cut the thread.
Knit palm:
Start in flesh color.
Row 1: 6 SC in Amigurumi Ring
Row 2: 6 İNC (12)
Row 3: (1 SC, İNC) * 6 times (18)
Rows 4-7: in a circle without changes 18 SC (18)
Row 8: We start tying a finger with a palm together
Having finished knitting a palm, do not cut the thread, put a marker, knit
3 SC together with the finger, 15 SC tie in a circle to the end of the row.
Rows 9-10: 18 SC (2 rows)
Row 11: (1 SC, DEC) * 6 times (12)
Rows 12-24: 12 SC (13 rows)
Pink thread
Row 25: 12 SC (12)
Row 26: knit for the back half loop
(1 SC, İNC) * 6 times (18)
After knitting a couple more rows, insert
wire optionally a little
to stuff. Next fill along
knitting but quite a bit
Rows 27-29: 18SC (3 rows)
Row 30: (1 SC, DEC) * 6 times (12)
Rows 31-33: 12 SC (3 rows)
Finish SL-ST, thread cut
To the 17th row, where we knitted for the back half-loop, we attach the quilling.
White thread: SL-ST, (SC, HSC, SC) in one loop, SL-ST, (SC,
HSC, SC) in one loop … and so on to the end of the row;
Do not forget that 2 hands should look in the mirror
reflection relative to the location of the thumb
BODY
Knit with a white thread.
Row 1: 6 SC in Amigurumi Ring
Row 2: 6 İNC (12)
Row 3: (1 SC, İNC) * 6 times (18)
Row 4: (2 SC, İNC) * 6 times (24)
Row 5: (3 SC, İNC) * 6 times (30)
Row 6: (4 SC, İNC) * 6 times (36)
Row 7: (5 SC, İNC) * 6 times (42)
Row 8: (6 SC, İNC) * 6 times (48)
Row 9: (7 SC, İNC) * 6 times (54)
Row 10: (8 SC, İNC) * 6 times (60)
Row 11: (9 SC, İNC) * 6 times (66)
Rows 12-17: 66 SC (6 rows)
Row 18: (9 SC, DEC) * 6 times (60)
Rows 19-20: 60 SC (2 rows)
Pink thread
Row 21: 60 SC (60)
Row 22: 60 SC for the rear half-loop (60)
Row 23: 60 SC (60)
Row 24: (8 SC, DEC) * 6 times (54)
Rows 25-26: 54 SC (2 rows)
Row 27: (7 SC, DEC) * 6 times (48)
Row 26: 48 SC (48)
Row 27: (6 SC, DEC) x 6 times (42)
Row 28: 48 SC (48)
Row29: (6 SC, DEC) * 6 times (42)
Row 30: 42 SC (42)
Row 31: (5 SC, DEC) * 6 times (36)
Row 32: 36 SC (36)
Row 33: (4 SC, DEC) * 6 times (30)
Row 34: attach the handles, in this row we can have
discrepancies in the amount of SC, visually determine where they should
be pens and knit the required amount of SC to
of this place, I knitted 7 SC, then 6 SC introducing the hook into the loops
left arm and torso at the same time, 9 SC torso, 6 SC
together with the right knob̆, and the remaining 2 SC (30)
Row 35: knit along the body and the remaining loop of the handles (3 SC, DEC) * 6
times (24)
Row 36: Behind the rear half loop 24 SC (24)
Milk thread
Row 37: (2 SC, DEC) * 6 times (18)
Rows 38-40: 18 SC (3 rows)
Fasten the thread SL-ST, leave a long end for sewing
To the 36th row, where we knitted for the back half-loop, we attach the quilling.
White thread: SL-ST, (DC, HDC, DC) in one loop, SL-ST, (DC, HDC,
DC) in one loop … and so on to the end of the row;
Cut the thread, leaving a long end for stitching. Sew to
head in the center.
Gray thread
Row 1: We collect a chain of 9 CH, İNC into the second loop from the hook,
6 SC, 4 SC in the last loop of the chain, continue to knit on
reverse side of chain 6 SC, İNC
We put a marker and begin to knit in a circle.
Row 2: İNC, SC, İNC, 4 SC, İNC, SC,
2 İNC, SC, İNC, 4 SC, İNC, SC, İNC (28)
Row 3: 2 İNC, 2 SC, İNC, 5 SC, İNC, 2 SC,
3 İNC, 2 SC, İNC, 5 SC, İNC, 2 SC, İNC (38)
Row 4: 4 SC, İNC, 14 SC, 2 İNC, 12 SC, İNC, 4 SC (42)
Row 5: we knit for the back half loop 42 SC
Change the thread color to white.
Row 6: 42 SC (42)
At this stage, circle our insole on cardboard or plastic and
cut (2 pcs.) If desired, insert the wire as in the photo.
We fill in the course of knitting.
LEGS (2 details)
Row 7: 12 SC (1 SC, DEC) * 6 times, 12 SC (36)
Row 8: 36 SC (36)
Row 9: 9 SC (1 SC, DEC) * 6 times, 9 SC (30)
Row 10: 9 SC, 6 DEC, 9 SC (24)
Row 11: 11 SC, 3 SC for the back half-loop, 10 SC (24)
Row 12: 2 SC, DEC * 6 times (18)
Change the thread color to pink.
Row 13: we knit for the back half loop 18 SC (18)
Rows 14-15: 18 SC (18)
Change the thread color to white.
Rows 16-18: 18 SC (18)
Change the thread color to pink.
Rows 19-21: 18 SC (18)
Change the thread color to white.
Rows 22-24: 18 SC (18)
Change the thread color to pink.
Rows 25-27: 18 SC (18)
Change the thread color to white.
Rows 28-30: 18 SC (18)
Change the thread color to pink.
Rows 31-33: 18 SC (18)
Change the thread color to white.
Rows 34-36: 18 SC (18)
Change the thread color to pink.
Rows 37-39: 18 SC (18)
Change the thread color to white.
Rows 40-44: 18 SC (18)
Row 45: (1 SC, DEC) * 6 times (12)
Row 46: decrease before closing
Sew legs and arms to the body. Insert the needle into the 13th row of the body with one
sides and withdraw on the other side at the same level. Further
pierce the foot with a needle (be sure to grab the filler), then
button and return the needle to the place where you started joining.
Attach the second leg in the same way as the first. Tie
the ends of the thread and hide them inside the body.
SKIRT
We knit 21 rows of the trunk for the back half-loop.
V – in the loop of the previous row: DC, 2 CH, DC
Pink thread
Row 1: (2 DC, V) repeat to the end of the row.
White thread
Row 2: (4 DC, V) repeat to the end of the row.
Pink thread
Row 3: (6 DC, V) repeat to the end of the row.
White thread
Row 4: (8 DC, V) repeat to the end of the row.
Pink thread
Row 5: (10 DC, V) repeat to the end of the row.
White thread
Row 6: (12 DC, V) repeat to the end of the row.
We make decorations at our discretion.
To do this, I take a piece of tulle 8 cm wide, the length of all can
to be different. And a needle with a thread (I used a rubber bead)
I begin to collect quilling. The splendor you can choose for your
taste. Try on the bunny rabbit, align and fix
with pins. Then it’s small, to sew all this beauty to
the body behind the rear floor of the loop if you use the thread. Or make
a skirt on an elastic band, and then it can be removed. Can stitch out
fabric or just knit a skirt.
* photo for example
FATIN LIFT
Bow:
We sew a bow from a piece of fabric, sew it to the ears.
I did not sew a bow, since there is no sewing machine. I bought in
fabric store, tape for gluing fabric. Ironed on
edges and done. So she looks
Flower:
Very often I use very simple decorations
flowers, knit easily, and playing with crochets, and the amount
different effects can be achieved with a petal
We dial 8 CH, close them into a ring with a connecting column,
we knit 4 CH, then we knit three unfinished columns with 2 nakida,
we combine them with a common vertex, i.e. we knit together, we knit 4 CH,
connect under the ring of art. non-cash Similarly, we knit 4 more petals.
The more crochets, the thicker the threads will be needed, so that for
similar colors were easier to care for.
That’s all! Your
“Bunny-POSITIVE”
ready !!!
Enjoy your knitting and light loops!