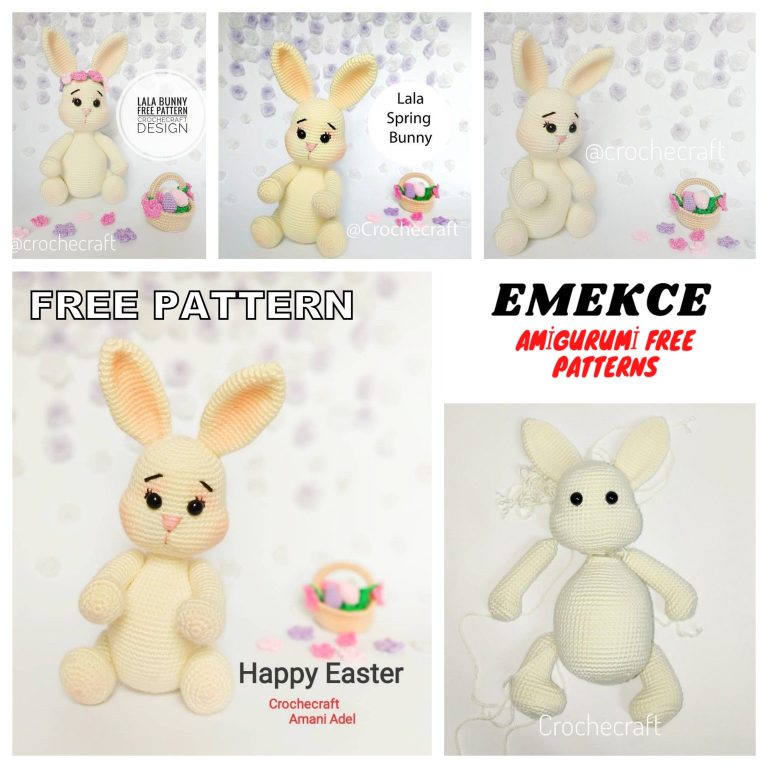
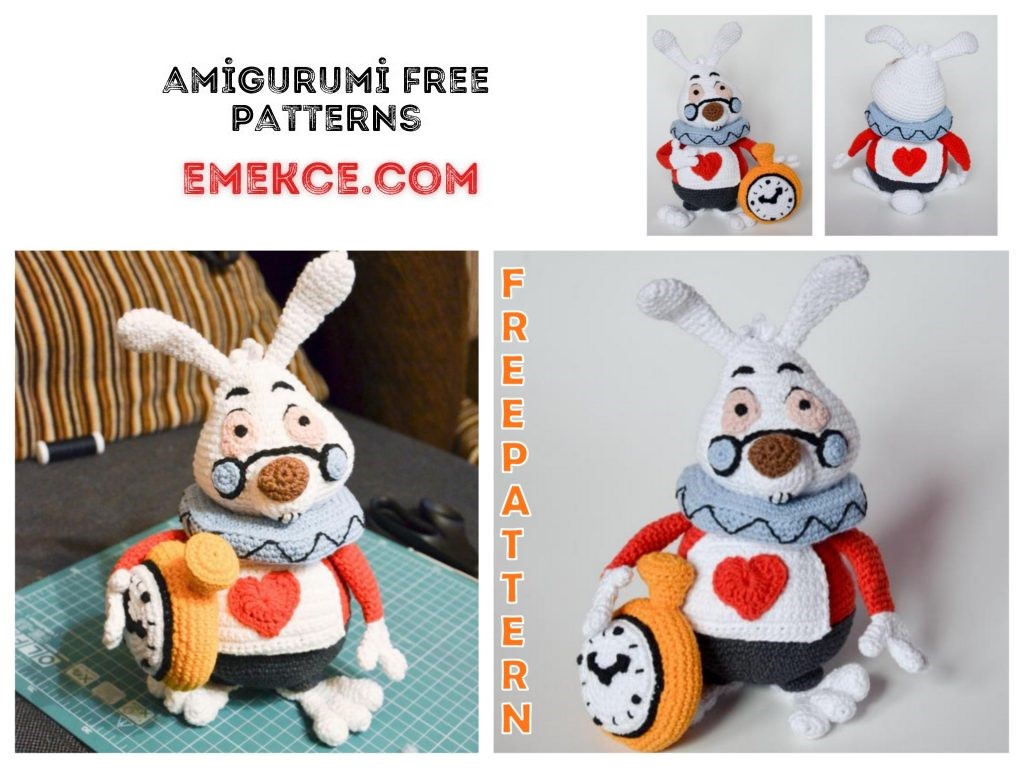
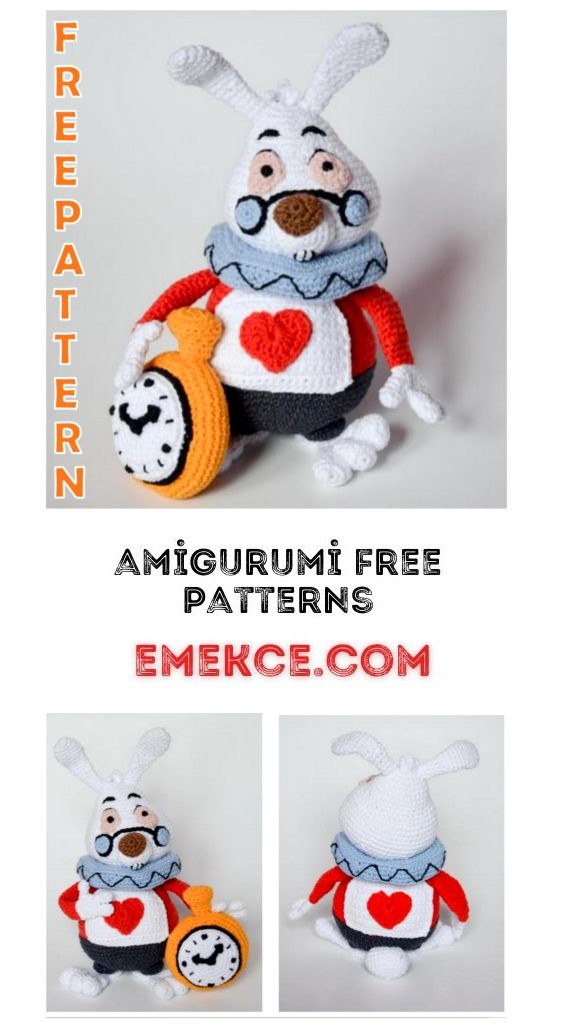
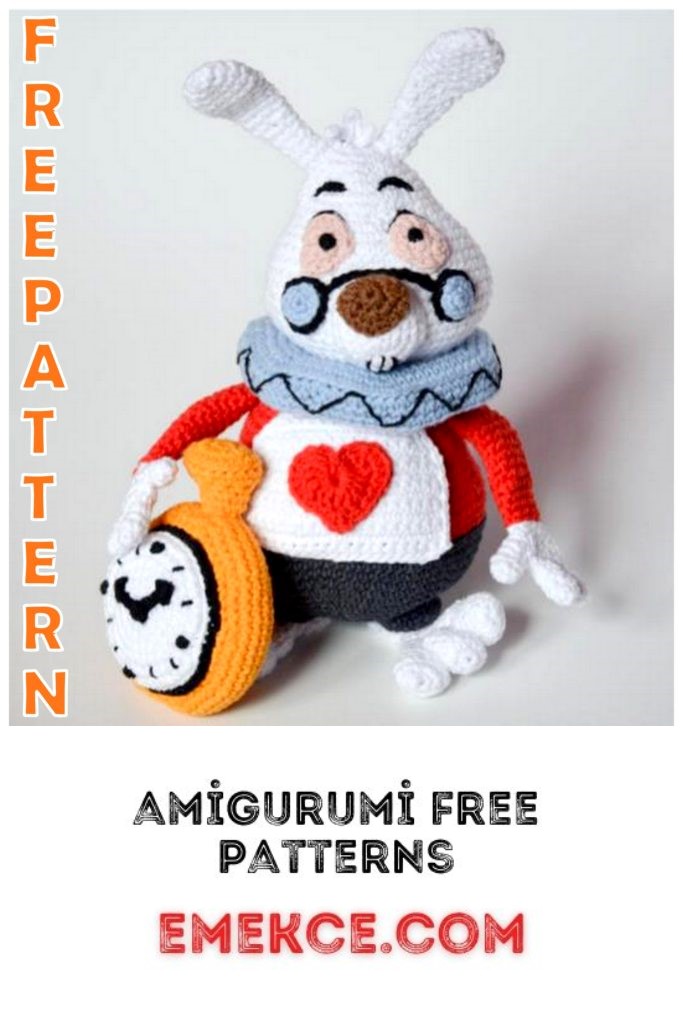
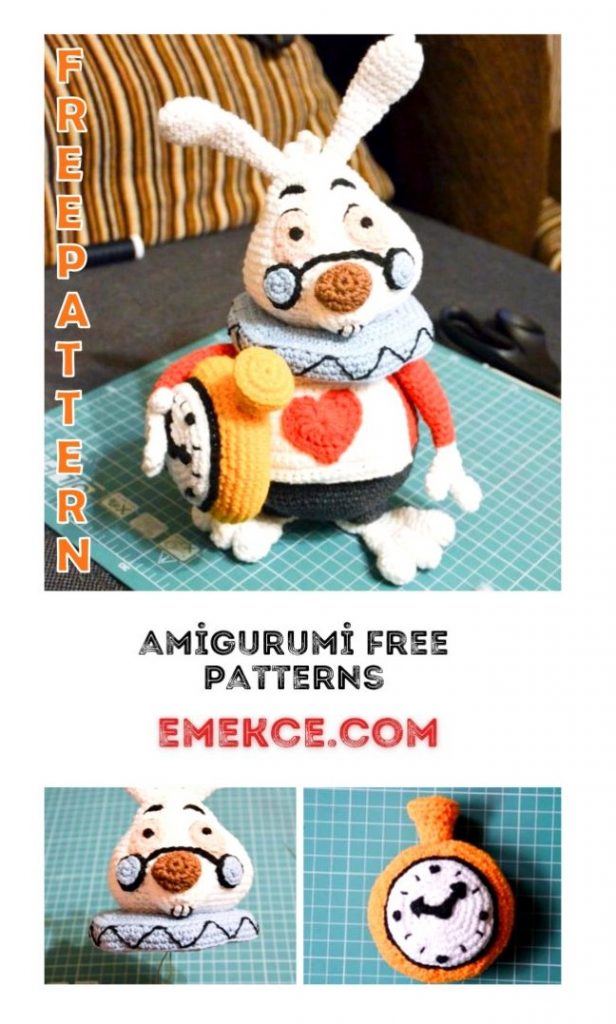
Amigurumi White Rabbit Free Crochet Pattern
We continue to bring together the most beautiful amigurumi patterns related to Amigurumi. In this article you are waiting for a of amigurumi white rabbit pattern.
ABBREVIATIONS:
•Mr: Magic ring,
• sc: single crochet,
•İnc: increase,
•DEC decrease,
• x: repeat.
•BLO: Back Loop only,
•FLO: Front Loop only,
•DC: Double crochet.
WHITE RABBIT
Materials
List of all the materials you will need for the Rabbit:
yarn (I use 55% cotton yarn, the size of which is 174 yards (159 meters) for 50 g, weight Sport / 5 ply (12 wpi), caliber 24-30 st. 4 inches (10 cm).
You can use the colors you like, but the following is a list of the colors that I used:
– white – head, arms, legs, tail, dial, white bathrobe
– dark gray- pants, legs,
– red – blouse, hearts on a dressing gown
– light blue -collar, glasses
brown – nose light
-pink -eye-yellow (gold)
-hour-black – the outlines of glasses, eyebrows, pupils
etc. 3 m – for the ears and hands, a black felt needle, thread, scissors, etc.
Head (1 piece) white yarn
P1: 6 sc into magic ring (6)
P2: 6 inc (12)
P3: * sc, inc * X6 (18)
P4: * sc 2, inc * X6 (24)
P5: sc 24 (24)
P6: * sc 3, inc * X6 (30)
P7: * sc 4, inc * X6 (36)
P8: sc 36 (36)
P9: * sc 7, dec * X4 (32)
P10: * sc 7, inc * X4 (36)
P11: * sc 5, inc * X6 (42)
P12: * sc 2, inc, sc 3, inc * X6 (54)
P13 -P15: sc 54 (54)
P16: * sc 8, inc * X6 (60)
P17 -P18: sc 60 (60)
P19: * sc 8, dec * X6 (54)
P20: * sc 7, dec * X6 (48)
P21: * sc 6, dec * X6 (42)
P22: sc 42 (42)
P23: * sc 5, dec * X6 (36)
P24: * sc 4, dec * X6 (30)
P25: * sc 3, dec * X6 (24) Close
Collar (detail 1) blue yarn
P1: 6 sc into magic ring (6)
P2: 6 inc (12)
P3: * sc, inc * X6 (18)
P4: * sc 2, inc * X6 (24)
P5: * sc 3, inc * X6 (30)
P6: * sc 4, inc * X6 (36)
P7: * sc 5, inc * X6 (42)
P8: * sc 6, inc * X6 (48)
P9: * sc 7, inc * X6 (54)
P10: * sc 8, inc * X6 (60)
P11: * sc 9, inc * X6 (66)
P12: * sc 10, inc * X6 (72)
P13: BLO (rear hinges only) sc 72 (72)
P14 -P15: sc 72 (72)
P16: BLO * sc 10, dec * X6 (66)
P17: * sc 9, dec * X6 (60) P18: * sc 8, dec * X6 (54)
P19: * sc 7, dec * X6 (48)
P20: * sc 6, dec * X6 (42)
P21: * sc 2, dec * around (32)
Ear (details 2) white yarn
P1: sc 9 into magic ring (9)
P2: sc 9 (9)
P3: * sc2, inc * X3 (12)
P4-P6: sc 12 (12)
P7: * sc2, dec * X3 (9)
P8-P12: sc 9 (9)
P13: * sc, dec * X3 (6)
P14-P18: sc 6 (6)
P19: sc 6 (6)
Hair (detail 1) white yarn
P1: 4 ch (4)
P2: sl-st 2, sc (3)
P3: 5 ch (5)
P4: sl-st 2, sc 2 (4)
P5: 4 ch (4)
P6: sl-st 2, sc (3)
Muzzle (detail 1) white yarn
P1: 6 ch (6)
P2: 5 sc on one side of the chain, 5 sc on the other (10)
P3: inc, sc 3, inc 2, sc 3, inc (14)
P4: inc 2, sc 4, inc, sc 6, inc (18)
P5: inc 4, sc 5, inc, sc 6, inc 2 (25)
P6: sc 25 (25)
Nose (detail 1) brown yarn
P1: 8 sc into magic ring (8)
P2: sl-st, [sc, dc into the same loop], [dc, sc into the same loop], [sc, hdc into the same loop], [hdc, sc into the same loop], [sc, dc to the same loop], [dc, sc to the same loop], sl-st (14)
P3: sc 13, sl-st (14)
Points (make 2 – one with a long chain) start with blue yarn
P1: sc 5 into magic ring (5)
P2: 5inc (10) change to black yarn
P3: BLO * sl-st 2, inc sl-st * around for one, ch 11 and for others
Eye right (make 1) light pink yarn
P1: 8 sc into magic ring (8)
P2: sl-st, [sc, dc into the same loop], inc dc, sc, sl-st, [sc, dc, dc into the same loop], inc dc, sc (13) P3: [hdc, sc ], sl-st (3)
Eye left (make 1) light pink yarn
P1: 8 sc into magic ring (8)
P2: sl-st, sc, inc dc, [dc, sc into the same loop], sl-st, sl-st, [sc, hdc into the same loop], sc (11)
P3: inc dc, [dc, dc, sc into the same loop], sl-st (6)
Body (make 1) start with charcoal yarn
P1: 6 sc into magic ring (6)
P2: 6 inc (12)
P3: * sc, inc * X6 (18)
P4: * sc 2, inc * X6 (24)
P5: * sc 3, inc * X6 (30)
P6: * sc 4, inc * X6 (36)
P7: * sc 5, inc * X6 (42)
P8: * sc 6, inc * X6 (48)
P9: 48sc (48)
P10: * sc 7, inc * X6 (54)
P11: * sc 8, inc * X6 (60)
P12: * sc 9, inc * X6 (66)
P13: * sc 10, inc * X6 (72)
P14 -P15: 72sc (72)
P16: sc 71, sl-st (72) close gray change to red yarn
P17: BLO sl-st 72 (72)
P18: BLO sc 72 (72)
P19: sc 72 (72)
P20: * sc 10, dec * X6 (66)
P21: * sc 9, dec * X6 (60)
P22: * sc 8, dec * X6 (54)
P23: sc 54 (54)
P24: * sc 7, dec * X6 (48)
P25 -P27: sc 48 (48)
P28: * sc 6, dec * X6 (42)
P29: * sc 5, dec * X6 (36)
P30: sc 36 (36)
P31: sc 35, sl-st (36) close
Toes (make 6) white yarn
P1: 6 sc into magic ring (6)
P2: * sc, inc, 3sc in1 * X2 (12)
P3: sc 12 (12)
P4: * sc 2, dec * X3 (9)
P5: sc 9 (9) P6: sc 9 (9)
Leg (make 2) white yarn
P1: sc 9 into magic ring (9)
P2: sc 9 (9)
P3: * sc 2, inc * X3 (12)
P4-P6: sc 12 (12)
P7: * sc, dec * X4 (8)
P8: sc 8 (8)
P9: * sc, inc * X4 (12)
P10: sc 12 (12)
P11: * sc 2, inc * X4 (16)
P12: * sc 3, inc * X4 (20)
P13: sc 20 (20)
Robe (make 2 pieces – front and back) with white yarn TURN after each row!
P1: 20 ch (20)
P2 -P11: sc 19 (19)
P12: dec, sc 15, dec (17)
P13: dec, sc 13, dec (15)
P14: dec, sc 11, dec (13) P15: dec, sc 9, dec (11)
P16: sc 11 (11) tie a sl-st around every detail of the robe
Heart (make 2) red yarn
P1: 4 ch, sl-st to 1-loop ch (4) You made a loop
P2: Make each stitch of 1 row of ch2, hdc 3, dc 3, hdc, dc 3, hdc 3, ch 2, sl-st
P3: 3 ch, [sc, hdc in the same loop], [hdc, hdc, hdc in the same loop], sc 4, ch, dc, ch, sc 5, [hdc, hdc, hdc in the same loop] , [hdc, sc to the same loop], sl-st
Hand (make 2) red yarn
P1: 9 sc into magic ring (9)
P2-P3: sc 9 (9)
P4: * sc 2, inc * X3 (12)
P5 -P13: sc 12 (12)
P14: * sc 2, dec * X3 (9)
P15 -P16: sc 9 (9)
P17: sc 9 (9)
Hand (make 2) white yarn
P1: 6 sc into magic ring (6)
P2: * sc, inc, 3sc v1 * X2 (12)
P3: sc 12 (12)
P4: * sc 2, dec * X3 (9)
P5: sc 9 (9) P6: sc 9 (9)
Finger (make 6) white yarn
P1: 5 sc into magic ring (5)
P2-P3: sc 5 (5)
P4: sc 4, sl-st (5)
Leg (make 2) dark gray yarn
P1: ch 12, sl-st in 1-st ch (12)
P2: * sc 2, inc * X4 (16)
P3: sc 16 (16)
P4: * sc 3, inc * X4 (20)
Tail (make 1) white yarn
P1: 6 sc into magic ring (6)
P2: * sc, inc, 3sb in 1 * X2 (12)
P3: * sc, inc * X6 (18)
P4: * sc 2, inc * X6 (24)
P5-P9: sc 24 (24)
P10: * sc 2, dec * X6 (18)
Watch Case (1 piece) with yellow yarn
P1: 6 sc into magic ring (6)
P2: 6 inc (12)
P3: * sc, inc * X6 (18)
P4: * sc 2, inc * X6 (24)
P5: * sc 2, inc * X8 (32)
P6: * sc 3, inc * X8 (40)
P7: * sc 3, inc * X10 (50)
P8: * sc 4, inc * X10 (60)
P9-P12: sc 60 (60)
P13: * sc 4, dec * X10 (50)
P14: * sc 3, dec * X10 (40)
P15: * sc 3, dec * X8 (32)
P16: * sc 2, dec * X8 (24) close
Dial (make 1) start with white yarn
P1: 6 sc into magic ring (6)
P2: 6 inc (12)
P3: * sc, inc * X6 (18)
P4: * sc 2, inc * X6 (24)
P5: * sc 2, inc * X8 (32)
P6: * sc 3, inc * X8 (40)
P7: * sc 3, inc * X10 (50) change to black
P8: sl-st around (50) close
Watch button (make 1) yellow yarn
P1: 10 sc into magic ring (10)
P2: inc (20)
P3: sc 20 (20)
P4: BLO sc 20 (20)
P5: dec 10 (10)
P6-P8: sc 10 (10) close
Assembly
1. Fill the clock
2. Sew on the dial to mask the hole. Put on the watch button and sew it on top.
3. Two black hands were cut out of black felt, 4 small circles (they will indicate the 3rd, 6th, 9th and 12th hour) and one large circle as a center (we will knit or sew these parts).
Two black hands were cut out of black felt, 4 small circles (they will indicate the 3rd, 6th, 9th and 12th hour) and one larger circle in
as a center. Sew the clock hands and a larger circle in the center. Sew small circles at 3, 6, 9 and 12 hours. Take the black yarn and mark the other clock with small black lines. Two black hands were cut out of black felt, 4 small circles (they will indicate the 3rd, 6th, 9th and 12th hour) and one larger circle as a center. Sew the clock hands and a larger circle in the center. Sew small circles at 3, 6, 9 and 12 hours. Take the black yarn and mark the other clock with small black lines.
We have all the details already done. Let’s sew them together …
Place the wires in your ears and / or lightly pop them with cotton. Strip your head if you haven’t done this before. Sew the ears to the head. Sew the hair between the ears. With each black thread, a pupil is made in each eye.
Sew the nose to the muzzle. Cut a small circle from black felt and sew like a mouth. With white yarn make two long teeth. Put out the muzzle on the small side. Sew the finished face to the head. Take glasses with a long chain. Sew it on one side of the nose, then sew the chain over the nose. See the photo.
Sew another piece of glasses on the other side. Sew on your eyes. With black yarn, make a contour on the top of the eyes. Make eyebrows. With black yarn, make a zigzag line on the collar. The collar is denser more at the edges, less in the center.
Sew the collar to the head. I also laid a wire connecting the head, collar and torso. Squeeze your legs and sew three toes on each foot. Assemble all the legs. Sew 3 fingers to each arm, 2 on the upper arm, 1 on the side like a thumb. See the photo.
Sew hearts to two clothes. One will be turned back, the other back. Sew robes, one facing the front and the other facing the back. If you have not done this before, remove the body. (side view) Stuff your legs a little and sew them to the body. Do not worry if your rabbit is not standing still, we will fix it later.
Attach your hands to your hands. Insert the wires into your hands or fill them (or both actually 🙂
Sew both hands to each side of the body. Remember that the thumbs should be pointing up. Finished body.
Sew the head / collar to the body. Pull the tail very, very firmly. Try to find a position in which the tail will support the rabbit so that it stands still, and sew it in this place.
Put the clock in the hands of the rabbit and watch how he worries that he is late 🙂
I hope you enjoyed this tutorial!