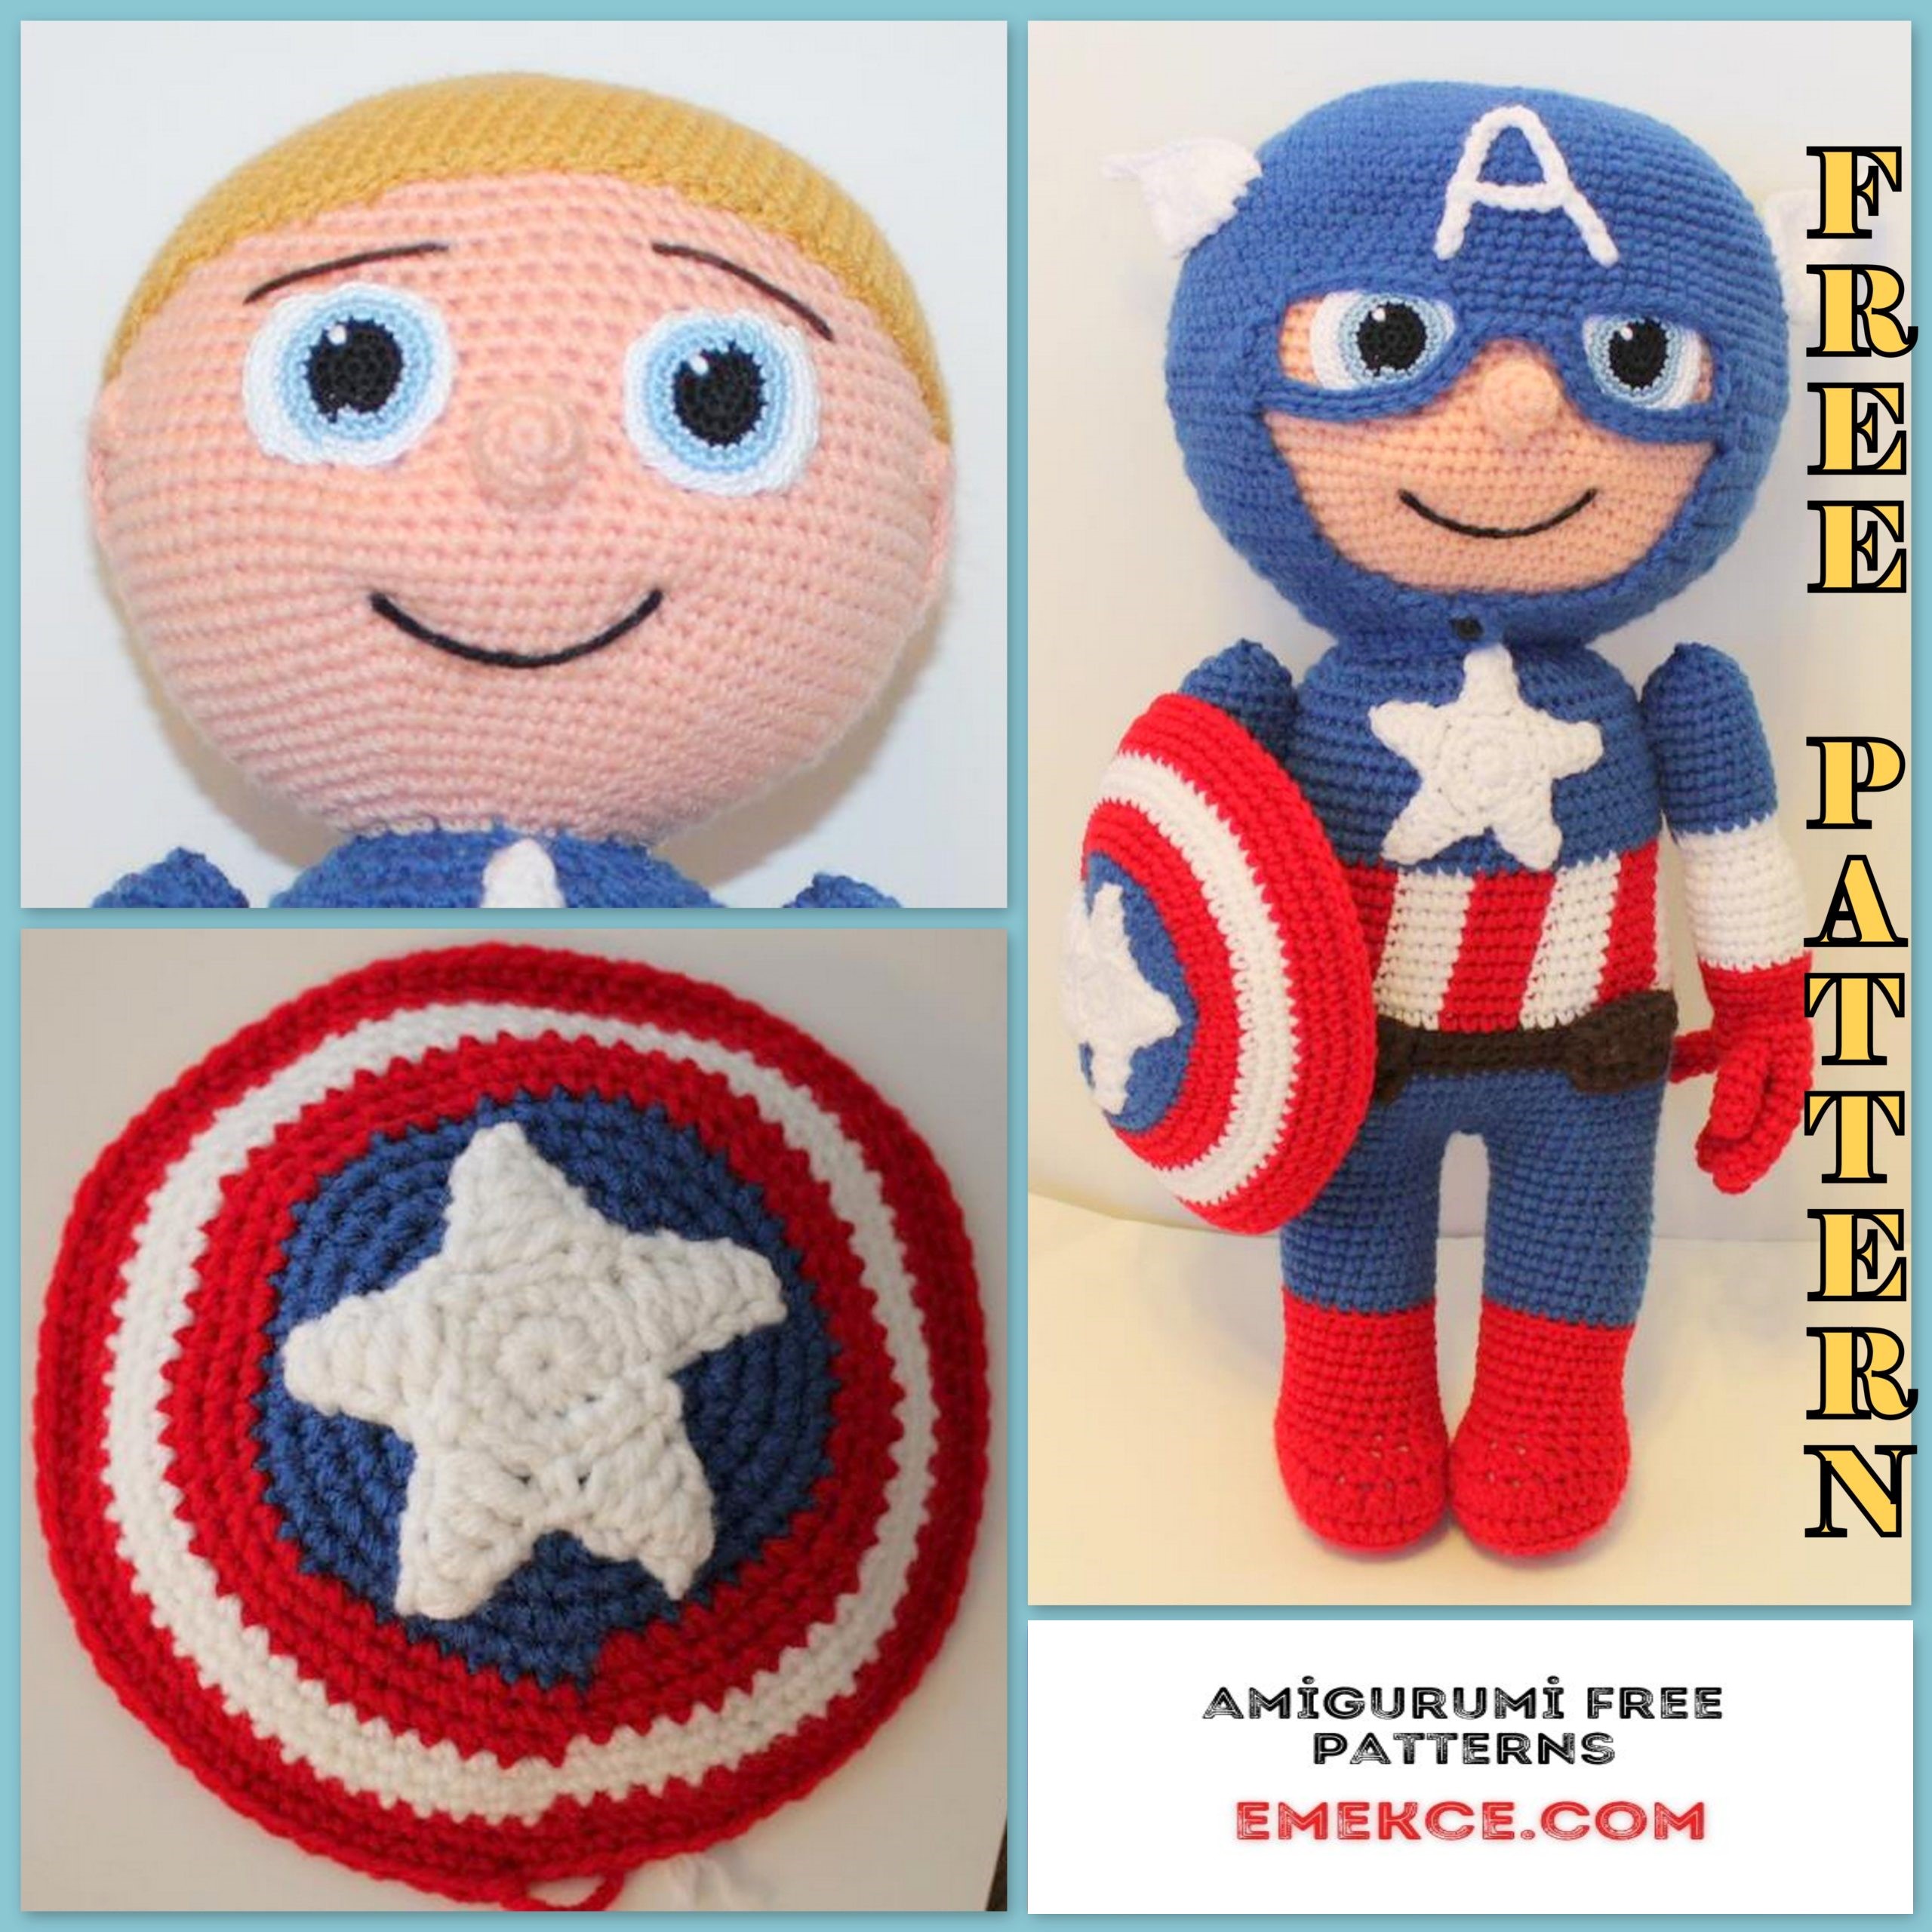
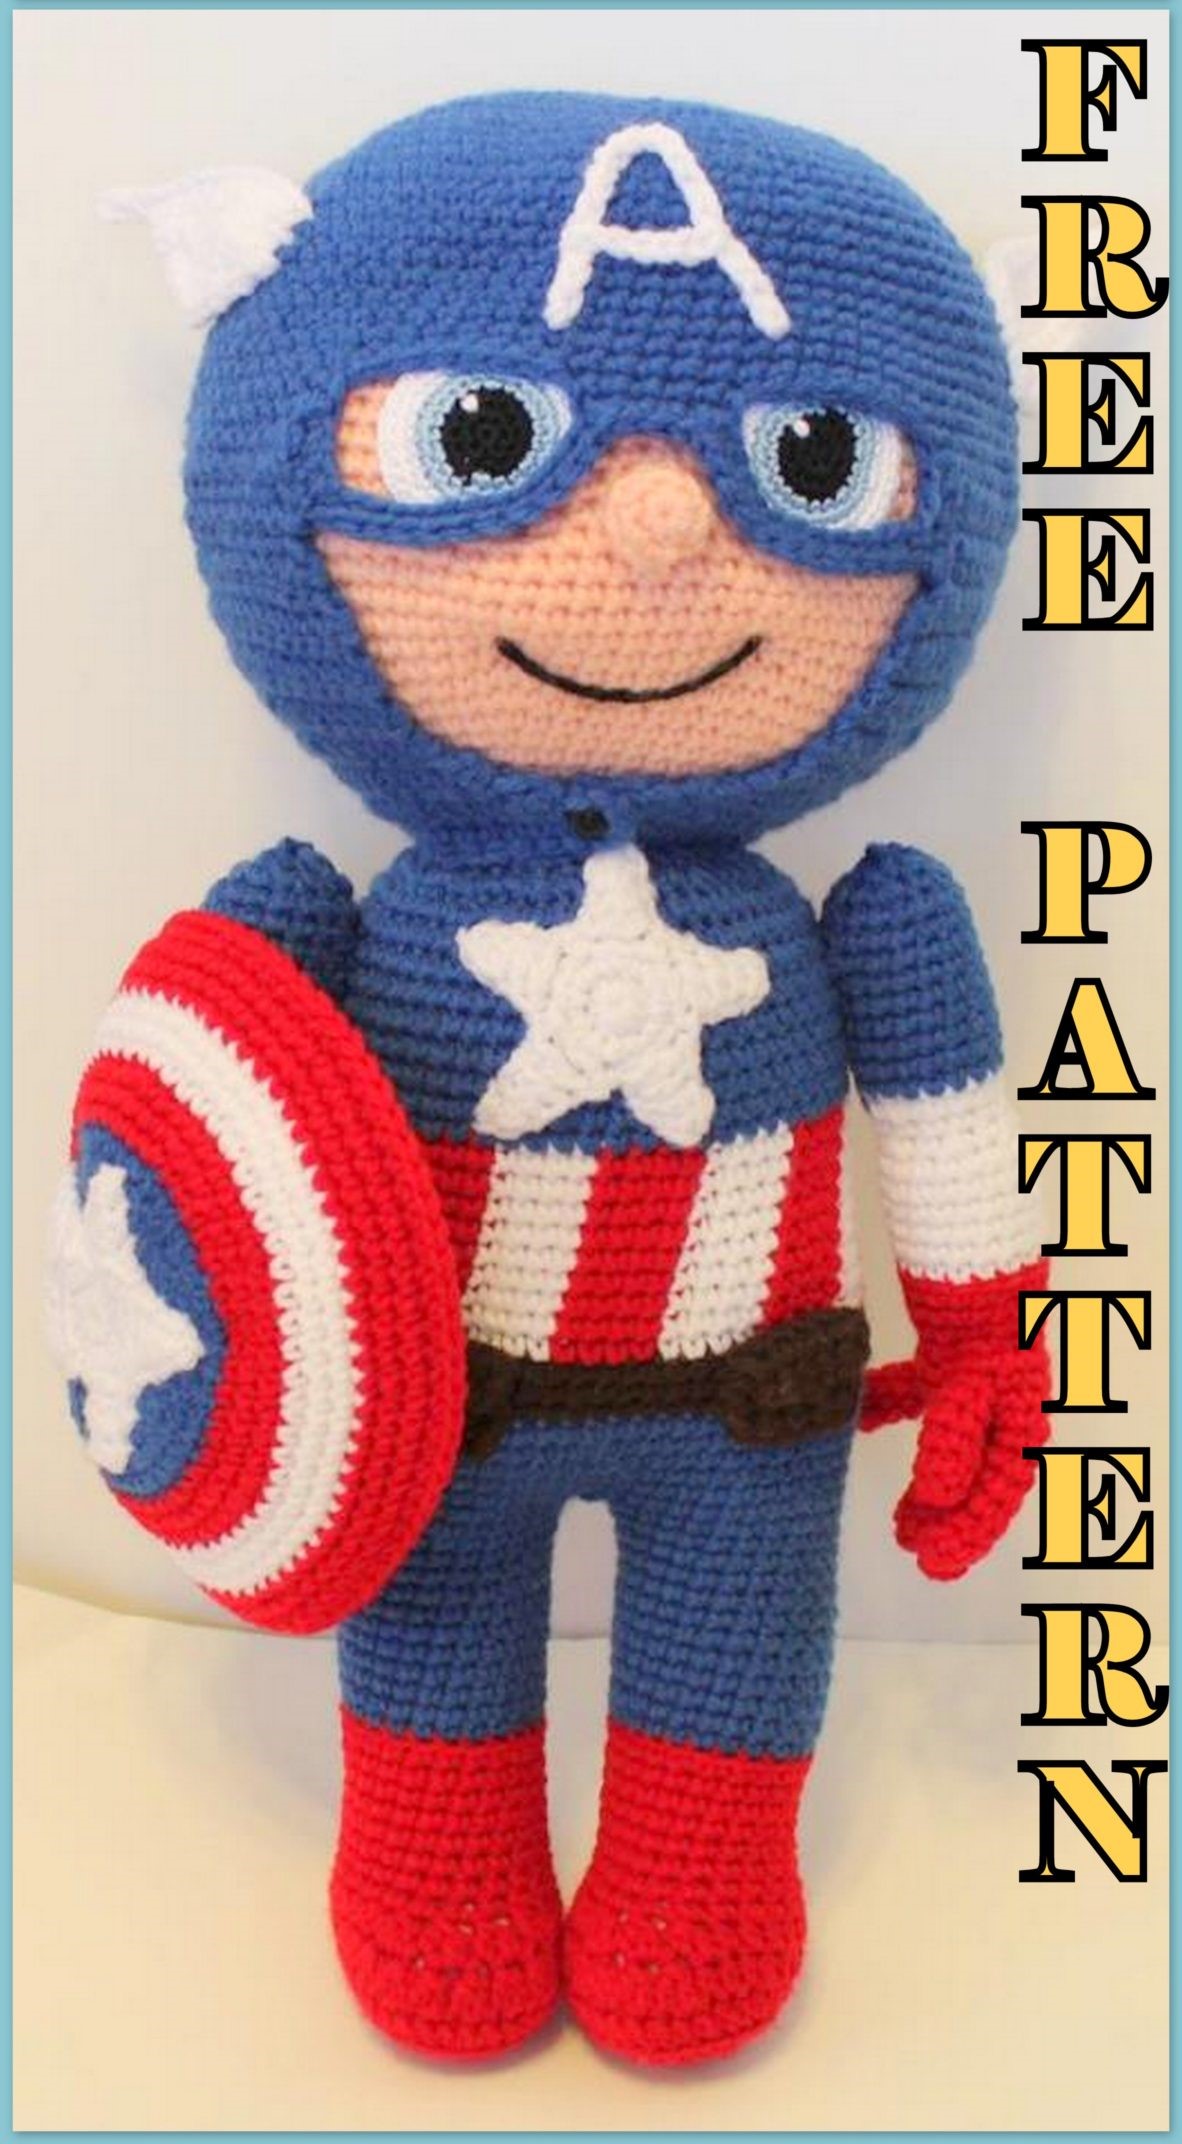
Captain America Amigurumi Free Pattern
Amigurumi free patterns continue to meet you. In this article captain america amigurumi free pattern is waiting for you.
Materials
Yarn of several colors:
Red (Shoes, Hands, Shield, stripes on the body)
Blue (Feet, body, arms, mask, shield)
White (Shield, hands, star, stripes on the body, wings to the mask)
Brown (belt)
Beige (Leather)
Yellow (hair)
Threads for embroidery (eyes): black, blue, white
A small blue or black button.
Hooks B / 1 (2.25mm), F / 5 (3.75mm), G / 6 (4.00mm)
Needle
Knitting markers
The filler that you prefer to stuff toys with.
Abbreviations
ch – air loop
sc – single crochet
hdc – half crochet
dc – double crochet
dec – decrease (next 2 stitches are sewn together)
dec hdc – half crochet decrease
inc – increase (knit 2 times sbn in the next stitch),
dc inc – make 2 double ssn in the next loop.
sl st. – connecting column
st– stitch (s)
sk – skip VP or stitch
SP – space
BLO – only loop back
R – in a circle
[] repeat the job as written
(), the number of stitches you should have at the end of your row
FO – close
MR – magic ring
Shoes / Legs make 2 pcs:
Red thread and hook F.
R1: MR 8
R2: inc x8 (16)
R3: [inc, sc 1] x8 (24)
R4: [inc, sc 2] x8 (32)
R5: BLO hdc 32 (32)
R6: hdc 10, hdc dec x6, hdc 10 (26)
R7: hdc 9, hdc dec x4, hdc 9 (22)
R8-14: sc 22
R15: [inc, sc 10] x2 (24)
Change the thread to blue.
R16: BLO sc 24
R17-26: sc 24
R27: [inc, sc 5] x4 (28)
FO, leave the thread for sewing.
Fill up.
Body / Head:
Blue thread and hook F.
R1: Take both legs, and knit them together with 2 stitches. These two joining stitches will not count towards
Your loop count. Now tie your legs in a circle. Put the marker at the beginning – this will be the back of your toy
so that you do not see how you change color (52)
R2: [inc, sc 12] x4 (56)
R3-6: sc 56
Change color to brown.
R7-9: sc 56
Change threads to red and white
R10-18: white thread sc 3, (red thread sc 4, white thread sc 4) x6, red nickel sc 4, white thread sc 1 (56)
Change the threads to blue.
R19-27: sc 56
R28: [dec, sc 2] x14 (42)
R29: [dec, sc 1] x14 (28)
R30: dec x14 (14)
Change the color to beige (skin color)
R31: inc x14 (28)
R32: [inc, sc 1] x14 (42)
Start stuffing the body.
R33: [inc, sc 2] x14 (56)
R34: sc 56
R35: [inc, sc 7] x7 (63)
R36: sc 63
R37: [inc, sc 8] x7 (70)
R38: [inc, sc 9] x7 (77)
R39: [inc, sc 10] x7 (84)
R40-47: sc 84
Leave a piece of beige yarn to make the nose in the center of the head.
R48-55: sc 84
Add padding to the body.
R56: sc 6, [dec, sc 12] x5, dec, sc 6 (78)
R57: [dec, sc 11] x6 (72)
R58: sc 5, [dec, sc 10] x5, dec, sc 5 (66)
R59: [sc 9, dec] x6 (60)
R60: sc 4, [dec, sc 8] x5, dec, sc 4 (54)
R61: [dec, sc 7] x6 (48)
R62: sc 3, [dec, sc 6] x5, dec, sc 3 (42)
R63: [sc 5, dec] x6 (36)
R64: sc 2, [dec, sc 4] x5, dec, sc 2 (30)
R65: [dec, sc 3] x6 (24)
Fill the neck and head with stuffing. Fill the neck very firmly so that the doll’s head does not fall.
R66: sc 1, [dec, sc 2] x5, dec, sc 1 (18)
R67: [sc 1, dec] x6 (12)
Fill to the end.
R68 dec x6 (6)
Fo, close.
Make a nose: count down 22 rows from the top of your head. Thread the yarn into the needle and sew 3 loops
several times to form a nose. Use the same yarn as for the head, count 3 loops to the right
and insert the needle there, count 6 rows down and sew them with a few stitches. Need to do such as the right,
so on the left to form dimples of a smile (see photos),
A big nose.
Doll body color thread and hook F.
R1: MR 6
R2: [inc, sc 1] x3 (9)
R3: sc 9 FO, leave the tail for sewing to stand.
Sew it to stand on top of the previous nose.
Eyes do 2.
Black thread and hook B.
R1: MR 6
R2: inc x6
R3: [inc, sc 1] x6 (18)
Change to a blue thread.
R4: [inc, sc 2] x6 (24)
R5: [sc 3, inc] x6 (30)
Change to a white thread.
R6: sc 2, [inc, sc 4] x5, inc, sc 2, sl st to the next st (36)
R7: turn, sk sl st, sc 12, sl st, turn
R8: sk sl st, sc 9, sl st
FO, leave the thread for sewing.
Use white to make his eyes sparkle).
Hair.
Yellow thread and hook G.
If the head is not filled firmly, the hair will be too large. Pay attention to this and if they
turn out to be too big, change the hook.
R1: MR 6
R2: inc x6 (12)
R3: [inc, sc 1] x6 (18)
R4: [inc, sc 2] x6 (24)
R5: [inc, sc 3] x6 (30)
R6: sc 2, [inc, sc 4] x5, inc, sc 2 (36)
R7: [sc 5, inc] x6 (42)
R8: sc 3, [inc, sc 6] x5, inc, sc 3 (48)
R9: [inc, sc 7] x6 (54)
R10: sc 4, [inc, sc 8] x5, inc, sc 4 (60)
R11: [sc 9, inc] x6 (66)
R12: sc 5, [inc, sc 10] x5, inc, sc 5 (72)
R13: [inc, sc 11] x6 (78)
R14: sc 6, [inc, sc 12] x5, inc, sc 6 (84)
R15-27: sc 84
FO, leave the thread for sewing.
Sew on the crown to make eyebrows, use the same yarn
or black as in the picture.
Add a mouth of black yarn or embroidery thread. Use tags to place your mouth.
Ear – Make 2
A thread of skin color for your doll.
On the side of the head where you want to make the ear, sew a chain stitch (google, embroidery technique) in the form
crescent moon. Fasten well at the end. Using the same yarn and hook F, knit sc into each of the vestibules
stitches you made.
Fo, hide the tail.
Fingers – do 3 on the hand (in general, there should be 6)
The red thread and the hook F. The picture is a different color so that it is better visible.
R1: MR 6
R2-6: sc 6
Fo hide the tail
Little finger and thumb – do 1 each for 2 hands (in general, there should be 4)
Red yarn and hook F.
R1: MR 5
R2-5: sc 5 Close the thumb and hide the tail. Do not cut the yarn on the little finger, continue to knit.
Hand / Hand – do 2
Red yarn and hook F.
R1: working with the little finger, sc 2, take 1 finger, knit sc 3, bermt finger two, knit sc 3, take finger three
we knit sc 6, sc 3 on the finger two, sc 3 on the finger one, sc 3 on the little finger. (23)
R2: sc 23
Right hand R3: sc, dec, sc 2, dec, thumb sc 2, sc 2, dec, sc 2, dec, sc 2, dec, sc 2 (18)
Right hand R4: dec, sc 3, sc 3 around the outside of the thumb, sc 11 (18)
Left hand R3: sc, dec, sc 2, dec, sc 2, dec, sc 2, with thumb sc 2, dec, sc 2, dec, sc 2 (18)
Left hand R4: sc 10, sc 3 around the thumb, dec, sc 4 (18)
The following instructions are for both hands.
R5: sc 18 R6: [dec, sc 1] x6 (12)
R7: [inc, sc 1] x6 (18)
R8-9: sc 18
Change the color to white.
R10: BLO sc 18
R11-15: sc 18
R16: [dec, sc 1] x6 (12)
R17: sc 12
R18: [inc, sc 1] x6 (18)
Change the color to blue.
R19-27: sc 18
R28: [dec, sc 1] x6 (12)
Stuff your hand, not your fingers.
R29: dec x6 (6)
R30: dec
FO, leave the thread for sewing.
Sew to the body.
Stars make 2 pcs. One on the chest and one on the shield.
White thread and hook F.
R1: MR 10
R2: [inc, sc 1] x5 (15)
R3: sl st, [ch 5, sc in 2nd ch off the hook, hdc, dc, tc, sk 2 sts with R2, sc] x5
FO, leave the thread for sewing.
Sew one star to your chest and leave the other for later.
Mask
Blue thread and hook G.
Do not include sl st in the count.
R1: MR 8
R2: inc x8 (16)
R3: [inc, sc 1] x8 (24)
R4: [inc, sc 2] x8 (32)
R5: sc 32
R6: [sc 3, inc] x8 (40)
R7: sc 2, [inc, sc 4] x7, inc, sc 2 (48)
R8: [inc, sc 5] x8 (56)
R9: sc 3, [inc, sc 6] x7, inc, sc 3 (64)
R10: sc 64
R11: [sc 7, inc] x8 (72)
R12: sc 4, [inc, sc 8] x7, inc, sc 4 (80)
R13: sc 80
R14: [inc, sc 9] x8 (88)
R15-24: sc 88
R25: sc 35, ch 15, sk 6 sts, sc 6, ch 15, sk 6 sts, sc 35 (106)
R26: sc 33, dec, sc 15, dec, sc 2, dec, sc 15, dec, sc 33 (102)
Now you have to work in rows, turning.
R27: sc 33, dec, sl st, turn (do not ch 1) (34 not counting sl st) this is ½ row
R28: sk sl st, sc 66, dec, sl st, turn (do not ch 1) (67)
R29: sk sl st, sc 66, dec (do dec in sl st and on the nearest st around the eyes st.) Sl st, turn (do not ch 1) (67)
R30: sk sl st, sc 66, dec, (do dec also like R29) sl st, turn (do not ch 1) (67)
R31: sk sl st, sc 66, inc, ch 1, turn (68)
R32: inc on the same st as ch 1, sc 66, inc, ch 1, turn (70)
R33: inc on the same st as ch 1, sc 68, inc, ch 1, turn (72)
R34-35: sc to the same st as ch 1, sc 71, ch 1, turn (72)
R36: [sc 16, dec] x2, [dec, sc 16] x2, ch 1, turn (68)
R37: [sc 15, dec] x2, [dec, sc 15] x2, ch 1, turn (64)
R38: [sc 6, dec] x3, [dec, sc 6] x5, ch 1, turn (56)
R39: [sc 5, dec] x5, [dec, sc 5] x3, ch 1, turn (48)
R40: [sc 4, dec] x2, [dec, sc 4] x6, ch 1, turn (40)
R41: inc, sc 17, dec x2, sc 17, inc, ch 1, turn (40)
R42: inc, sc 8, dec, sc 18, dec, sc 8, inc, ch 1, turn (40)
R43: inc, sc 10, dec, sc 14, dec, sc 10, inc, ch 1, turn (40)
R44: inc, sc 12, dec, sc 10, dec, sc 12, inc, ch 1, turn (40)
R45: inc, sc 5, dec, sc 24, dec, sc 5, inc, ch 1, turn (40)
R46: inc, sc 38, inc (42)
Fo, close the tail.
Sew a small button outside one bottom corner. This helps to fasten the mask.
The letter “A” on the mask.
Ch 20, sew the outer part of the letter “A” to the mask.
Ch 6, make the horizontal part of the letter “A” sew to the mask.
Wings for the mask. Make 2 pcs
White thread and hook F.
R1: ch 20, sl st in 2nd ch off the hook, sl st x2, sc 2, hdc 2, dc 10, hdc 1, sc 1, ch 1, turn
R2: sc 2, hdc 2, dc 6, hdc 2, sc 1, sl st, turn (not ch 1) (not a complete row)
R3: sk sl st, sc 2, hdc 2, dc 1, tc 2, dc 1, hdc 1, sc 1, sl st
FO, leave the thread for sewing.
Sew to the mask around the edges.
Front of the shield:
Blue thread and hook G.
R1: MR 6
R2: inc x6 (12)
R3: [inc, sc 1] x6 (18)
R4: [sc 2, inc] x6 (24)
R5: [inc, sc 3] x6 (30)
R6: sc 2, [inc, sc 4] x5, inc, sc 2 (36)
R7: [sc 5, inc] x6 (42)
R8: sc 3, [inc, sc 6] x5, inc, sc 3 (48)
Red thread.
R9: [inc, sc 7] x6 (54)
R10: sc 54
R11: sc 4, [inc, sc 8] x5, inc, sc 4 (60)
White thread.
R12: [sc 9, inc] x6 (66)
R13: sc 66
R14: sc 5, [inc, sc 10] x5, inc, sc 5 (72)
Red thread.
R15: sc 72
R16: [inc, sc 11] x6 (78)
R17: sc 78
Fo, hide the end.
Sew a star to the center.
Strap for Shield.
White thread and hook G.
R1: ch 15, turn, sc during 2nd ch off hook, sc 13 (14)
R2-3: ch 1, turn, sc 14
FO, leave the thread for sewing.
Back side of the shield.
White thread and hook G.
R1: MR 6
R2: inc x6 (12)
R3: [inc, sc 1] x6 (18)
R4: [sc 2, inc] x6 (24)
R5: [inc, sc 3] x6 (30)
R6: sc 2, [inc, sc 4] x5, inc, sc 2 (36)
R7: [sc 5, inc] x6 (42)
R8: sc 3, [inc, sc 6] x5, inc, sc 3 (48)
R9: [inc, sc 7] x6 (54)
R10: sc 54
R11: sc 4, [inc, sc 8] x5, inc, sc 4 (60)
R12: [sc 9, inc] x6 (66)
R13: sc 66
R14: sc 5, [inc, sc 10] x5, inc, sc 5 (72)
R15: sc 72
R16: [inc, sc 11] x6 (78)
Fo, hide the thread.
Sew the shield strap to the back of the shield on R6 (as in the picture). With the help of sc, tie 2 parts of the shield with red
thread in a circle. The back of the shield is one line smaller than the front, but has the same number of stitches.
Thus the shield bends in the right direction.
Pockets for the belt make 2 pcs.
Brown yarn and hook F.
R1: ch 6, turn, sc during 2nd ch off hook, sc 4 (5)
R2-11: ch 1, turn, sc 5
FO, leave the thread for sewing.
Put the pieces together about ¾. Sew the sides together, making a small pocket. Fold down
(closing part). You can sew it in this place or sew a small button! Sew to the belt on the left and
right side. If you want, you can embroider a belt buckle and add any other details that you want!