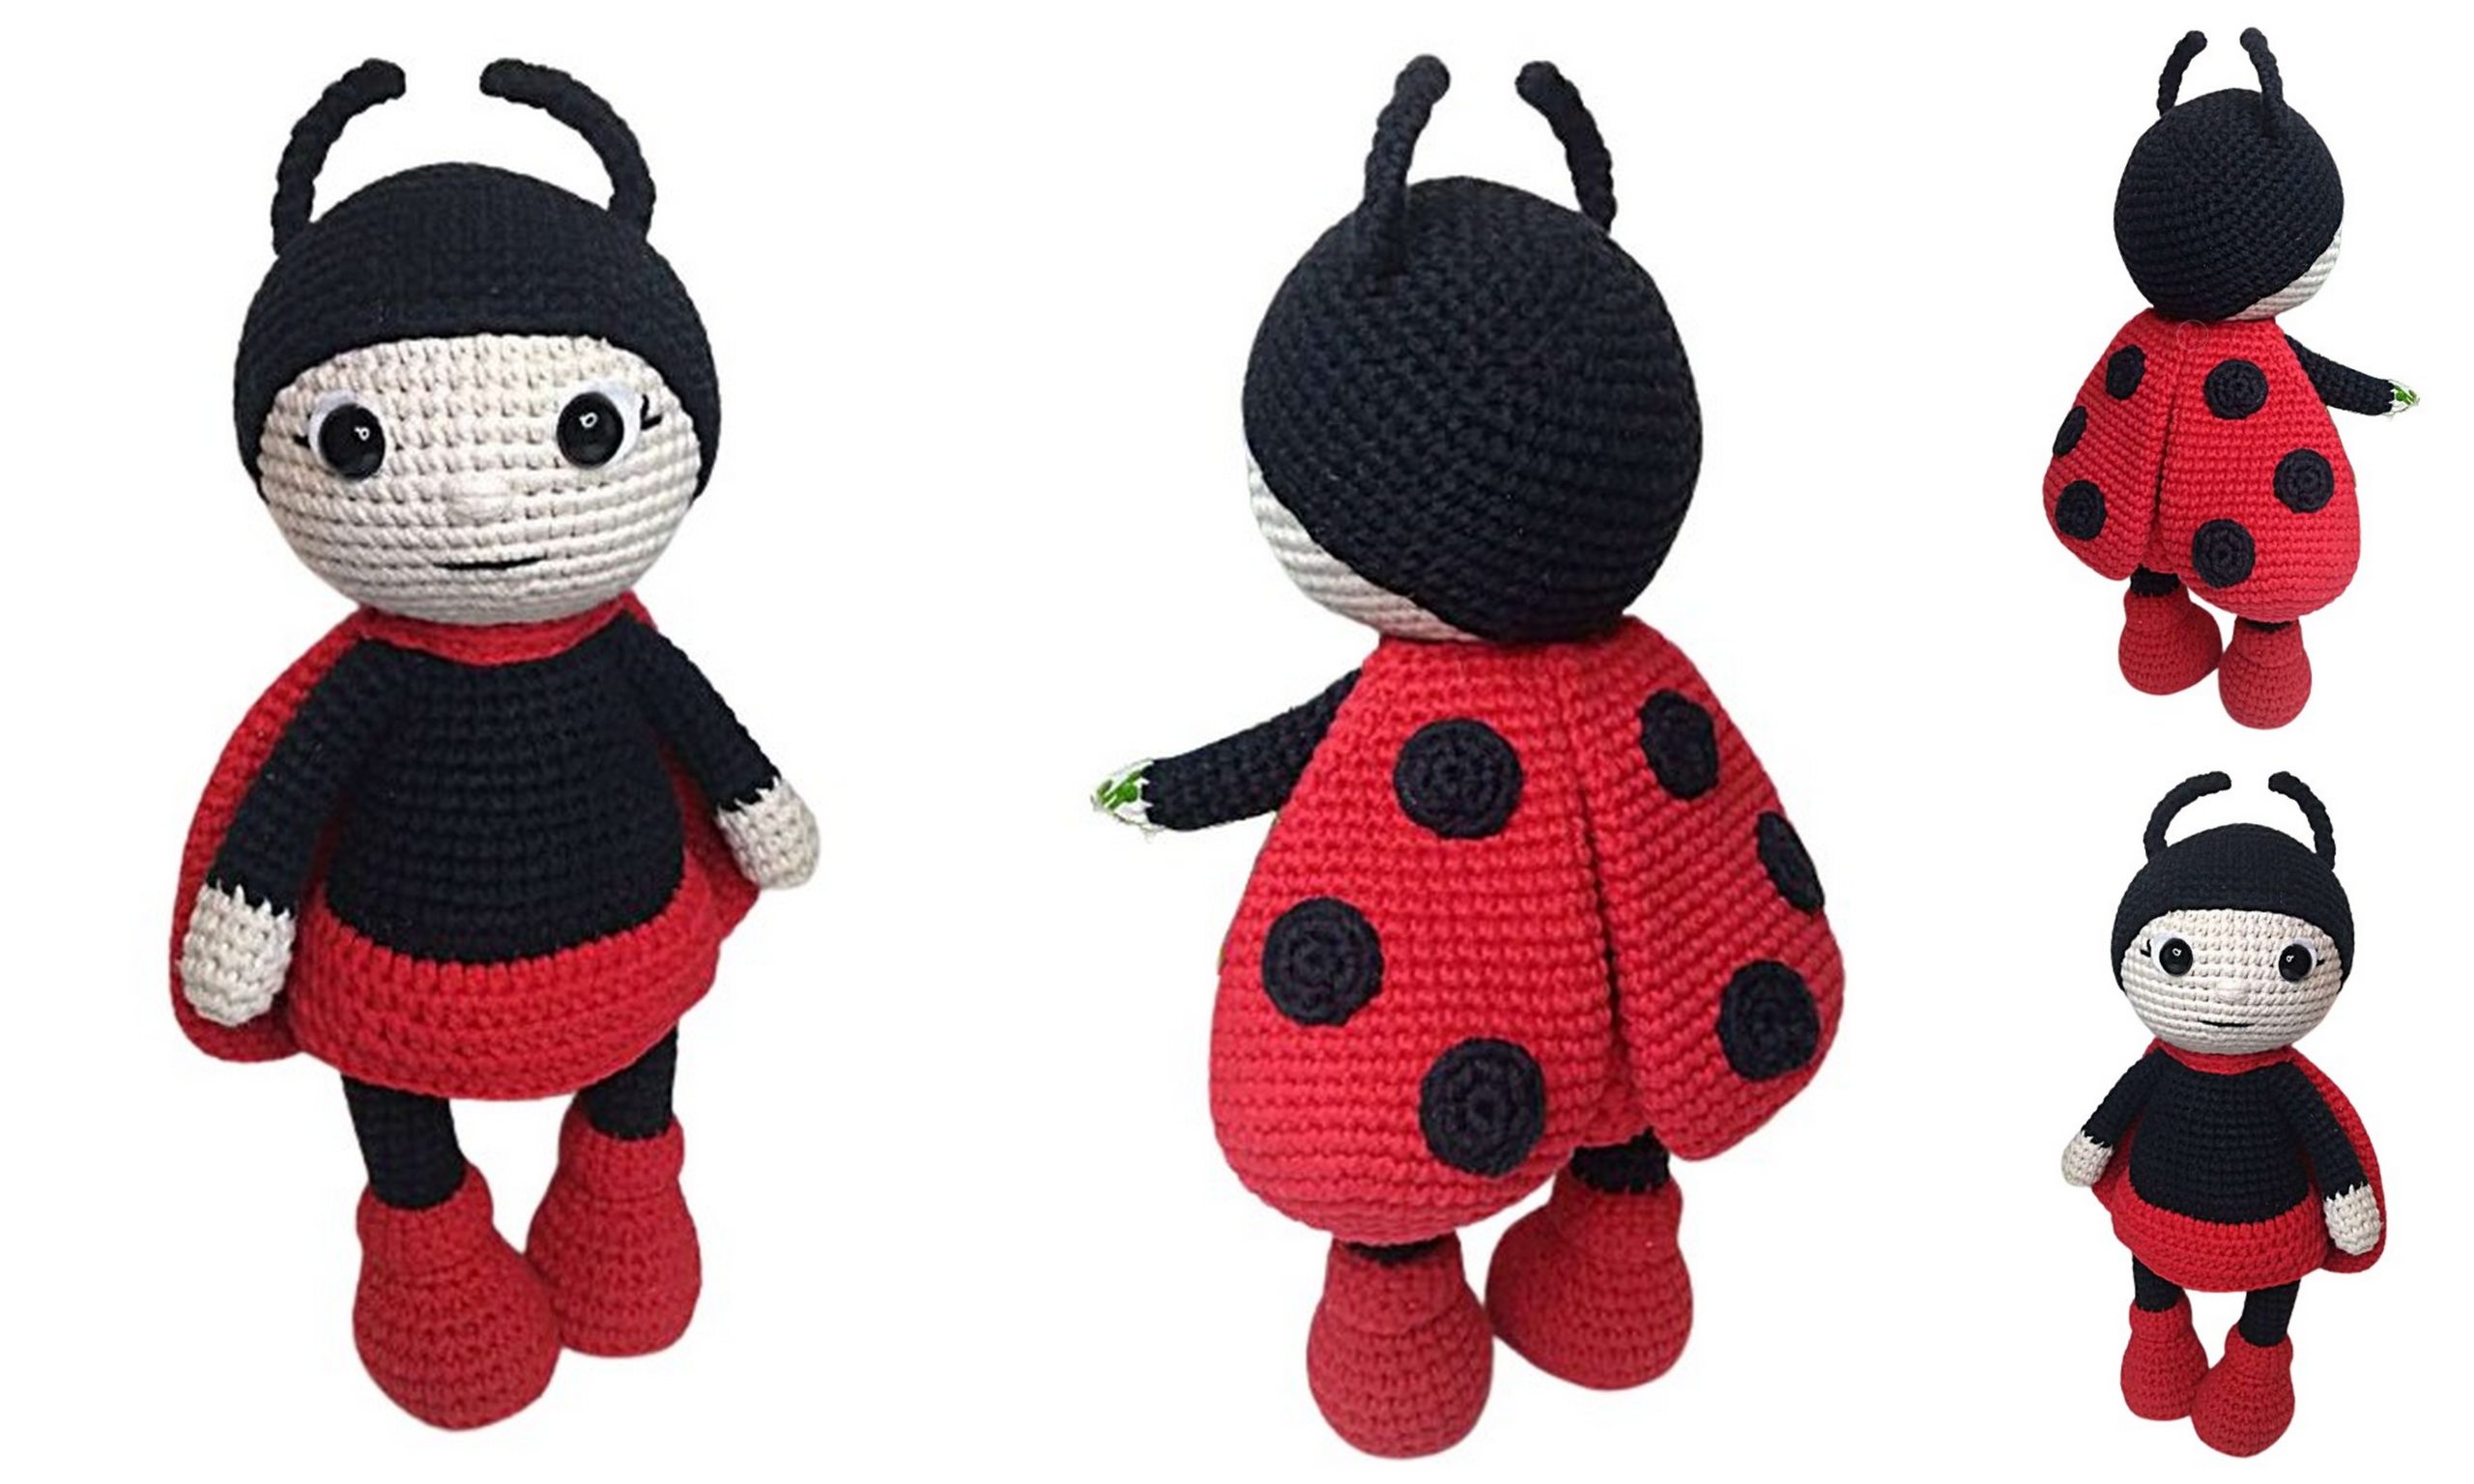
Ladybug Doll Amigurumi Free Pattern: Crochet Your Own Adorable!
Embrace the whimsy of nature with our amigurumi free crochet pattern to create your very own Ladybug Doll amigurumi! Whether you’re an experienced crocheter or new to the craft, this pattern offers a delightful journey into the world of insects. Stitch by stitch, craft your own adorable ladybug doll, complete with vibrant colors and charming details. Perfect for nature enthusiasts or as a playful companion for children, this amigurumi promises hours of joyful crafting and imaginative play. Join us on this bug-filled adventure and let’s crochet our way to creating a lovable ladybug friend!
If you want to access 1000+ free amigurumi patterns, you can download our application from this link!
Materials Needed:
1.Yarn Art Jeans yarn in red color No. 90
2.Yarn Art Jeans yarn in beige color No. 5
3.Yarn Art Jeans yarn in black color No. 53
4.Crochet hook 2 mm
5.Safety eyes with a diameter of 9 mm
6.Two felt circles for eyes with a diameter of 12 mm
7.Needles for facial details and sewing
8.Stuffing material (polyester fiberfill)
9.Scissors
10.Sturdy material for insoles (cardboard or plastic)
11.When using these materials, the toy’s size is approximately 20 cm.
Abbreviations:
MC – Magic Circle
ch – chain
sc – single crochet
inc – increase
hdc – half double crochet
dc – double crochet
dec – decrease
sl st – slip stitch
BLO – back loop only
PATTERN – Ladybug Doll Amigurumi
Head – Ladybug Doll Amigurumi:
Using beige yarn:
1: 6 sc in MC
2: 6 inc (12)
3: (1 sc, 1 inc) repeat 6 times (18)
4: (2 sc, 1 inc) repeat 6 times (24)
5: (3 sc, 1 inc) repeat 6 times (30)
6: (4 sc, 1 inc) repeat 6 times (36)
7: (5 sc, 1 inc) repeat 6 times (42)
8: (6 sc, 1 inc) repeat 6 times (48)
9: (7 sc, 1 inc) repeat 6 times (54)
10-19: 10 rounds of 54 sc each
Insert safety eyes with felt circles between rounds 14 and 15, leaving 6 stitches between the eyes. Secure the eyes.
20: (7 sc, 1 dec) repeat 6 times (48)
21: (6 sc, 1 dec) repeat 6 times (42)
22: (5 sc, 1 dec) repeat 6 times (36)
23: (4 sc, 1 dec) repeat 6 times (30)
24: (3 sc, 1 dec) repeat 6 times (24)
25: (2 sc, 1 dec) repeat 6 times (18)
Stuff the head.
26: (1 sc, 1 dec) repeat 6 times (12)
27: 6 dec (6)
Cut the yarn, draw it through the remaining stitches, pull tight to close the hole, secure the yarn, and hide it inside the head.
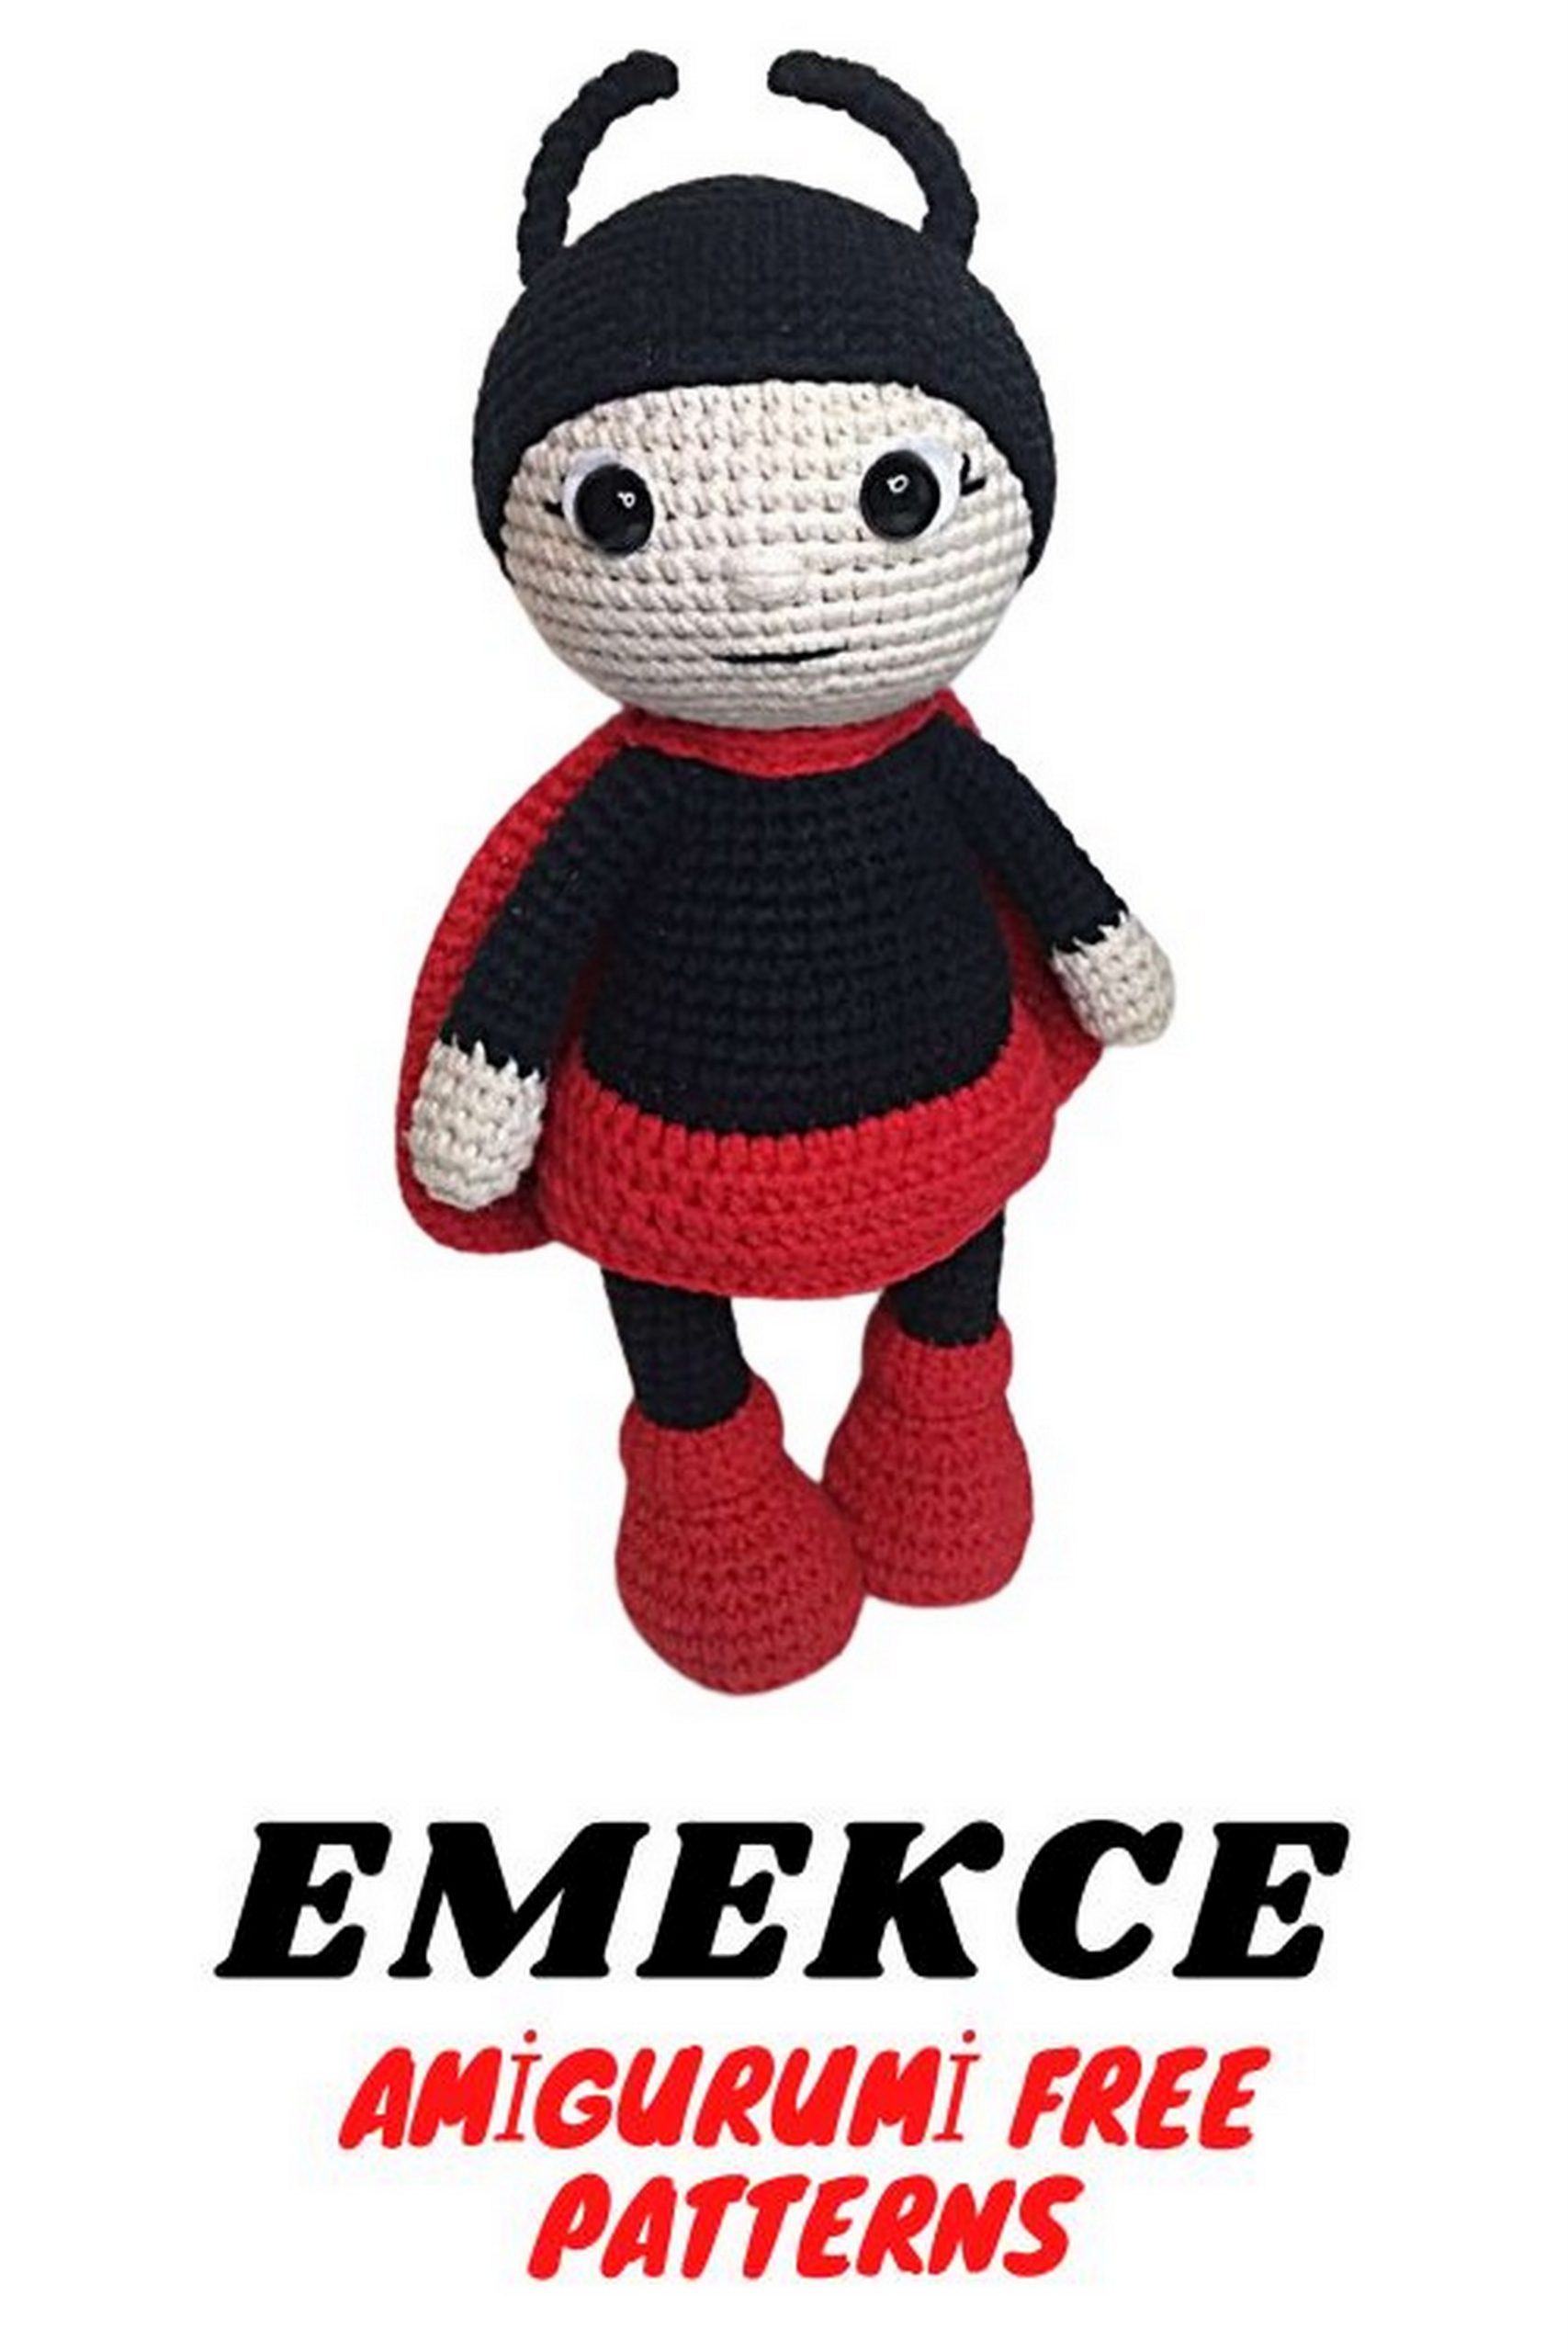
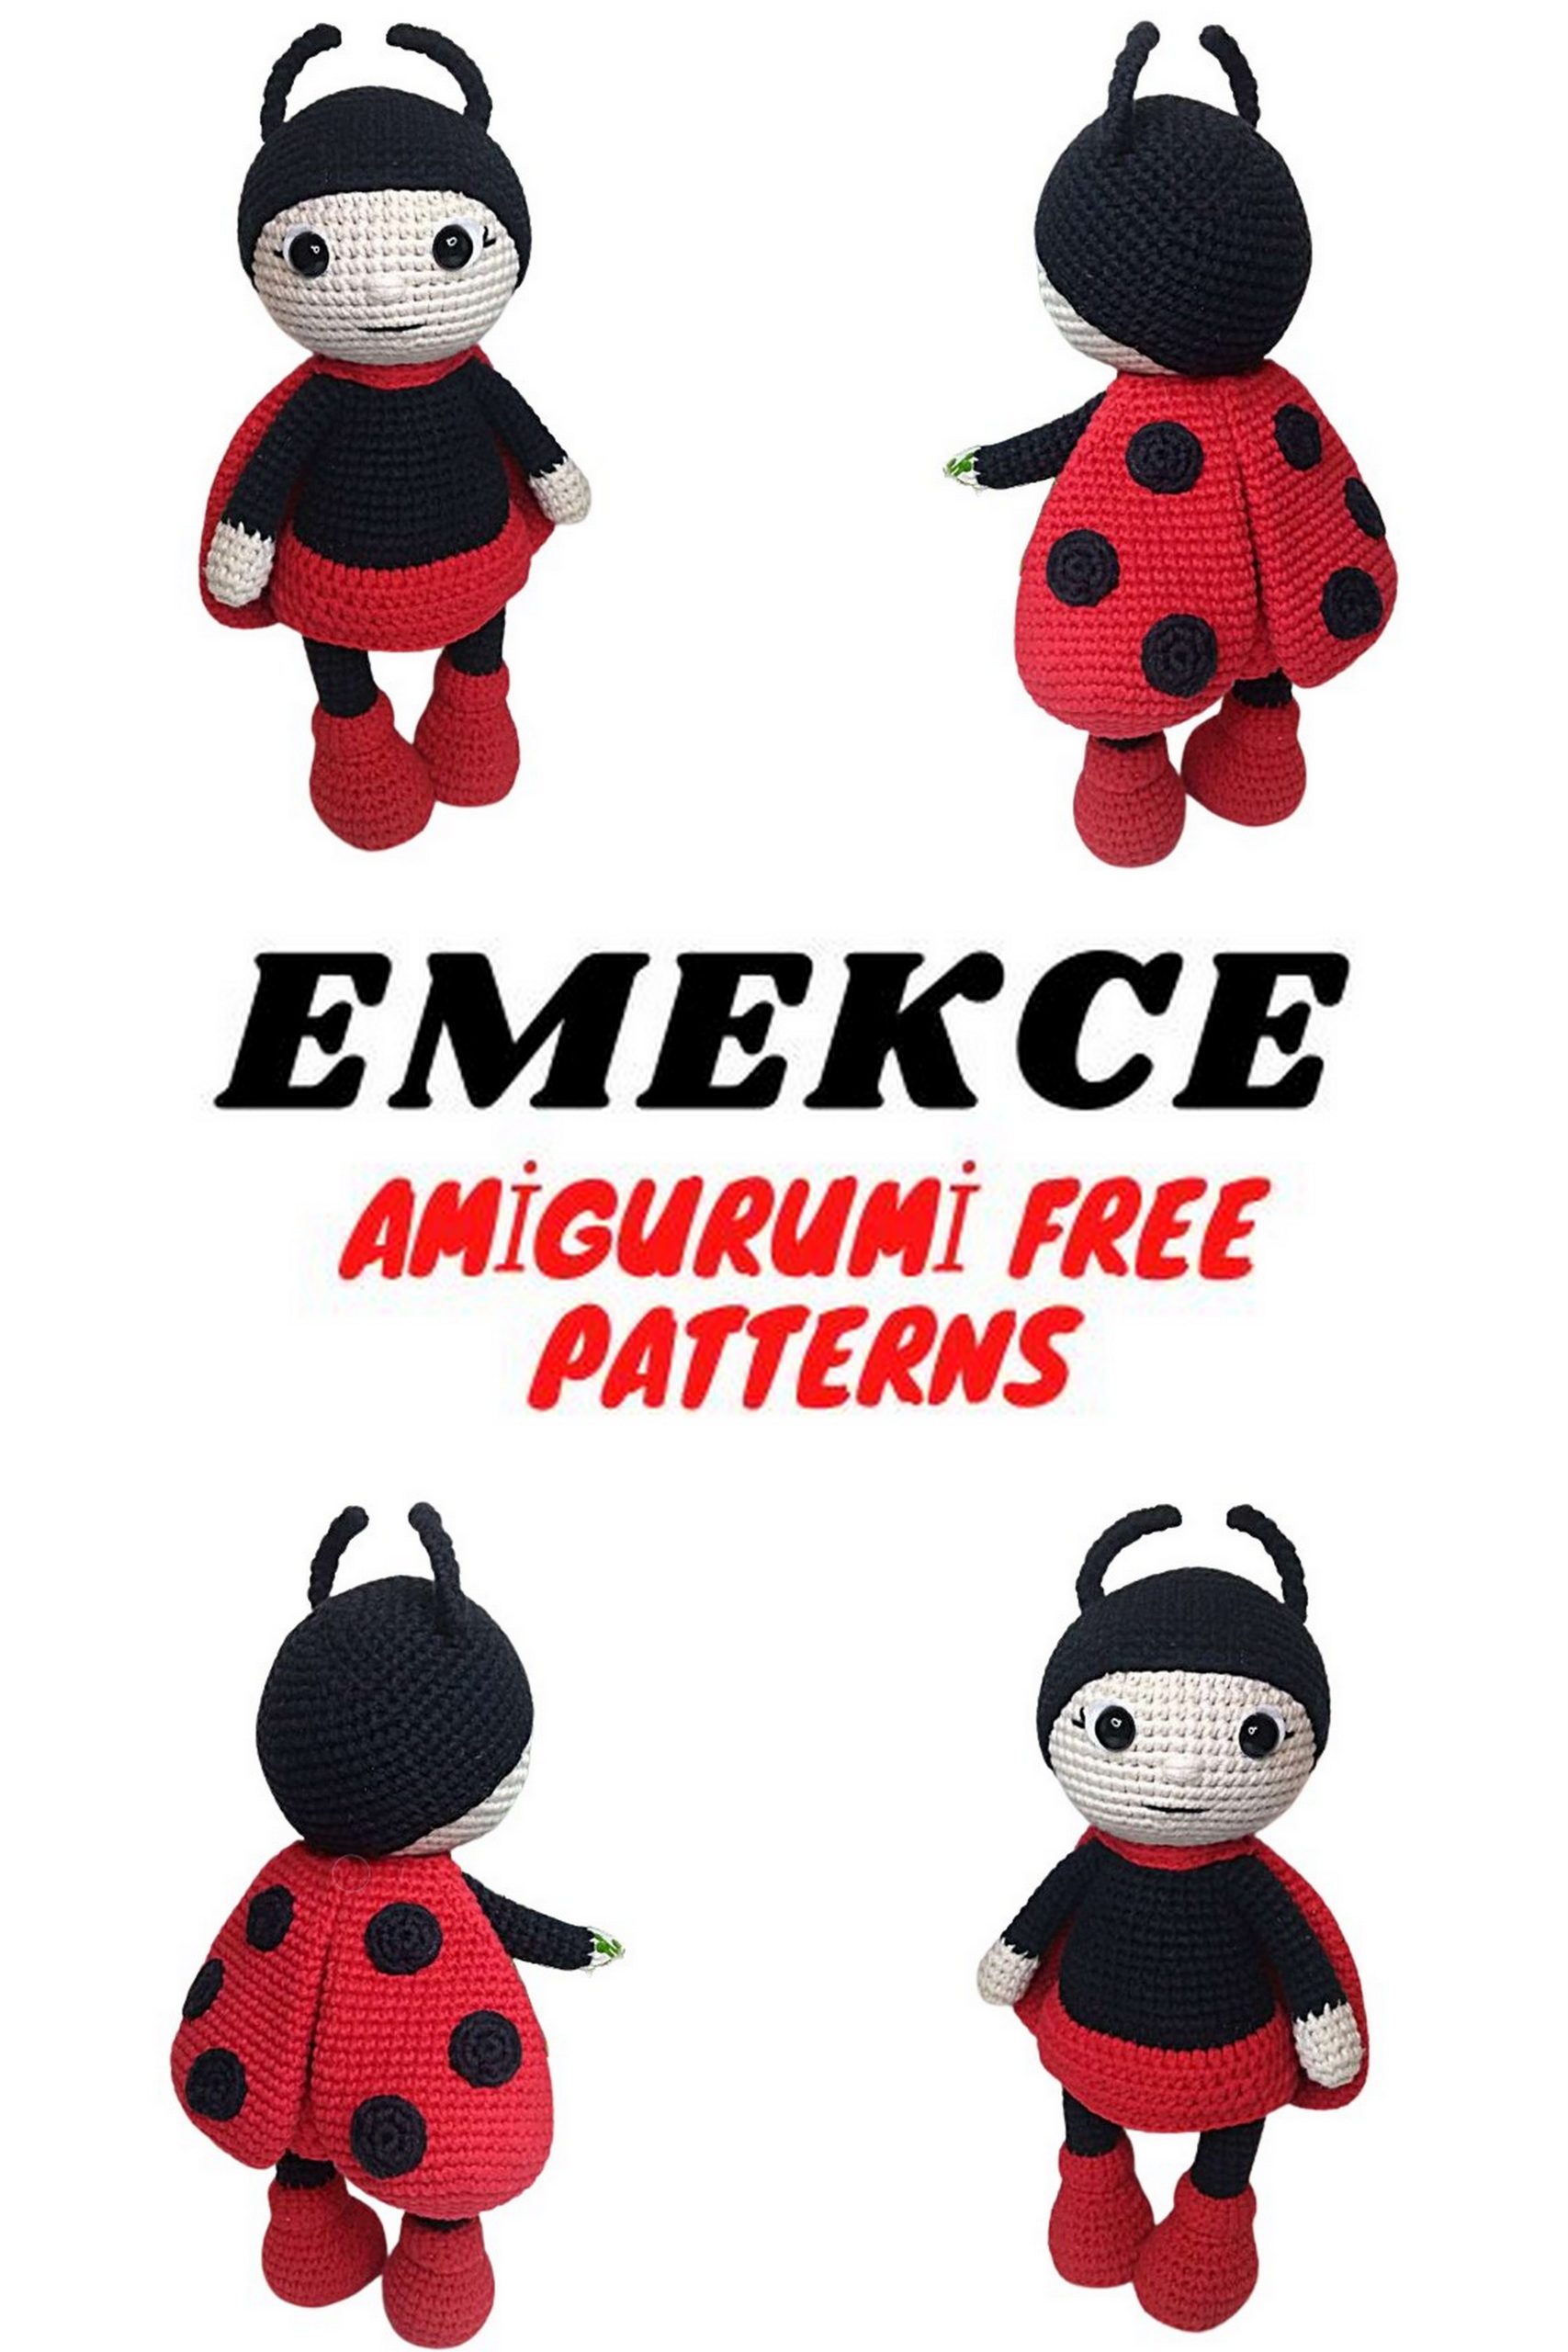
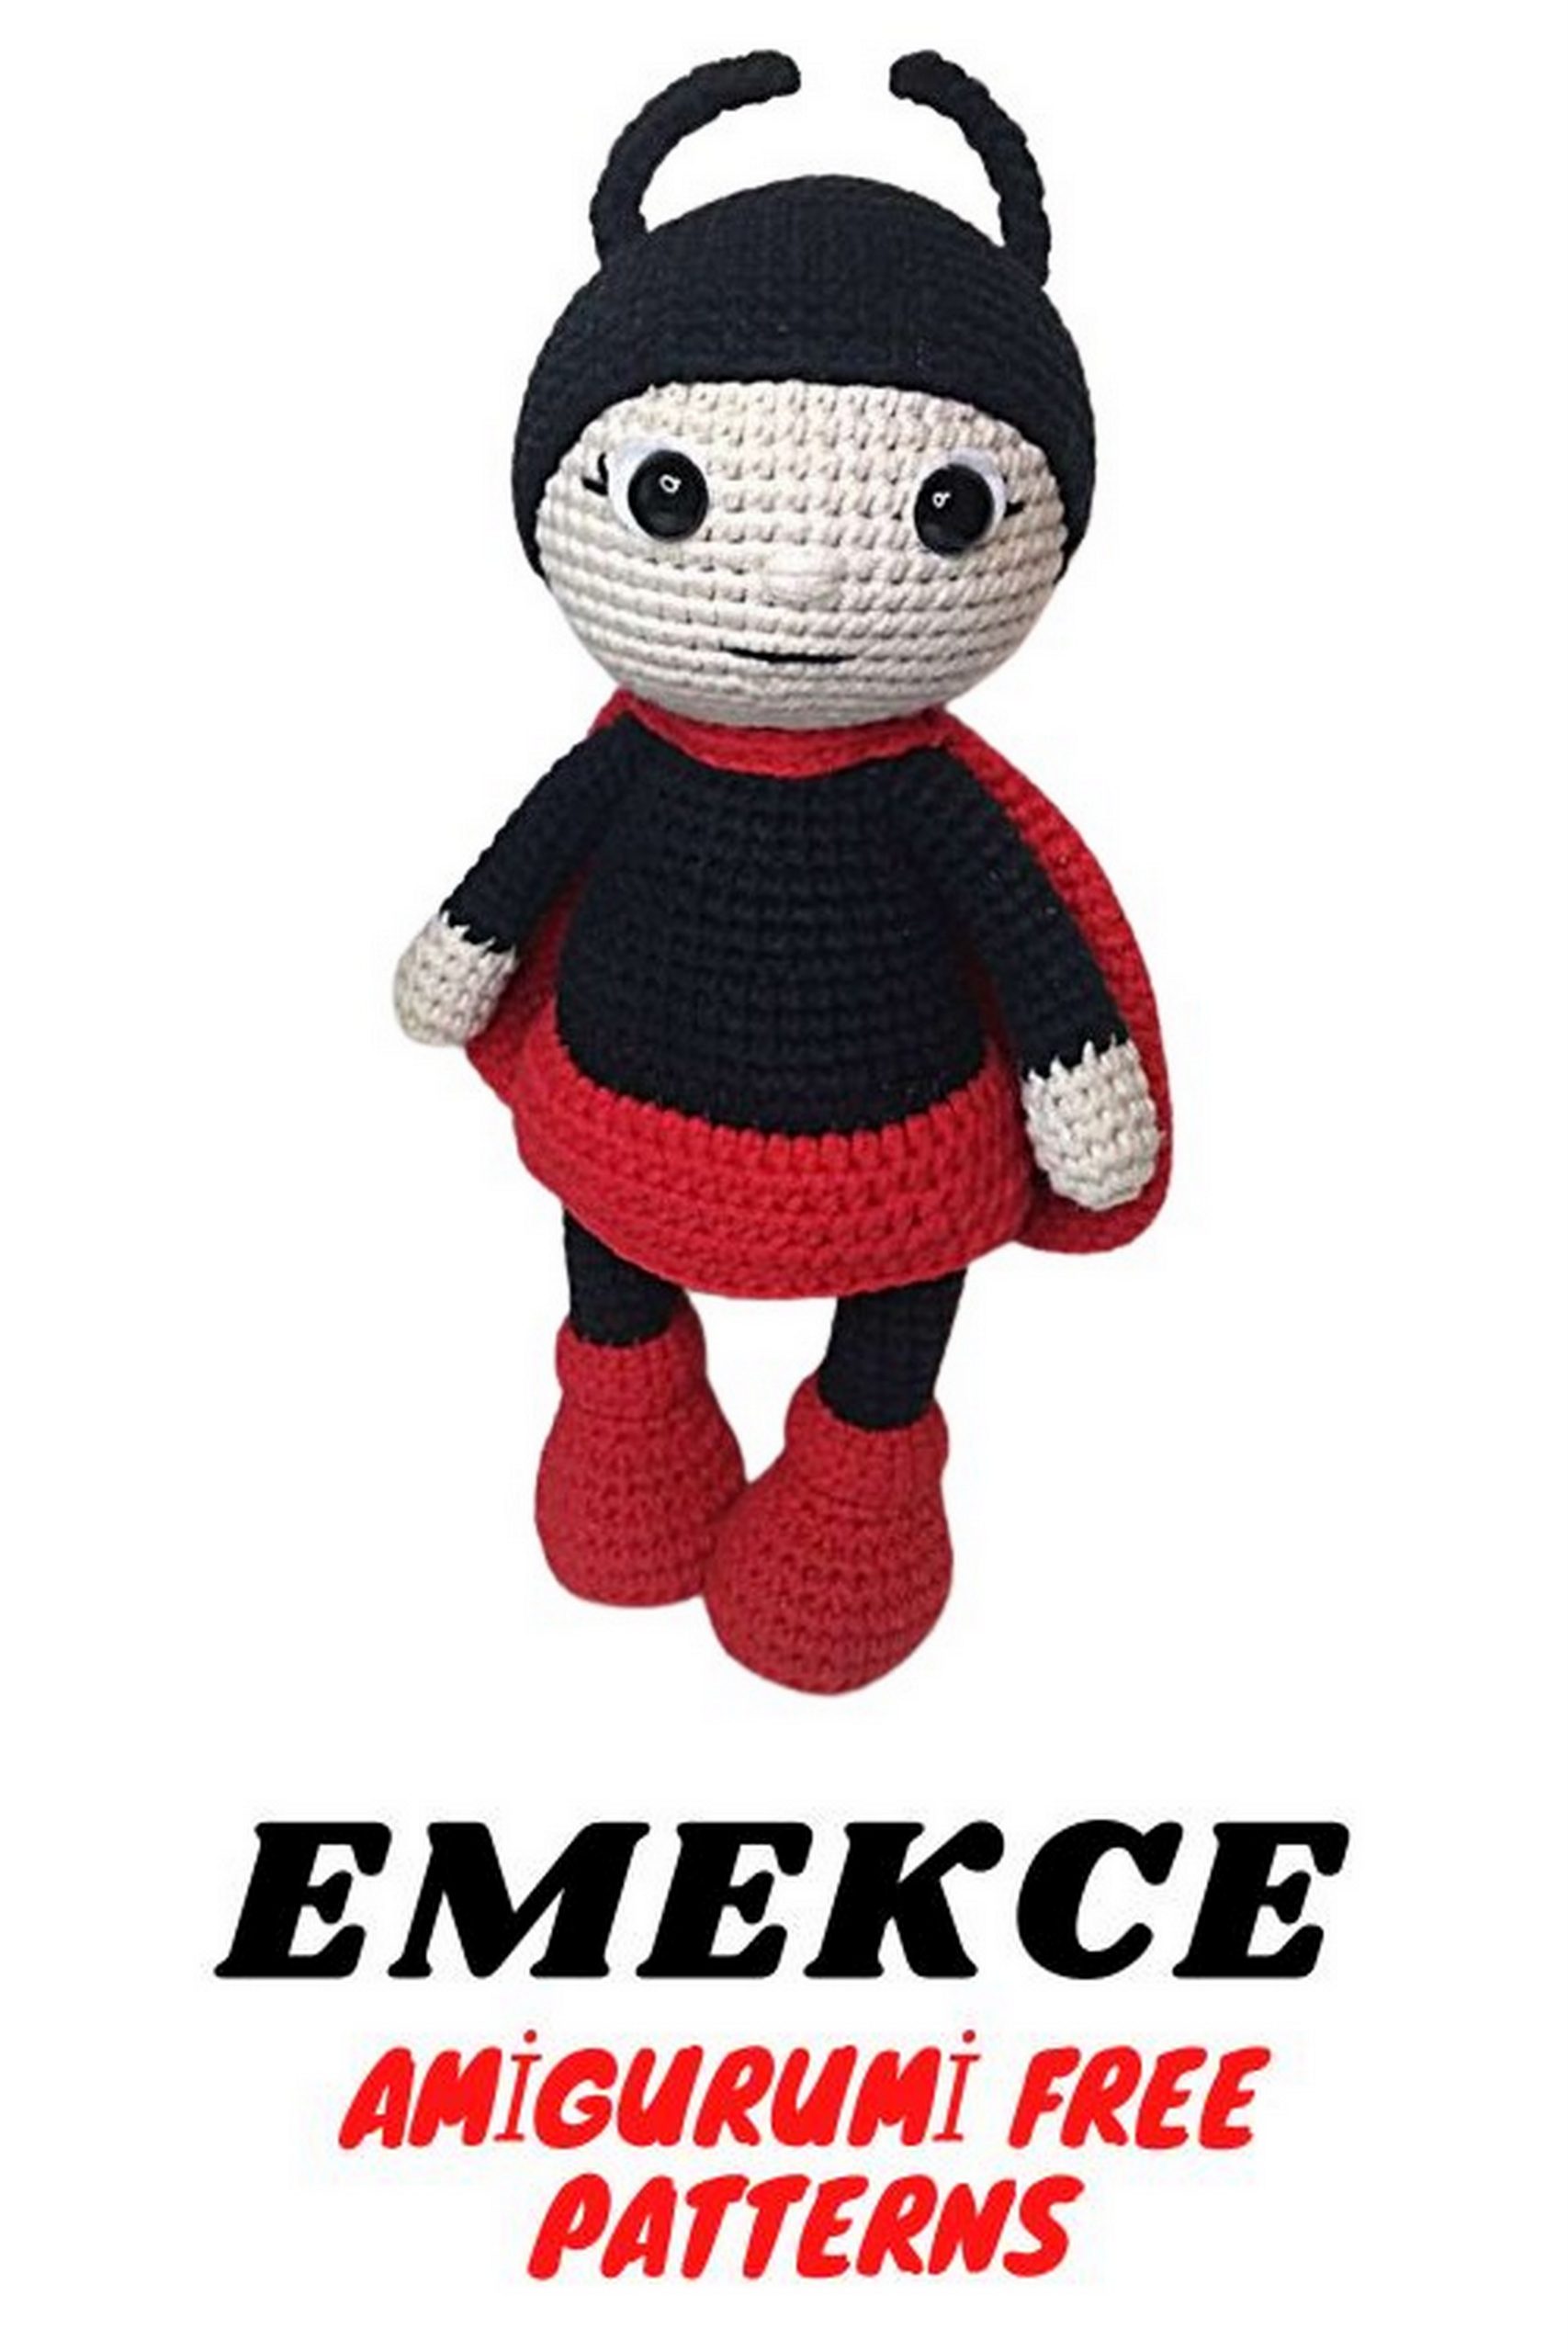
Hat – Ladybug Doll Amigurumi:
Using black yarn:
1: 6 sc in MC
2: 6 inc (12)
3: (1 sc, 1 inc) repeat 6 times (18)
4: (2 sc, 1 inc) repeat 6 times (24)
5: (3 sc, 1 inc) repeat 6 times (30)
6: (4 sc, 1 inc) repeat 6 times (36)
7: (5 sc, 1 inc) repeat 6 times (42)
8: (6 sc, 1 inc) repeat 6 times (48)
9: (7 sc, 1 inc) repeat 6 times (54)
10: (8 sc, 1 inc) repeat 6 times (60)
11-18: 8 rounds of 60 sc each, join with a sl st
Cut the yarn, leaving a long tail for sewing to the head.
Antennae (2 pieces):
Using black yarn, chain 12, starting from the second st from the hook, crochet 10 sc, 3 sc in the last st, crochet 10 sc along the opposite side of the chain. Fold the piece in half and sew it closed. Make the second piece in the same way.
Sew the hat to the head, aligning it with the eyes.
Facial Details:
Embroider the nose between rounds 16 and 17 of the head using the same yarn used for the head. Make 4-5 horizontal stitches, catching 2 loops each time.
Embroider the mouth with black yarn between rounds 19 and 20, and add eyelashes on the sides of the eyes.
Sew the antennae on the 9th round of the hat, leaving 17 stitches between them.
Arms – Ladybug Doll Amigurumi:
Using beige yarn:
1: 6 sc in MC
2: 6 inc (12)
3-5: 3 rounds of 12 sc each
6: 1 dec, 8 sc, 1 dec (10)
Switch to black yarn:
7-18: 12 rounds of 10 sc each
Cut the yarn and stuff the arm. Repeat to make the second arm.
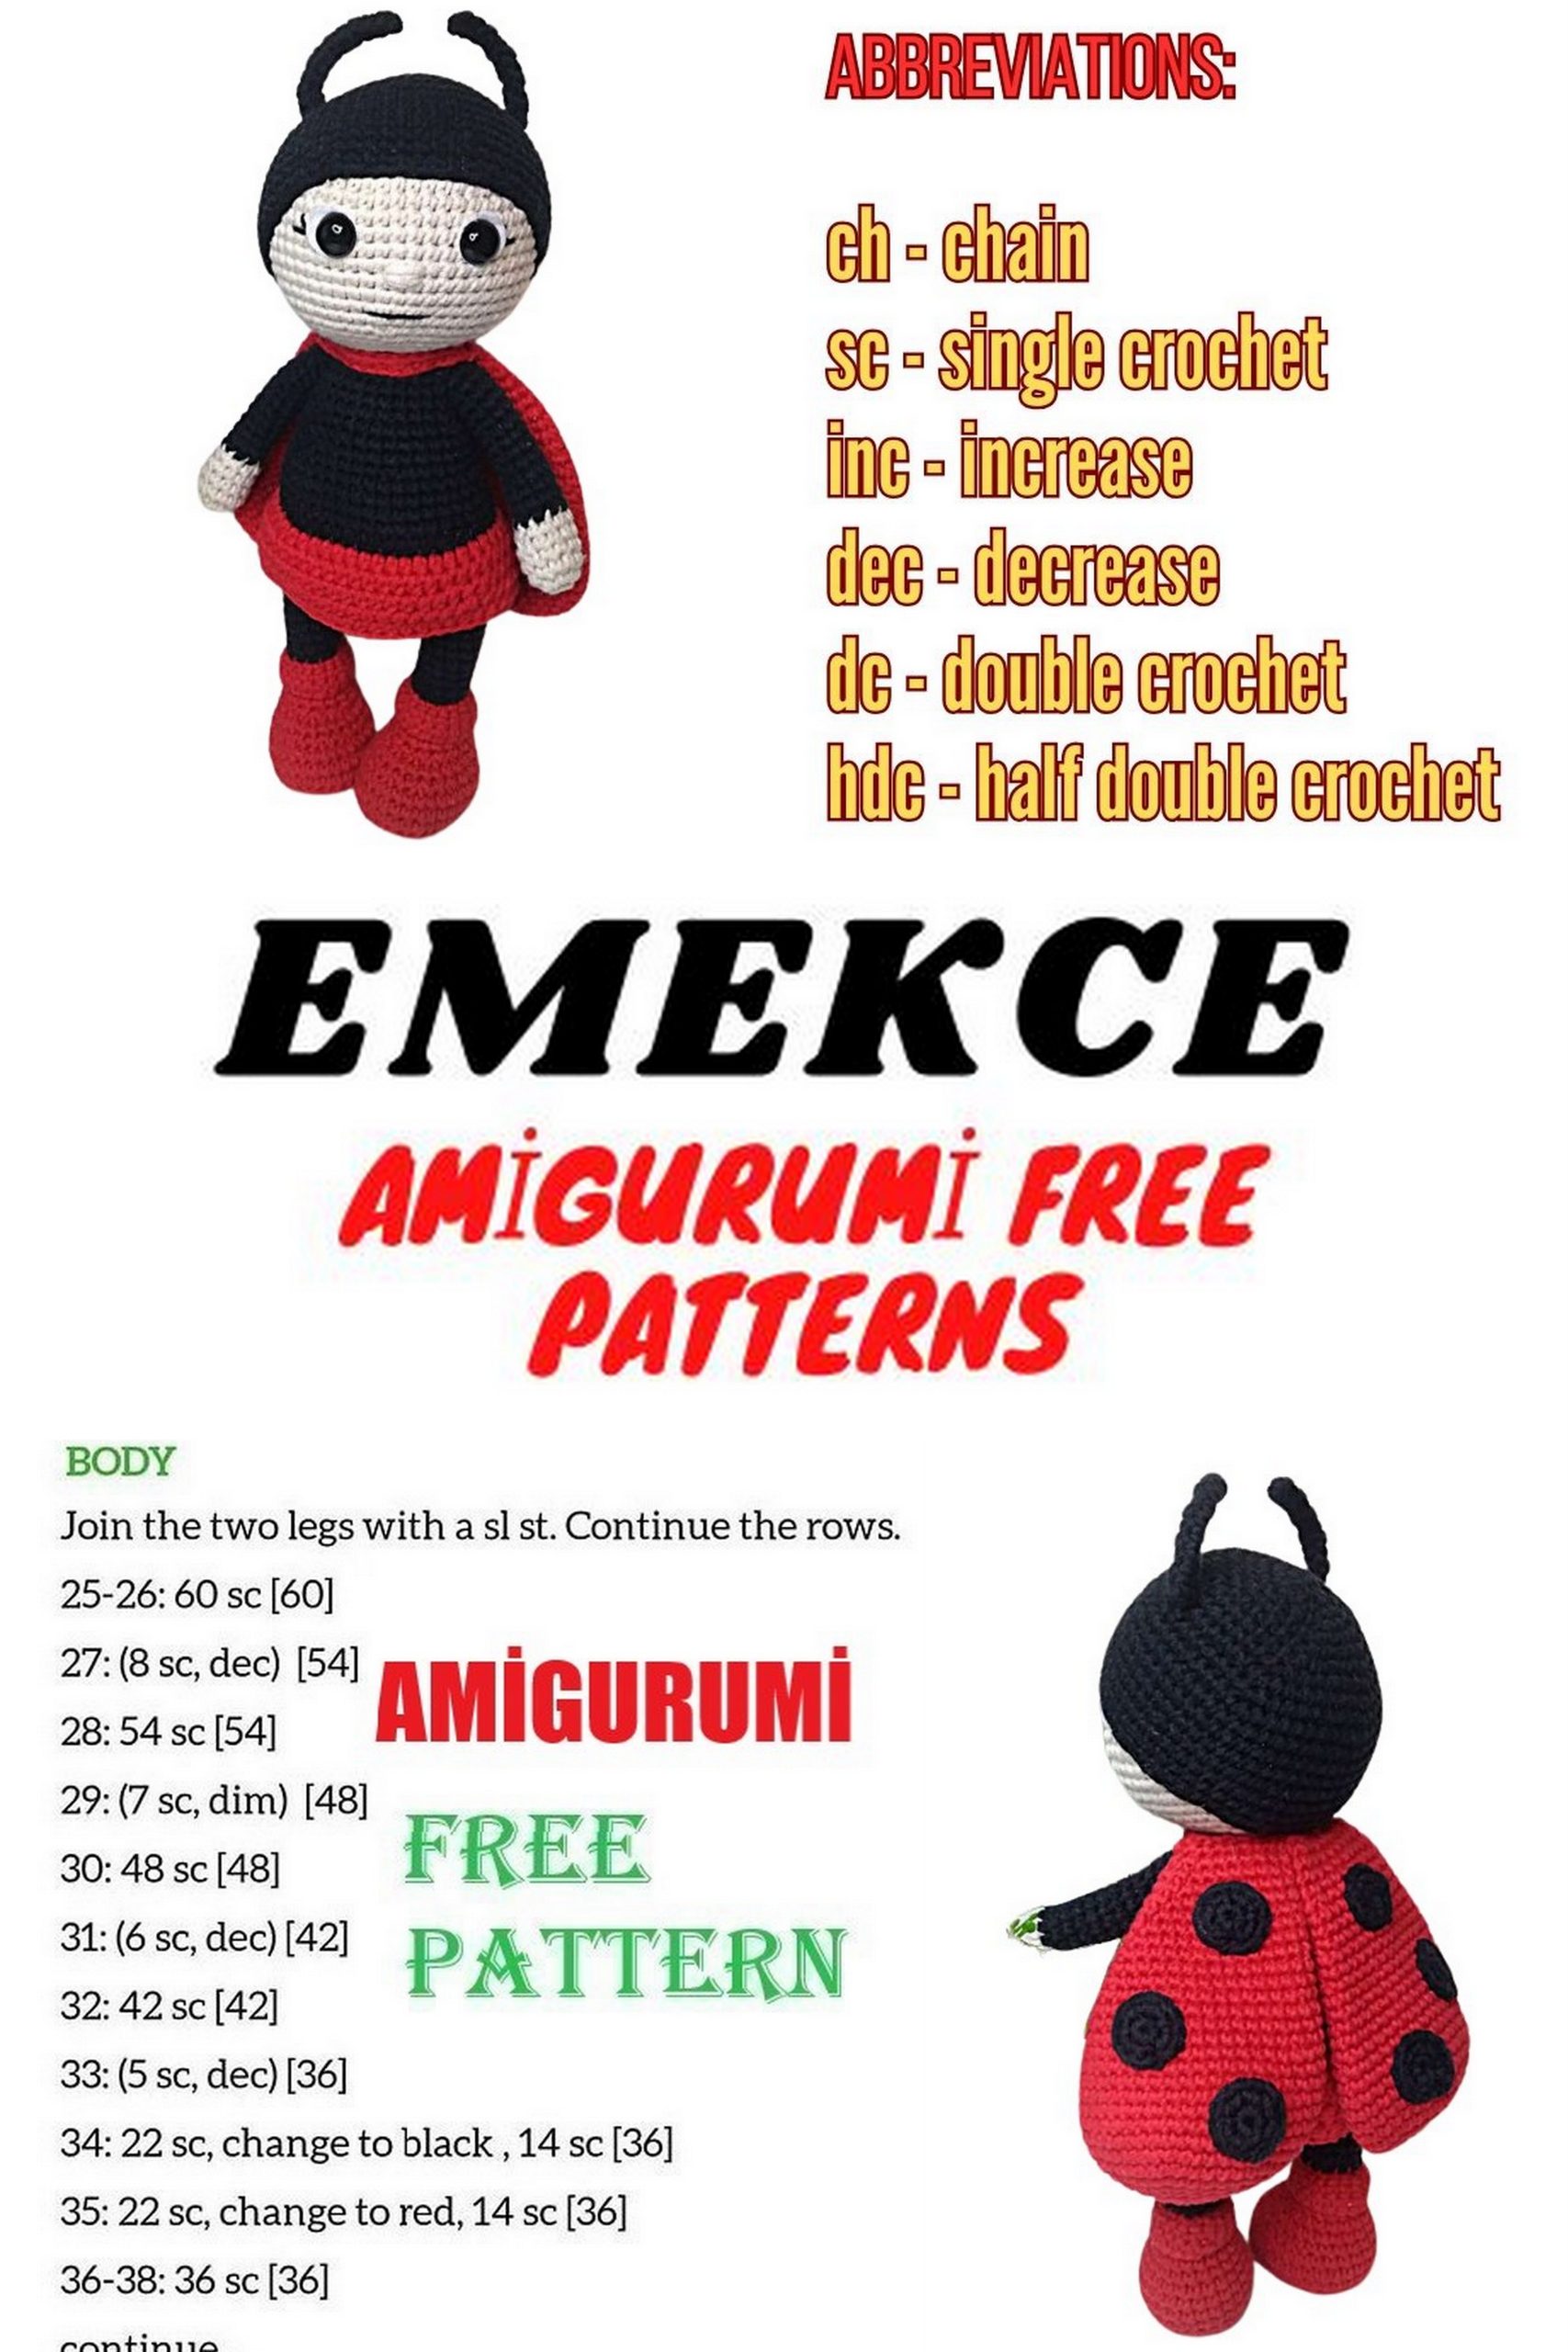
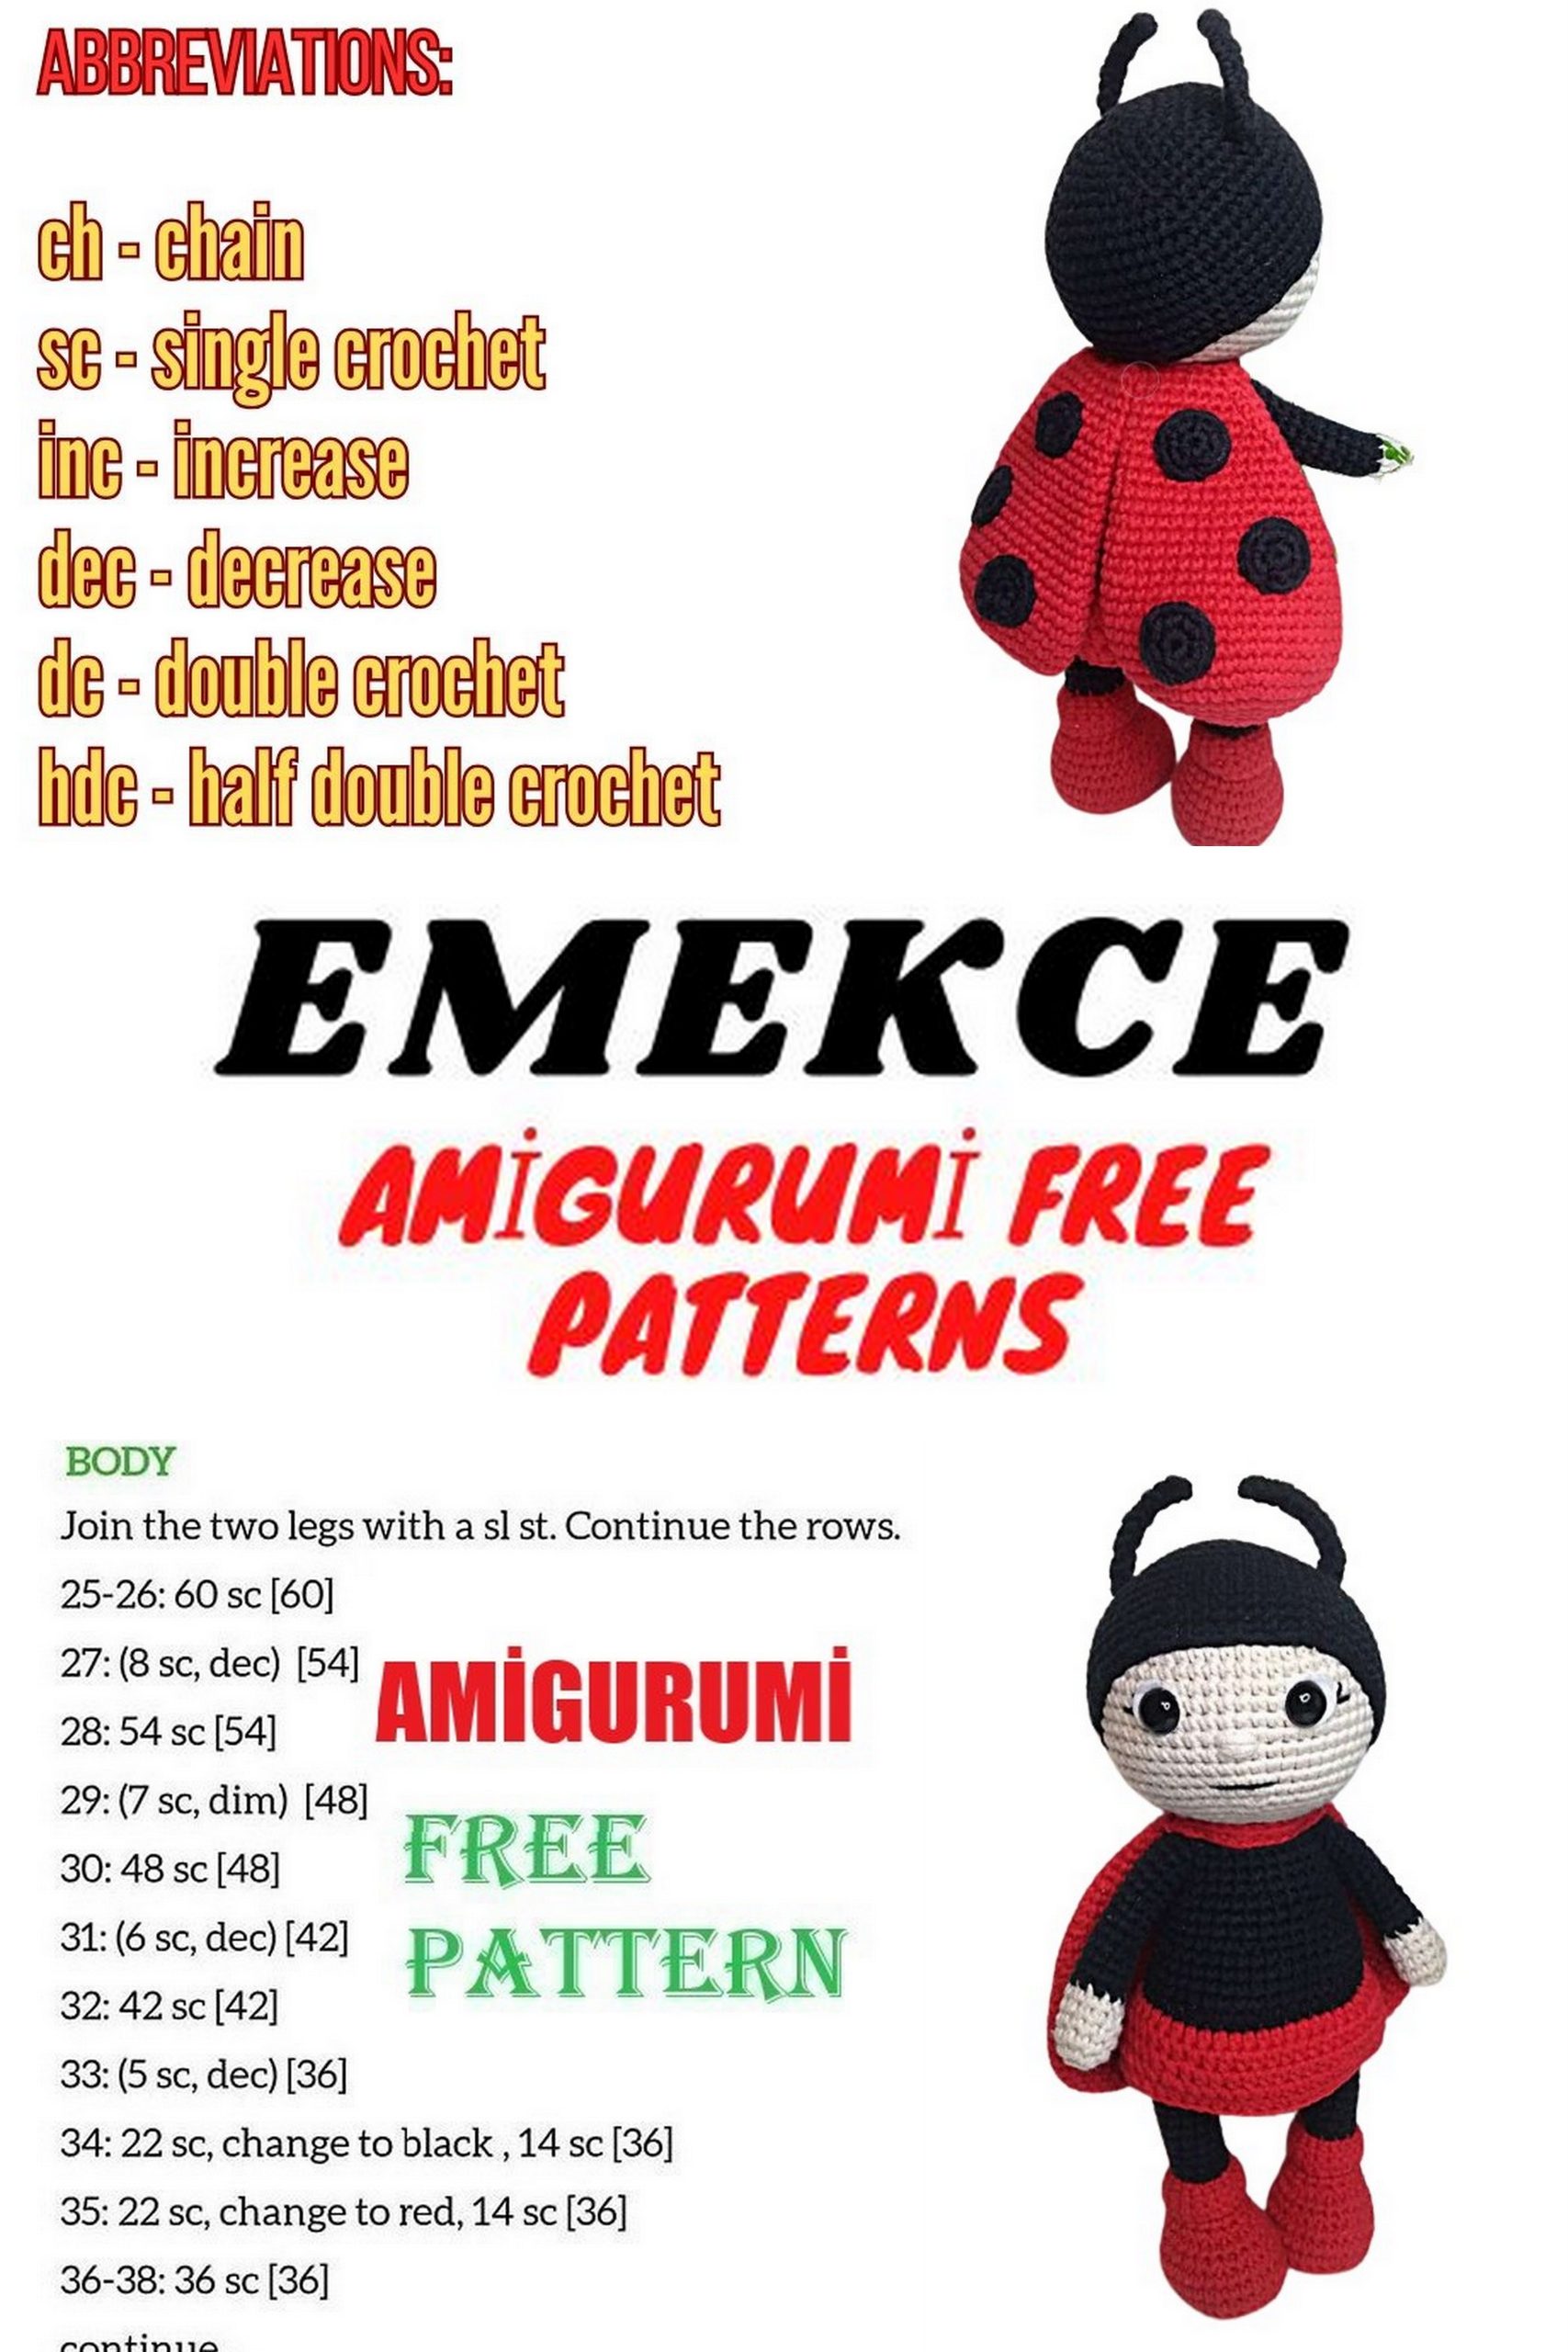
Legs and Body – Ladybug Doll Amigurumi:
1: With red yarn, chain 6, starting from the second st from the hook, crochet 4 sc, 3 sc in the last st, crochet 3 sc along the opposite side of the chain, inc (12)
2: Inc, 3 sc, 3 inc, 3 sc, 2 inc (18)
3: Inc, 4 sc, (inc, 1 sc) 3 times, 3 sc, (inc, 1 sc) 2 times (24)
4: Inc, 5 sc, (inc, 2 sc) 3 times, 3 sc, (inc, 2 sc) 2 times (30)
Cut a cardboard or plastic insole to fit the sole of the foot.
5: 30 sc in the back loops only
6-7: 2 rounds of 30 sc each
8: 5 sc, (1 sc, dec) 6 times, 7 sc (24)
9: 24 sc
Insert the insole.
10: 5 sc, 6 dec, 7 sc (18)
11: 18 sc
12: (1 sc, dec) 6 times (12)
13-14: 2 rounds of 12 sc each
Continue to crochet the upper part of the bootie:
15: (1 sc, inc) 6 times in the front loops only
16-17: 2 rounds of 18 sc each in the front loops only
Cut the yarn, leaving a long tail for sewing. Fold the upper part of the bootie down.
For the right leg, do not cut the yarn. Chain 9 and join it to the left leg to crochet the body:
22: 12 sc on the left leg, 9 sc on the chain, 12 sc on the right leg, 9 sc along the other side of the chain (42)
23: (6 sc, inc) 6 times (48)
24-30: 7 rounds of 48 sc each
31: 48 sc in the back loops only
32: (6 sc, dec) 6 times (42)
33-35: 3 rounds of 42 sc each
36: (5 sc, dec) 6 times (36)
37-39: 3 rounds of 36 sc each
40: (4 sc, dec) 6 times (30)
41: 30 sc
42: 4 sc, crochet 4 sc together with the left hand, 11 sc, crochet 4 sc together with the right hand, 7 sc (30)
43: 4 sc, crochet 6 sc around the left hand, 11 sc, crochet 6 sc around the right hand, 7 sc (34)
44: 3 sc, dec, 4 sc, dec, 9 sc, dec, 4 sc, dec, 6 sc (30)
45: 2 sc, (dec, sc) 3 times, 6 sc, (dec, sc) 3 times, 4 sc (24)
46: 24 sc
47: (2 sc, dec) 6 times (18)
Stuff the body.
Rnd 48: (1 sc, dec) 6 times (12)
Rnd 49: 6 dec (6)
Cut the yarn, draw it through the remaining stitches, pull tight to close the hole, secure the yarn, and leave a tail for sewing. Sew the head to the body.
Skirt – Ladybug Doll Amigurumi:
Turn the body upside down.
Using red yarn, attach it to the front loop of the 31st round.
1: 48 hdc in the front loops only
2-5: 4 rounds of 48 hdc each
Secure the yarn, cut it, and hide the end of the yarn.
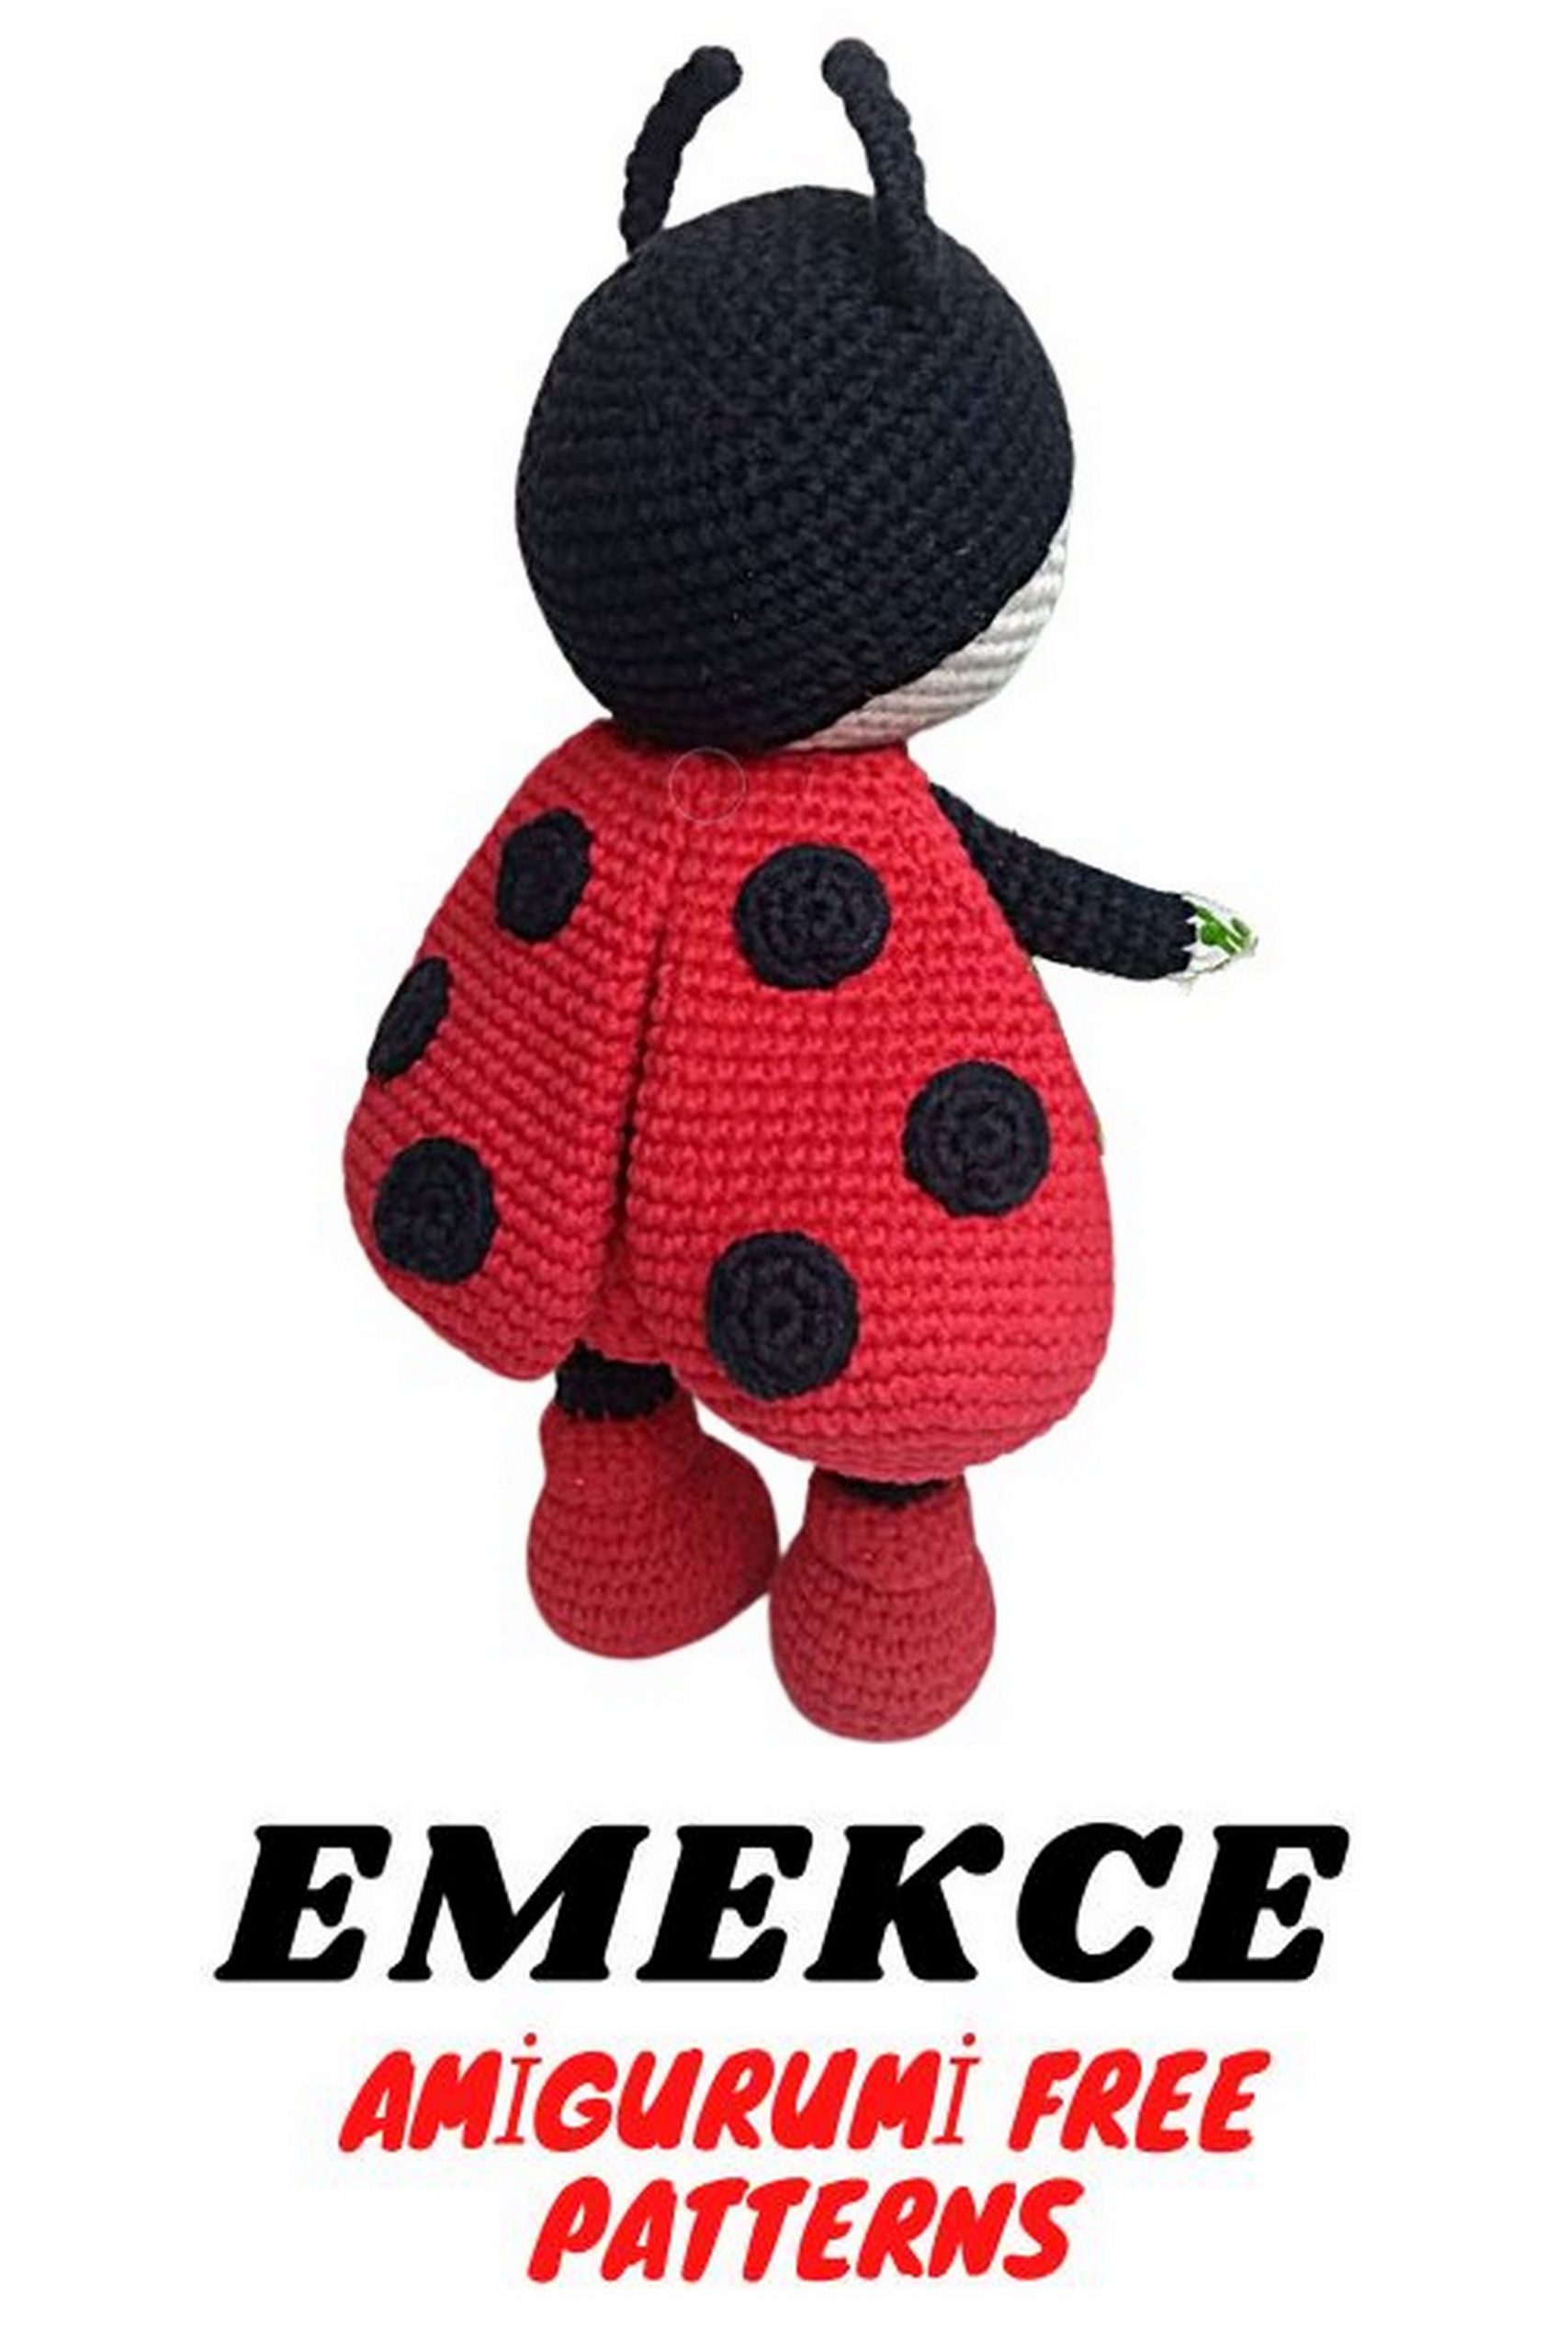
Wings (2 pieces) – Ladybug Doll Amigurumi:
Right Wing:
1: 6 sc in MC
2: 6 inc (12)
3: (1 sc, 1 inc) repeat 6 times (18)
4: (2 sc, 1 inc) repeat 6 times (24)
5: (3 sc, 1 inc) repeat 6 times (30)
6: (4 sc, 1 inc) repeat 6 times (36)
7-12: 6 rounds of 42 sc each
13: (dec, 19 sc) 2 times (40)
14: dec, 38 sc (39)
15: dec, 37 sc (38)
16: (dec, 17 sc) 2 times (36)
17: dec, 34 sc (35)
18: dec, 33 sc (34)
19: (dec, 15 sc) 2 times (32)
20: dec, 30 sc (31)
21: dec, 29 sc (30)
22: (dec, 13 sc) 2 times (28)
23: dec, 26 sc (27)
24: dec, 25 sc (26)
25: (dec, 11 sc) 2 times (24)
26: dec, 22 sc (23)
27: dec, 21 sc (22)
28: dec, 18 sc, dec (20)
29: dec, 16 sc, dec (18)
For the right wing, do not cut the yarn.
For the left wing, after completing rnd 29, chain 15 (see photo). Secure the yarn and cut it.
Align the wings symmetrically, sew them together along the top for about 2 cm from the inner side.
Turn the wings to the front and crochet 9 sc along both sides of the right wing, then crochet 9 sc along both sides of the left wing, and continue to crochet 15 sc along the chain.
Spots for Wings (6 pieces):
Using black yarn:
1: 6 sc in MC
2: 6 inc (12), sl st
Cut the yarn, leaving a long tail for sewing to the wing. Crochet 5 more spots in the same way.
Sew the spots to the wings.
Sew the wings on. Wrap the strap around the toy’s neck and sew it. Secure the wings and strap around the neck with a stitch around in a circle.
Congratulations!
Your ladybug is ready!
Thank you for choosing my tutorial!
Good luck and see you soon!