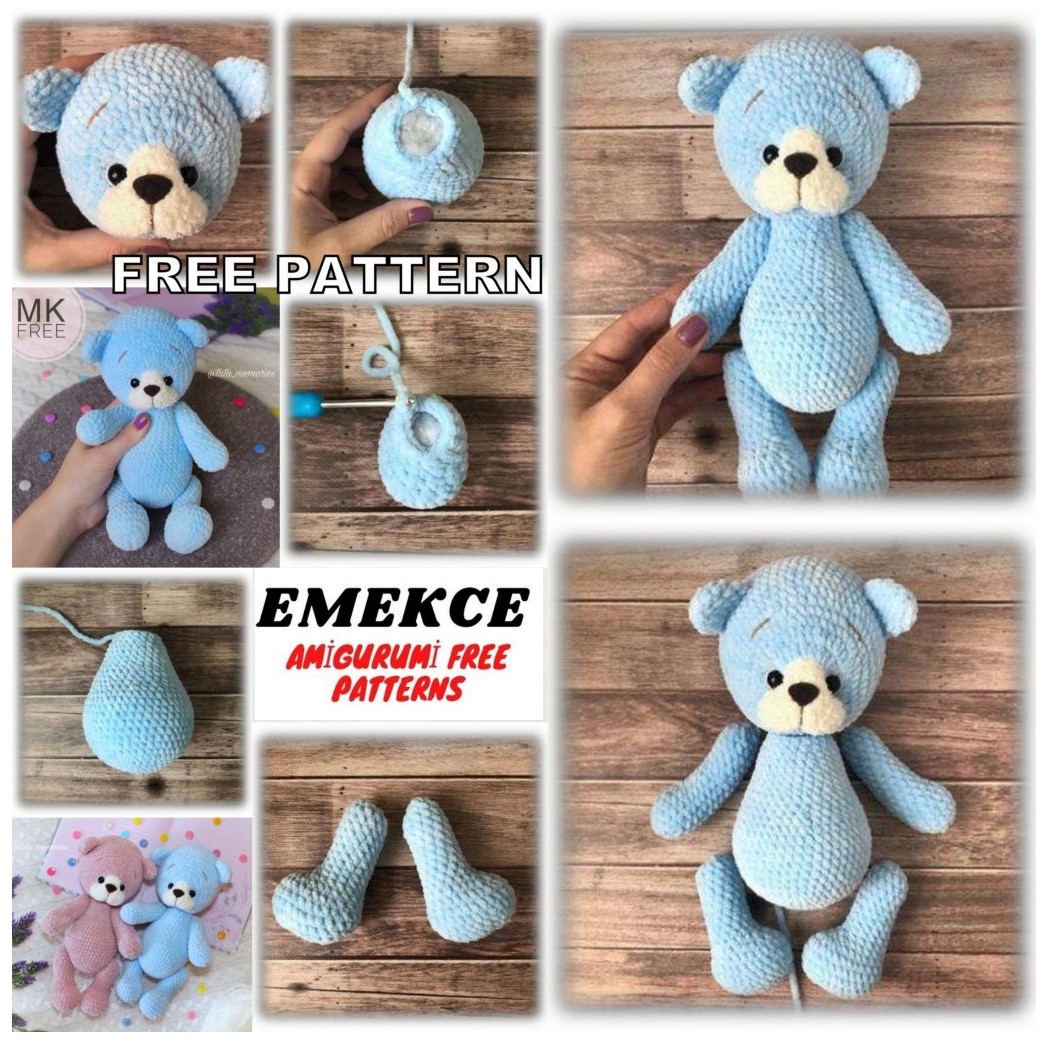
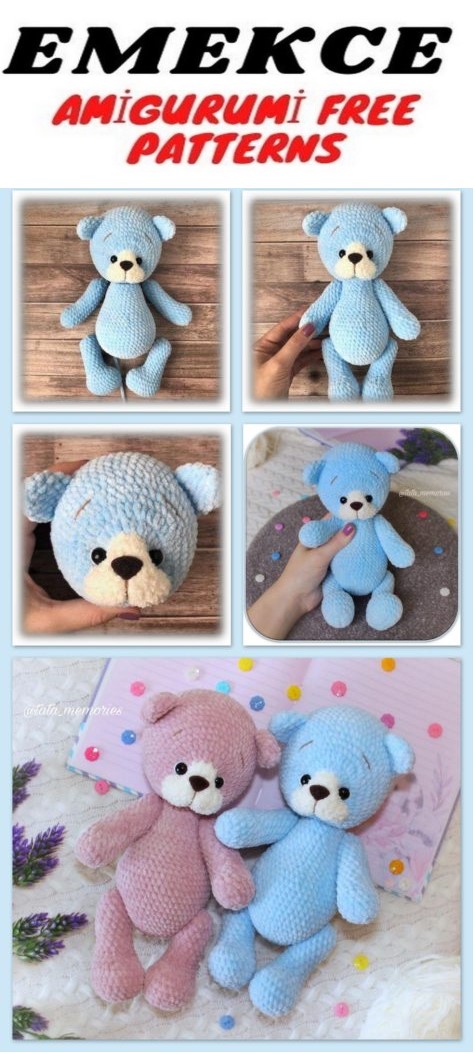
Teddy Bear Amigurumi Free Pattern
Pattern Designer profile Instagram @tata_memories
LIST OF MATERIALS REQUIRED
- Himalaya Dolphin FINE yarn of your favorite shade.
- Yarn Alize Softy light shade for the muzzle (in two additions).
- Strong thread in tone of the main (for thread fastening), and also
white and brown thread for the design of the muzzle (I have
this is YarnArt Jeans).
- Hook number 3.
- Filler (holofiber, syntepuh).
- Eyes 10 mm on a secure mount.
- Nozzle No. 15 on a secure mount (optional)
- A long needle with a large eye for tightening and thread fastening.
- Needle for stitching toy parts.
- Scissors.
When using these materials and medium density
knitting toy turns out to be about 23 cm tall.
ATTENTION!
If you knit from Himalaya Dolphin BABY yarn or the like,
for muzzle use Alize Softy Plus in one addition – so
the muzzle is more harmonious. Yarn Himalaya Dolphin FINE,
which I knit is much thinner than the usual “bun”. From Himalaya
Dolphin BABY when using hook No. 4 and medium density
knitting bear turned out to be about 33 cm.

ABBREVATİONS
SC – single crochet
inc – increase (2 SC in one loop)
dec – decrease (2 SC together)
CH – chain
HDC – half double crochet
incHDC – inc of half double crochet (2 half crochets with single crochet)
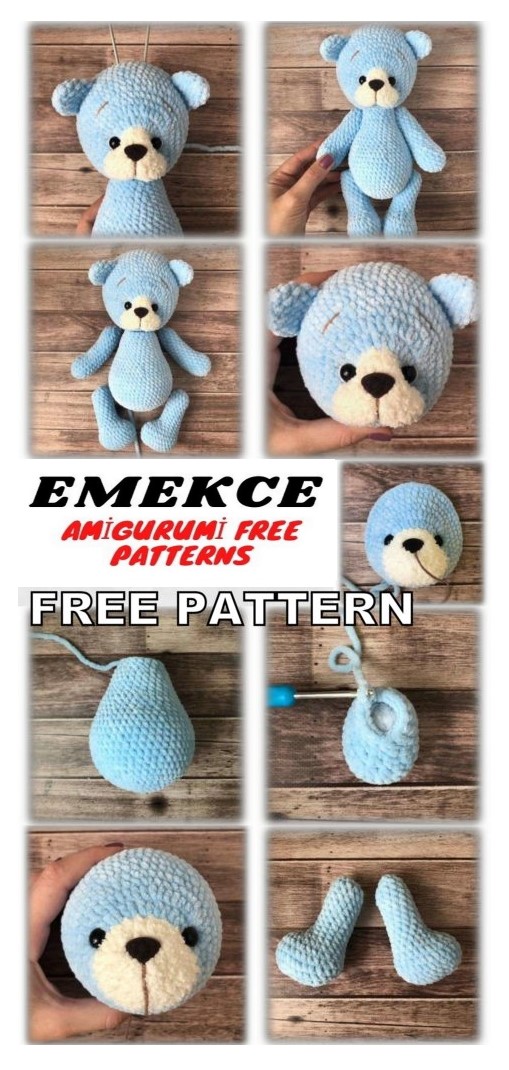
HEAD
Start Knitting Alize Softy in Two
addition (if you do not have two hanks of one
colors, you can use one by pulling
the second end of the thread from the middle of the hank).
1 row: 6 SC into Magic ring (6)
2 row: inc * 6 times (12)
3 row: 2 SC, (3 SC in one loop) * 2 times, 4 SC,
(3 SC in one loop) * 2 times, 2 SC (20)
4 row: 4 SC, 3 inc, 7 SC, 3 inc, 3 SC (26)
5-6 row: 26 SC (26)
Change the color to primary.
7 row: 10 SC, 7 incHDC, 9 SC (33)
8 row: inc, 7 SC, inc, 1 SC, 2 HDC, (incHDC,
HDC) * 6 times, 1 HDC, 1 SC, inc, 6 SC (42)
9 row: 1 SC, inc, 7 SC, inc, 7 SC, inc, 4 SC, inc, 4
SC, inc, 8 SC, inc, 5 SC (48)
10 row: 15 SC, (inc, 6 SC) * 4 times, 5 SC (52)
11 row: 22 SC, inc, 10 SC, inc, 18 SC (54)
12 row: 27 SC, inc, 2 SC, inc, 23 SC (56)
Insert safety eyes between
semi-columns of 7 rows (at the beginning and at the end
increases from half columns).
To the base of the spout (if you use
spout on secure mount) attach
brown thread (with the help of it you will later
embroider the face). Insert the nose in the center
muzzle between 3 and 4 rows.
13-21 rows (9 rows): 56 SC (56)
22 row: (12 SC, dec) * 4 times (52)
23 row: 5 SC, dec, (11 SC, dec) * 3 times, 6 SC (48)
24 row: (10, dec) * 4 times (44)
25 row: 4 SC, dec, (9 SC, dec) * 3 times, 5 SC (40)
26 row: (8 SC, dec) * 4 times (36)
Start filling your head. It needs to be done tight enough
pushing the filler from the center to the walls, again adding it to
center.
27 row: 1 SC, dec, (4 SC, dec) * 5 times, 3 SC (30)
28 row: (3 SC, dec) * 6 times (24)
29 row: (2 SC, dec) * 6 times (18)
30 row: (1 SC, dec) * 6 times (12)
31 row: dec * 6 times (6)
Pull the hole. Hide the thread.
BODY
1 row: 6 SC into Magic ring (6)
2 row: inc * 6 times (12)
3 row: (1 SC, inc) * 6 times (18)
4 row: (2 SC, inc) * 6 times (24)
5 row: (3 SC, inc) * 6 times (30)
6 row: 1 SC, inc, (4 SC, inc) * 5 times, 3 SC (36)
7 row: (5 SC, inc) * 6 times (42)
8 row: 2 SC, inc, (6 SC, inc) * 5 times, 4 SC (48)
9-16 row (8 rows): 48 SC (48)
17 row: 11 SC, dec, (6 SC, dec) * 3 times, 11 SC (44)
18 row: 7 SC, dec, (5 SC, dec) * 4 times, 7 SC (39)
19 row: 2 SC, dec, 12 SC, dec, 4 SC, dec, 11 SC, dec, 2 SC (35)
20 row: 9 SC, dec, 13 SC, dec, 9 SC (33)
21 row: 33 SC (33)
Start stuffing your torso.
22 row: 11 SC, dec, (3 SC, dec) * 2 times, 10 SC (30)
23 row: 30 SC (30)
24 row: 4 SC, dec, 19 SC, dec, 3 SC (28)
25 row: 28 SC (28)
26 row: 11 SC, dec, 4 SC, dec, 9 SC (26)
27 row: dec, 11 SC, dec, 11 SC (24)
28 row: (4 SC, dec) * 4 times (20)
29 row: 20 sc (20)
Fill your body to the end. Cut the thread
leave a long end for sewing.
LEGS (2 parts)
Dial 7 CH, knit from the second loop from
hook:
1 row: inc, 4 SC, 4 SC in one loop, 4 SC, inc (6)
2 row: inc, 5 SC, 3 SC in one loop, 2 SC, 3 SC
single loop, 5 SC, inc (22)
3 row: 3 SC in one loop, 7 SC, 3 SC in one
loop, 4 SC, 3 SC in one loop, 8 SC (28)
4-5 row: 28 SC (28)
6 row: dec, 26 SC (27)
7 row: 8 SC, 6 dec, 7 SC (21)
8 row: 7 SC, 4 dec, 6 SC (17)
9 row: 7 SC, 2 dec, 6 SC (15)
10 row: 7 SC, dec, 6 SC (14)
Start stuffing the leg.
11-17 row: 14 SC (14)
18 row: 3 SC, 2 dec, 7 SC (12)
Fill the leg to the end.
19 row: dec * 6 times (6)
Pull the hole. Cut and hide the thread.
PENS
Stuff the details during the knitting process.
left:
1 row: 6 SC into Magic ring (6)
2 row: ((3 SC in one loop) * 2 times, 1 SC) * 2 times (14)
3 row: 2 SC, inc, 6 SC, inc, 4 SC (16)
4-5 row: 16 SC (16)
6 row: 3 SC, inc, 6 SC, 2 dec, 2 SC (15)
7 row: 4 SC, inc, 6 SC, dec, 2 SC (15)
8 row: 11 SC, dec, 2 SC (14) SC
9 row: 14 SC (14)
10 row: 11 SC, dec, 1 SC (13)
11 row: 13 SC (13)
12 row: 11 SC, dec (12)
13-17 row (5 rows): 12 SC (12)
18 row: dec, 3 SC, dec, 5 SC (10)
Fill the handle to the end.
19 row: dec * 5 times (5)
Pull the hole. Cut and hide the thread.
right:
1 row: 6 SC into Magic ring (6)
2 row: ((3 SC in one loop) * 2 times, 1 SC) * 2 times (14)
3 row: 2 SC, inc, 6 SC, inc, 4 SC (16)
4-5 row: 16 SC (16)
6 row: 2 SC, 2 dec, 6 SC, inc, 3 SC (15)
7 row: 2 SC, dec, 6 SC, inc, 4 SC (15)
8 row: 2 SC, dec, 11 SC (14)
9 row: 14 SC (14)
10 row: 1 SC, dec, 11 SC (13)
11 row: 13 SC (13)
12 row: 1 SC, dec, 10 SC (12)
13-17 row: 12 SC (12)
18 row: 1 SC, dec, 5 SC, dec, 2 SC (10)
Fill the handle to the end.
19 row: dec * 5 times (5)
Pull the hole. Cut and hide the thread.
EARS
1 row: 6 SC into Magic ring (6)
2 row: inc * 6 times (12)
3-5 row (3 rows): 12 SC (12)
Do not stuff your ears. Fold the top edges
together and knit 5 SC.
TAIL
1 row: 6 SC into Magic ring (6)
2 row: inc * 6 times (12)
3 row: dec * 6 times (6)
Do not stuff the tail.
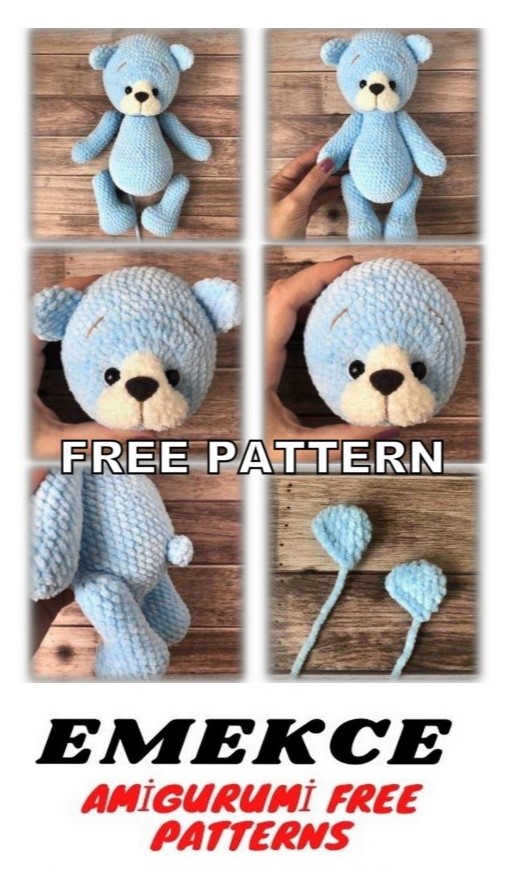
ASSEMBLY AND DECORATION
So, all the details are connected, now our
bear an expressive face and collect it)
Muzzle must be pulled – this is a guarantee
attractiveness of the teddy bear)) And it’s not at all difficult)
Mark on the face the points through which you will make the weight
(this is enough to be done visually): 2 points near each eye and
2 points below the muzzle, in the region of 6-7 rows (the distance between
nearby points – 1 SC).
Take a long needle and a sturdy
white thread. Tighten the thread
tight enough.
Enter the needle at point D, output to
point B (leave one end of the thread
sticking out of point E). From point B
insert the needle at point A and output to
point B. From point B, enter the needle at
point G and deduce from point E. Then
enter again at point D and repeat
tightening another 1-2 times.
We made the muzzle of the muzzle, the thread is withdrawn from point E. Now
it is necessary to tighten eyes between themselves. Enter the needle at point D,
output from point B, enter to point A, withdraw from point B, then to
point G, output at point B. Repeat again (A-B-D), tighten
thread, withdraw it from point E, tie it to the second end and hide it.
The hitch is ready!
The thread you tied to
embroider the muzzle and if
also allows the length of the edge. White thread
color embroider “whites” of the eyes.
Now look at the difference below –
the muzzle is decorated on the right, on the left – no))
Sew the ears between 15 and 16 side by side at a distance of 13-14 SC.
Next, sew the head to the torso. I sew it straight
plush thread, which I knit a toy (I sew the ears as well).
To prevent the head from hanging when sewing, fasten it to
body with the help of two or three knitting needles.
Sew the tail from the back between the 7th and 10th rows of the trunk.
Fasten handles and legs with the help of a thread fastener. Legs in
an area of 8-9 rows of the body, arms – 25-26 rows (as I do thread