Amigurumi Crochet Family Otters Free Pattern


We will need:
3.5 mm hook
Yarn:
Автор The author used brown color: Red Heart Super Saver in Cafe Latte (100g for 1 otter);
beige color Bernat Super Value in Mushroom (50 g for 1 otter);
Автор dark brown for legs the author used: Bernat Handicrafter in Warm Brown (small
quantity);
Автор The author used black in color: Red Heart Super Saver in Black (a bit for the nose and face);
Автор chocolate color author used: Bernat Pipsqueak in Chocolate (for baby)
Black thread for embroidery of the face and eyes (or 12 mm eyes for a large otter and 9 mm for
baby)
6 hand magnets
Filler
Needles for stapling
Colors:
B – Brown
C – Cream
In the place where you need to change the color of the thread, the author simply indicates the letter designating the color.
The front of the body (do 1 panel) hook 3.5 mm:
The panel is knitted from the bottom up. 1 run and turn at the end of each row. We start with brown yarn.
Row 1: 12 GW, closed in 2 loops from the hook and in the next 10 loops (11)
Row 2: raise twice, 7 coupled, gain twice (15)
Row 3: Increase, 13 Clushes, Increase (17)
Row 4: Bunch each loop (17)
Row 5: raise, 15 cbl, gain (19)
Row 6: Bn in each loop (19)
Row 7: increase, 17 cbl, increase (21)
Row 8: Bn in each loop (21)
Now we will start to knit belly
Row 9: B7 UBN, C7 UBN, B7 UBN (21)
Rows 10-11: B6 Ub, C9 Ub, B6 Ub (21)
Rows 12-13: B5 UBN, C11 UBN, B5 UBN (21)
Rows 14-18: B4 UBN, C13 UBN, B4 UBN (21)
Rows 19-21: B3 Ub, C15 Ub, B3 Ub (21)
Rows 22-24: B2 Sat, C17 Sat, B2 Sat (21)
Row 25: B1 Ub, C19 Ub, B1 Ub (21)
Rows 26 to 30 knit only cream color.
Rows 26-30: put in each loop (21)
The following stitches are knitted only with brown thread.
Rows 31-37: put in each loop (21)
Row 38: increase, 17 cbn, decrease (19)
Row 39: Bn in each loop (19)
Row 40: double down, 11 double, double down (15)
Row 41: decrease, 11 cbn, reduction (13)
Row 42: double down, psn, 3 ssn, psn, double down (9)
Close the knitting and set aside for assembly later.
The back of the body (do 1 panel) hook 3.5 mm:
The back panel repeats the front knitting completely, but it is knitted only in brown. Description
The following is simplified without any color changes:
Row 1: 12 GW, closed in 2 loops from the hook and in the next 10 loops (11)
Row 2: raise twice, 7 coupled, gain twice (15)
Row 3: Increase, 13 Clushes, Increase (17)
Row 4: Bunch each loop (17)
Row 5: raise, 15 cbl, gain (19)
Row 6: Bn in each loop (19)
Row 7: increase, 17 cbl, increase (21)
Rows 8-37: put in each loop (21)
Row 38: increase, 17 cbn, decrease (19)
Row 39: Bn in each loop (19)
Row 40: double down, 11 double, double down (15)
Row 41: decrease, 11 cbn, reduction (13)
Row 42: double down, psn, 3 ssn, psn, double down (9)
Close the knitting and set aside for assembly later.
Hands (we make 4 panels for 2 hands) hook 3.5 mm and brown thread:
Row 1: 6 VP, CBN in 2 loops from the hook and in the next 4 loops (5)
Row 2: increase, 2 sbn, increase (5)
Row 3: increase, 2 sbn, increase (5)
Row 4: increase, 2 sbn, increase (5)
Row 5: increase, 2 sbn, increase (5)
Row 6: increase, 2 sbn, increase (5)
Row 7: increase, 2 sbn, increase (5)
Row 8: increase, 2 sbn, increase (5)
Row 9: increase, psn, decrease (3)
Close the knitting. Repeat rows 1 through 9 for 2 panels, but do not cut the thread. Attach the details to each
to a friend and start tying them sbn to the bottom corners knit (sbn, vp, sbn) – these are the parts that we will
Sew the item to the body. Start stuffing the part by tying up 1/3 of the parts. If you want your otters
hold hands, insert magnets into the ends of the paw, and then continue to knit and finish ss in 1 loop.
Close the knitting and hide the thread. Repeat for 2 hands. The author inserted magnets in each hand, therefore
there is no difference on which side of the otter. The author also inserted magnets in the body of the baby, so that adults otters
could hug him.
* Attention: If you knit an otter for a child, then do not insert magnets, as they are dangerous if their
swallow. *


Legs (make 2) hook 3.5 mm dark brown thread:
Feet knit bottom up
Row 1: 4 VP, CBN in 2 loops from the hook and in the next 2 loops (3)
Row 2: increase, bond, increase (5)
Rows 3-5: Bib in each loop (5)
Row 6: increase, 3 cbn, increase (7)
Row 7: ssn, ss, [2 ssn] in 1 loop, ss, [2 ssn] in 1 loop, ss, ssn (9)
Close knitting.
Ears (we make 4 panels for 2 ears) a hook of 3.5 mm and a brown thread:
We begin to knit with amigurumi rings, but still knit, turning knitting
Row 1: 5 BK in KA (5) turn
Row 2: x5 increase (10)
Close knitting. Repeat rows 1 through 2 for 2 panels, but do not cut the thread. We connect both panels
together bun and brown thread. (sbn, vp, sbn) to the bottom corners (these are the parts with which we will sew
detail to the body). The author did not fill his ears. SS in 1 loop. Close the knitting and hide the thread. Thereafter
set aside parts for assembly further.
Nose (do 1) hook 3.5 mm and black thread:
The nose fits in a circle, we tie a chain from the top.
Row 1: 6 VP, starting with 2 hook loops, ss, 3 sbn, [4 ss] to the last loop, 3 sbn, [3 ss] to the last loop
loop, close the knitting and hide the thread (14)
Postpone until we sew.


Tail (we make 2 panels) hook 3.5 mm and brown thread:
Tail fit from base to tip
Row 1: 7 vp, starting with 2 loops from the hook, knit sbn (6)
Rows 2-3: Bunch in each loop (6)
Row 4: 2 sbn, sly, 2 sbn (5)
Rows 5-6: put in each loop (5)
Row 7: 1 sbn, sly, 2 sbn (4)
Rows 8-9: Bunch into each loop (4)
Row 10: 1 sbn, sly, 1 sbn (3)
Row 11: 14 RR, 3 sbn, skip 2 loops, 3 psn, skip 2 loops, 3 ssn, ss in 10 rows.
Close knitting. Repeat rows 1 through 11 for 2 panels, but do not cut the thread. We connect both panels
together bun and brown thread. Tamp the base of the tail. Close knitting.
Baby body panels (make 2) hook 3.5 mm and chocolate thread:
Row 1: 8 vp, starting with 2 loops from the hook, knit sbn (7)
Row 2: raise, 5 net, gain (9)
Row 3: increase, 7 cbn, increase (11)
Rows 4-14: put in each loop (11)
Row 15: decrease, 7 sbn, decrease (9)
Row 16: decrease, 5 sbn, decrease (7)
Row 17: decrease, 3 sbn, decrease (5)
Close knitting.
Ears (make 2):
Row 1: 4 sbn ka (4) turn
Row 2: increase x 4 (8)
Close knitting.
Tail (do 1):
Row 1: 5 vp, starting with 2 loops from the hook, knit sbn (4)
Row 2: Bunch in each loop (4)
Row 3: 1 sbn, sly, 1 sbn (3)
Row 4: Bn in each loop (3)
Row 5: Sat, Turnoff (2)
Row 6: Bn in each loop (2)
Row 7: 7 BG, 2 BTS, skip 2 loops, 2 psn,
slss in 6 row. Close knitting, begin
assembly
Assembly:


Step 1: Face and Legs
Embroider the nose in the center of the front panel.
so that the lower part slightly affected the bottom
the belly. Next install the eyes (12
mm) or embroider happy eyes with a black thread for embroidery. For the muzzle author used as
thread for knitting, and thread for embroidery. You can use the one you like the most.
Embroider the cheeks.
Next, sew the legs to the bottom of the front panel with a brown thread. For a small otter by
I did not knit my nose, but embroidered separately with black yarn and used 9 mm eyes.
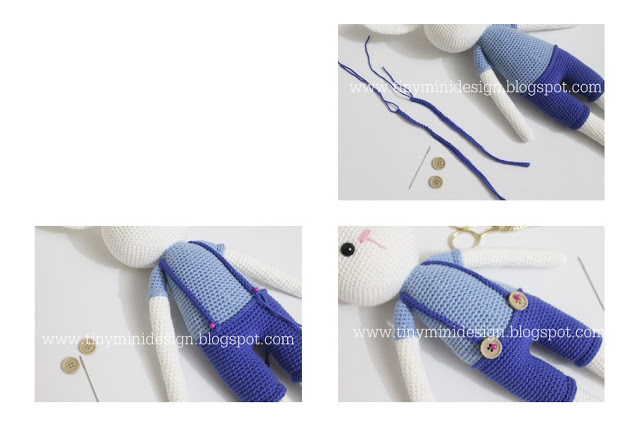
Step 2: Body, Hands and Ears
Now we begin to tie up the parts of the place, here are the parts that you should already have:
Attach the two panels to each other and begin to tie them.


** Make sure the front part of the otter is facing you. **
We begin to tie up on the left side and tie up the details so that the threads match in color with
details. Those. if you tie your head, then you knit with a brown thread, and if your cheeks, then cream.
After you tie the cheek, change the thread, but do not knit, and take the foot. Put it up
details and knit it together with the body, i.e. knit through 3 parts at once. The hand should look at the belly.
The photo below shows how the author knit 2 hands, but for 1 the same technique was used.


We knit further, when you reach the tail, then place the tail inside the panels and sew the tail separately
needle, then tie just the bottom of the front panel, because the bottom is already stitched. Further
we knit further, we knit the arm, then we change the thread to cream in the cheeks and back to the brown thread.
When you reach the ear, place it also between the panels and sew it up like a tail after that.
Just knit the front panel, because the part where the ear will be stitched. Field of this knit up
the next ear and repeat everything too for him. Do not forget to stuff the body when you tie the details.
Close knitting ss and close knitting.
For the baby, we also use the description of the assembly, only you do not need to change the color of the thread.