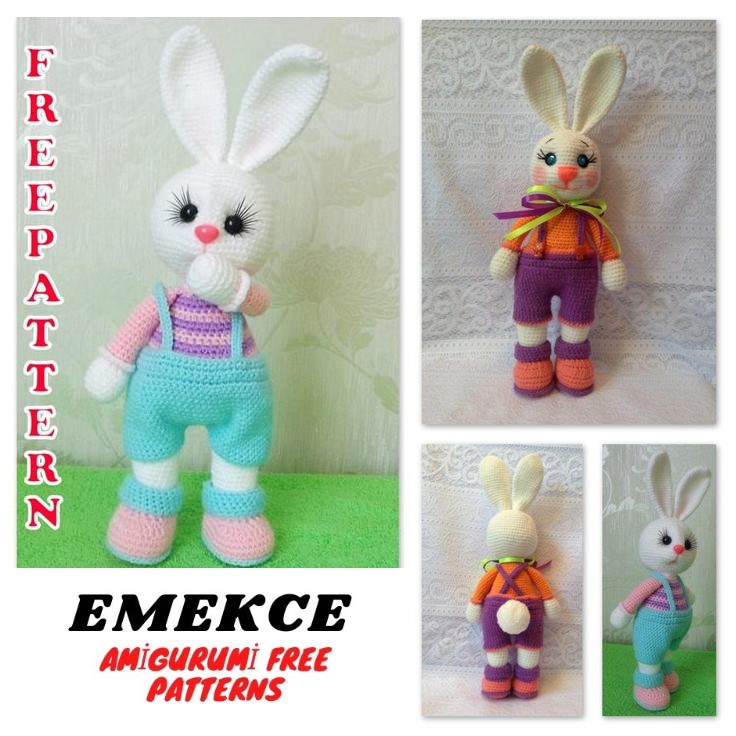
Mr. Pumkinhead And Crackerjack Amigurumi Crochet Free Pattern
LIST OF MATERIALS AND SUPPLIES:
Mr. Pumpkinhead Doll:
• Size 10 Crochet Cotton – Orange, green, dark yellow, black, white, brown, light
brown, cranberry (or any maroon-like red)
• Crochet Hooks – Size 7 (1.65mm) and Size 12 (1mm)
• Two 4-mm black eyes
• Three 3/16-inch black doll buttons
• Fiberfill stuffing
• Sewing needle, small blunt tapestry needle
• Small, sharp scissors
Cracker Jack the Crow:
• Size 20 Crochet Cotton – Black and dark yellow
• Size 10 crochet hook
GAGE: Gage is not important as long as the same size thread and hook are used for all
the pattern pieces. However, since tension can vary in different circumstances, it is
suggested that when making two pieces that must be the same, such as arms and legs, that
you complete both in one sitting.

SPECIAL INSTRUCTIONS:
Hdc2tog: Yoh, insert hook into next st; YO and pull up a lp, YO and pull thru 2 lps on
hook; Yoh, insert hook into next st; YO and pull up a lp, YO and pull thru all lps on
hook.
Sc2tog: Sc the next 2 sc together (decrease): Insert the hook into the next st and pull up
a lp; insert the hook into the next st and pull up a lp; YO and pull thread through all 3
loops on hook.
Adjustable Ring: Leaving a tail at the beginning, wrap thread around index finger and
middle finger of left hand; anchor tail between middle finger and ring finger. Insert hook
underneath first strand of yarn, then catch second strand with hook and pull a loop up
underneath first strand. Remove fingers of left hand from ring and hold working end of
yarn. Chain 1, work number of stitches required into ring. Pull up a long loop, then,
grasping the stitches just made with right hand and tail with left, pull to tighten ring.
Insert hook into long loop and tighten back against hook. Making sure tail is to the back,
skip ch-1 and continue working pattern.
Weaving/hiding loose thread ends: When making the bear, you can hide the loose
ends by pulling them to the inside of the piece with a tapestry needle. Pass the needle
through the piece 2 or 3 times to anchor the thread end (always go in and come out
between stitches, being careful not to catch any fabric), and then pull the thread taut, and
clip close to the surface so that it disappears inside.
For other pattern pieces, it’s best to weave all loose ends as you finish each piece. If you
can’t hide the beginning tail by working over it for a few stitches, leave a tail that is long
enough to enable you to thread it onto a needle to weave it. When you fasten off, always
leave a tail that is long enough to thread onto a needle and weave. To weave: Thread the
tail onto a needle. Working on the WS of the piece and beginning directly beneath the
place where you fastened off, insert the needle underneath and through the upper loops of
fabric for a length of 4 or 5 stitches, and then turn and repeat through 2 or 3 of the same
stitches in the opposite direction.
ABBREVIATIONS
beg – begin/beginning
bet — between
BL – back loop
CC – contrasting color
ch – chain stitch
ch- – refers to a ch space previously
made: e.g., ch-1 space
ch-sp – refers to chain or space
cm – centimeter(s)
cont — continue
Dc – double crochet (UK treble cr)
Dc2tog – double crochet 2 stitches
together (decrease)
Dec – decreases(s)
Dtr – double treble crochet
ea – each
FL – front loop(s)
FO – fasten off
hdc – half double crochet
hdc2tog – half double crochet 2
stitches together
lp(s) – loops
MC – main color
mm – millimeter(s)
pl – place
inc – increase
lp(s) – loops
prev – previous
rem – remaining
rep – repeat(s)
rnd(s) – round(s)
RS – right side
sc – single crochet (same as UK dc)
sc2tog – single crochet 2 stitches
together
sk – skip
Sl st – slip stitch (same as UK sc)
Sp(s) – space(s)
St – stitch
tog — together
Tr – treble crochet
Trtr – treble treble crochet
WS — wrong side
Yd(s) – yard(s)
YO – yarn over
Yoh – yarn over hook
COMPARISON BETWEEN PERLE COTTON AND CROCHET COTTON:
Perle Size Crochet Size
3 5
5 10
8 20
12 30
16 40 – 50

Check for Comparison to Perle Cotton: Wrap the thread you want to use around a ruler, with each
thread wrap touching the last wrap. The number of wraps that fit inside ¼ inch (.6 cm) is the
equivalent size to perle cotton. For instance, if your thread wraps around 12 times, then it is equivalent
to size 12 perle cotton.
Check for Comparison to Crochet Cotton: Wrap the thread you want to use around a ruler, with
each thread wrap touching the last wrap. The number of wraps that fit inside ½ inch (1.3 cm) is the
equivalent size to crochet cotton. For instance, if your thread wraps around 30 times, then it is
equivalent to size 30 crochet cotton.
MR. PUMPKIN HEAD DOLL
HEAD (Make 2):
1. Using orange and the size 7 (1.65mm) hook, begin with an adjustable ring and make 6
sc in ring, OR ch 2 with orange, 6 sc in 2nd ch from hook; do not join. Place a 3-inch
piece of contrasting thread as a rnd marker. (6 sc)
2. 2 sc in ea sc around. (12 sc)
3. (2 sc in next sc, sc in next sc) 6 times around. (18 sc)
4. (2 sc in next sc, sc in next 2 sc) 6 times around. (24 sc)
5. (2 sc in next sc, sc in next 3 sc) 6 times around. (30 sc)
6. (2 sc in next sc, sc in next 4 sc) 6 times around. (36 sc)
7. Sc in next 3 sc, (2 sc in next sc, sc in next 5 sc) 5 times, 2 sc in next sc, sc in next 2 sc.
(42 sc)
8. Sc in next 4 sc, (2 sc in next sc, sc in next 6 sc) 5 times, 2 sc in next sc, sc in next 2 sc
(48 sc)
9. Sc in ea sc around, sl st in next sc; FO orange. (48 sc)
FACIAL FEATURES:
First you must find the bottom center of the face. With the RS of the face piece facing
you, count 5 sc to the right of the st where you fastened off. Mark this sc with a pin or a
piece of yarn. The 4 sc between the last st and your marker will be the top of the neck of
your doll, and therefore the center bottom of the face is the center point of these 4 sc.
NOSE: The nose is created first so that you can see where
the eyes should be located. With dark brown size 10
thread, or 3 strands of dark brown embroidery floss,
embroider the nose in the center of the face. The nose
should be a long, thin triangle, about ½-inch long. (Note
that with the head facing you, the center bottom of the head
will be 2 sc to the right of the last sl st on rnd 9.) Begin the
top of the nose triangle 2 rnds above the center opening of the face, straight up from the
center point. The bottom of the nose should be 2 rnds below the center opening of the
face. Make the outline triangle first, and then fill it in with satin stitch. Alternately, you
can cut a triangle from felt and glue or sew it onto the face.

EYES: (Make 2)
1. Make an adjustable ring (see Special Instructions) with white size 10 thread using a
size 12 (1mm) hook, make 8 sc in ring; OR ch 2, 8 sc in 2nd ch from hook; do not join.
(8 sc)
• Carefully sew white circle to face; see picture for placement. With dark brown size
10 thread or 3 strands of brown floss, embroider chain stitches around and very close
to the white circle. Insert purchased 4mm eye into the center of the white circle and
secure to back of face. Repeat with 2nd
eye.
• With brown size 10 thread or 3 strands of brown floss, make eyebrows with a straight
stitch one row above the eyes, beginning at about 12:00 above the eye, and making
the brows about the length of 3 sc. (See picture.)
MOUTH:
1. With brown size 10 thread and size 12 hook, ch 16; FO brown.
2. Join white with sc in 1st ch, using size 10 thread and continue with size 12 hook, sc in
next 14 ch, 4 sc in last ch, moving around to other side of chain, sc in next 14 free lps, 3
sc in last free lp; join with sl st in 1st sc, FO, leaving long end for sewing mouth to face.
• Carefully sew mouth to face. Bottom edge of mouth should be two rows from edge of
head; follow the curve of the face as you sew on the mouth.
• Using black, sew 8 vertical straight stitches from top to bottom of mouth, as in
picture.
• Following the foundation ch of the mouth, embroider a line from one end of the
mouth to the other, going over the top of the vertical straight stitches.
• With red size 10 thread, embroider a line of chain stitches around and very close to
the mouth.
Join Head Front to Back:
Place the 2 pieces of head WS together with last sl st on row 9 of front of the head being
4 sc apart from the last sl st on rnd 9 of the back. Begin with front of head facing you
and stitch the 2 pieces together, sewing through the inside lps of the stitches of rnd 9 on
both pieces, as follows: *Insert the needle from front to back into the inside lp on the
front of the head, continue through the inside lp on the back of the head. Turn, and insert
the needle from back to front through the inside lp on the back of the head, continue
through the inside lp on the front of the head. Turn and** Continue working from * to **
around the head, leaving an opening at center top 2 sc in width in which to insert the
pumpkin stem, and a 4-sc wide opening at center bottom for the neck.
PUMPKIN STEM:
1. With RS facing and using the size 7 (1.65mm) hook, join green size 10 thread with sc
in 1st skipped sc on the back side of the top edge of the head, sc in same pl, 2 sc in next
sc, sc in seam, 2 sc in ea of next 2 sc, sc in seam; do not join, pl rnd marker. (10 sc)
2. Sc in ea sc around. (10 sc)
3. (Sc in next 4 sc; 2 sc in next sc) twice. (12 sc)
4. Working in BL, (sc2tog) 6 times; join with sl st in next sc; FL, leaving 6″ end for
sewing. (6 sc)
LEAF:
Ch 9, sl st in 2nd ch from hook and in next ch, sc in next ch, hdc in next ch, ch 1, tr in next
ch, tr in same ch, dc in same ch, dc in next ch, hdc in next ch, sc in next ch; ch 3, sl st in
2nd ch from hook and in next ch, moving to opposite side of foundation ch, sc in 1st ch,
hdc in next ch, dc in next ch, (dc and 2 tr) in next ch, sl st in side of tr just made, hdc in
next ch, sc in next ch, sl st in next ch; FO. Sew leaf to base of stem on left side of head.
• Sew a gathering stitch in and out of BL of the sc around the edge of rnd 4; pull tightly
to gather and close. Secure thread, then insert needle into center of top of stem and
out at base of stem; pull to indent center of stem; secure thread.
• Stuff head just until it looks like a little round throw pillow.
NECK AND BODY:
1. With right side and front of head facing you, use the size 7 hook (1.65mm) to join
orange with sc in 1st free sc at neck edge on row 9, sc in same pl, sc in next 2 sc, 2 sc in
next sc, sc in end of row 9 before seam on head front; sc in end of row 9 after seam on
head back, 2 sc in next sc, sc in next 2 sc, 2 sc in next sc, sc in end of row 9 before seam
on head back, sc in end of row 9 after seam on head front; do not join; place marker. (16
sc)
2. Sc in ea of next 15 sc; do not work last sc at this time. (15 sc worked)
3. Ch 6, working in RS of ch, sc in 2nd ch from hook and in next 4 ch, sc in next 8 sc on
front of head, ch 6, working in WS of ch, sc in 2nd ch from hook and in next 4 ch, sc in
next 8 sc on back of head, working on opposite side of 1st ch-6, sc in next 4 ch, 2 sc in
last ch, place marker, 2 sc in next sc, sc in next 12 sc, working on opposite side of 2nd ch6,
sc in next 4 ch, 2 sc in last ch, 2 sc in next sc, sc in next 18 sc. (40 sc)
4 – 18. Sc in ea sc around. (40 sc)
19. Sc2tog, sc in next 18 sc, sc2tog, sc in next 18 sc; sl st in next sc; FO, leaving long
end for sewing.
• Stuff neck, shoulders and top half of torso. Sew bottom opening of body to close,
leaving ½ inch to finish stuffing; stuff remainder of body. Finish closing. Body
should be about 8 inches around.
RIGHT ARM:
1. Continue with size 7 hook and size 10 thread and chain 5 with orange, sc in 2nd ch
from hook and in next 3 sc, moving around to other side of beginning ch, sc in next 4 free
lps; do not join – place rnd marker. (8 sc)
2. (2 sc in next sc, sc in next sc) 4 times. (12 sc made)
3. (2 sc in next sc, sc in next 5 sc) twice. (14 sc)
4. Sc in ea sc around. (14 sc)
5. (2 sc in next sc, sc in next 6 sc,) twice. (16 sc)
6. Sc in ea sc around. (16 sc)
7. Sc in ea sc around, remove marker; ch 2, sk 2 sc, sc in next sc; replace marker here.
8. Sc in next 13 sc, sc in BL of next 2 ch, sc in last sc. (16 sc)
9. (Sc in next 6 sc, sc2tog) twice. (14 sc)
10. Sc in next 6 sc, sc2tog; sc in next 4 sc, sc2tog. (12 sc)
11. Sc in ea sc around. (12 sc)
• Stuff hand, and continue to add stuffing to the arm every few rows as you work. Stuff
hand and arm through row 28 firmly; stuff arm rows 28 through 32 medium-firmly.
Do not stuff rows 33 – 38.
12 – 37. Sc in ea sc around. (12 sc)
38. Sc in next sc, sc2tog, sc in next 4 sc, sc2tog, sc in next 3 sc, sl st in next sc; FO
orange, leaving long end for sewing. (10 sc)
Thumb:
1. Beginning with top end of arm facing you, attach orange with sc in 1st free lp at thumb
opening, sc in next sc, turn and sc in end of row between top and bottom of thumb
opening, turn and sc in next 2 sc, turn and sc in end of row; do not join. (6 sc)
2 – 3. Sc around. (6 sc)
4. (Sc2tog, sc in next sc) twice; FO orange, leaving long end for sewing. (4 sc)
• Thread the end onto a tapestry needle; sew a gathering round in and out of FL’s of
round 3; pull to gather. Hide end by inserting needle into center opening, through
thumb, and across and out other side of arm. Pull thread taut and clip close to arm.
Thread should disappear into arm.
• Flatten arm horizontally and sew open end closed. Using same thread, sew arm to
shoulder: Place flattened end horizontally against side of shoulder with thumb facing
front and sew in place. Secure and hide end of thread by running into and out of
body a couple of times.
• Sew arm to right side of body at edge of shoulder. Thumb should be pointing toward
front.
LEFT ARM:
1. Ch 5 with orange, sc in 2nd ch from hook and in next 3 sc,; moving around to other
side of beginning ch, sc in next 4 free lps; do not join – place marker. (8 sc)
2. (2 sc in next sc, sc in next sc) 4 times. (12 sc made)
3. (2 sc in next sc, sc in next 5 sc) twice. (14 sc)
4. Sc in ea sc around. (14 sc)
5. Sc in next sc, 2 sc in next sc, sc in next 6 sc, 2 sc in next sc, sc in next 5 sc. (16 sc)
6. Sc in ea sc around. (16 sc)
7. Sc in next 3 sc, ch 2, sk 2 sc, sc in ea sc remaining 11 sc. (14 sc, 2 ch)
8. Sc in next 2 sc, remove rnd marker; replace rnd marker; sc in next sc, sc in BL of next
2 ch, sc in next 13 sc. (16 sc)
9. (Sc2tog, sc in next 6 sc) twice. (14 sc)
10. Sc2tog, sc in next 4 sc; sc2tog; sc in next 6 sc. (12 sc)
11. Sc in ea sc around. (12 sc)
• Stuff same as right arm.
12 – 37. Sc in ea sc around. (12 sc)
38. Sc next 2 tog, sc in next 3 sc, sc2tog, sc in next 5 sc; FO orange, leaving long end for
sewing. (10 sc)
Thumb:
1. Beginning with top end of arm facing you, attach orange with sc in 1st sc at thumb
opening, sc in next sc, turn and sc in end of row between top and bottom of thumb
opening, turn and sc in next 2 free lps, turn and sc in end of row; do not join. (6 sc)
2 – 3. Sc around. (6 sc)
4. (Sc2tog, sc in next sc) twice; FO orange, leaving long end for sewing. (4 sc)
• Thread the end onto a tapestry needle; sew a gathering round in and out of FL’s of
round 3; pull to gather. Hide end by inserting needle into center opening, through
thumb, and across and out other side of arm. Pull thread taut and clip close to arm.
Thread should disappear into arm.
• Flatten arm horizontally and sew open end closed. Using same thread, sew arm to
shoulder: Place flattened end horizontally against side of shoulder with thumb facing
front and sew in place. Secure and hide end of thread by running into and out of
body a couple of times.
• Sew arm to left side of body at edge of shoulder. Thumb should be pointing toward
front. You may need to massage the arms and hands into the desired shape and
position.
LEGS: (Make 2)
Tip: You can have a real problem with legs if you aren’t careful to keep your tension
consistently the same while making both legs; you may end up with one leg significantly
shorter than the other, even though you’ve followed exactly the same pattern!
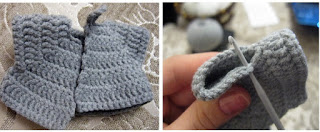
Shoe:
1. Using brown size 10 thread and a size 7 (1.65mm) hook, begin with an adjustable
ring, and make 6 sc in ring, OR ch 2, 6 sc in 2nd ch from hook. (6 sc)
2. 2 sc in ea sc around. (12 sc)
3. (2 sc in next sc, sc in next sc) around. (18 sc)
4 – 11. Sc in ea sc around. (18 sc)
Note: All sl st should be made loosely, or you could have trouble working into them on
the next round.
12. Sl st in next 4 sc, hdc in next 14 sc. (4 sl st, 14 hdc)
13. Sl st in next 4 sl st, hdc2tog; hdc in next 10 hdc; hdc2tog. (4 sc sl st, 12 hdc)
14. Sl st in next 4 sl st, hdc2tog; hdc in next 8 hdc; hdc2tog. (4 sc sl st, 10 hdc)
15. Sl st in next 4 sl st, hdc2tog; hdc in next 6 hdc; hdc2tog. (4 sc sl st, 8 hdc)
16. Sl st in next 4 sl st, hdc in next 8 sc. (4 sl st, 8 hdc)
17. Sl st in next 4 sl st, sc in next 8 sc. (4 sl st, 8 sc)
18. Sc in next 4 sl st; sc in next 8 sc. (12 sc)
19. Sc in ea sc around; sl st in BL of next sc; FO. (12 sc)
• Stuff shoe firmly, shaping as you go. Back of shoe should be vertical when you’re
finished.
Sock:
20. Join dark yellow size 10 thread with sc in BL of sc at center of heel at back of shoe
(this will be the stocking seam, so make sure it’s at the center back of the shoe!); sc in ea
sc in each sc around (when you come to the joining sl st, sc in BL of same sc sl st was
made in.); join with sl st in 1st sc. (12 sc)
21. Ch 1, do not turn (this applies to all rows); sc in same sc as joining and in ea sc
around; join with sl st in 1st sc, changing to cranberry size 10 thread (To change colors,
at end of round insert hook into 1st sc as if to join with sl st; instead of bringing
through a loop of yellow, bring through a loop of cranberry. Reverse when changing
to yellow.). Do not fasten off yellow; let it trail as you work the next 2 rounds. (18 sc)
22. With cranberry ch 1, sc in same sc as joining and in ea sc around; join with sl st in 1st
sc. (12 sc)
23. Ch 1, sc in same sc as joining and in ea sc around; join with sl st in 1st sc, changing to
yellow. (12 sc)
24. With yellow, ch 1, sc in same sc as joining and in ea sc around; join with sl st in 1st
sc. (12 sc)
25. Ch 1, sc in same sc as joining and in ea sc around; join with sl st in 1st sc, changing to
cranberry; FO yellow. (12 sc)
26. With cranberry ch 1, sc in 1st sc and in ea sc around; join with sl st in 1st sc. (12 sc)
27. Ch 1, sc in 1st sc and in ea sc around; join with sl st in BL of 1st sc, changing to
orange; FO cranberry. (12 sc)
Leg:
28. You will now resume working in continuous rounds. With orange size 10 thread and
size 7 hook, ch 1, sc in BL of same sc as joining. Sc in next 11 sc; place marker. (12 sc)
29. Resume working in both lps; sc in next 12 sc. (12 sc)
30 – 60. Sc in ea sc around. (12 sc)
• Stuff leg through round 57. Do not stuff rows 58 – 60. Flatten top of leg horizontally.
Thread long end on needle and sew top opening closed with a whipstitch. Do not trim
long end of thread yet; this will be used to sew leg to body.
• After both legs are completed, sew legs to bottom seam of body, with outside edge of
leg being at the outside edge of the body.
Shoe Laces: Leaving a 3-inch end at beginning and end, and using dark yellow size 10
thread, embroider a row of cross stitches down the front center of the shoe, with a
horizontal straight stitch at the bottom end of the row. (See picture) Tie the ends into a
bow, and put a tiny bit of fray stop or glue on the ends of the laces.
OVERALLS:
1. Using the size 7 hook, ch 52 with light brown size 10 thread, hdc in 3rd ch from hook
and in ea ch across; ch 1, turn. (50 hdc)
2 – 5. Hdc in 1st sc and in ea sc across; ch 1, turn. (50 sc)
6 – 7. Hdc in 1st sc and in ea sc across; join with sl st in 1st sc; ch 1, turn. (50 sc)
First leg:
8. Hdc in next 25 sc, ch 5, join with sl st in 1st hdc; ch 1, turn. (25 hdc, 5 ch)
9. Hdc in FL of next 5 ch, hdc in next 25 hdc, join with sl st in top of beg hdc; ch 1, turn.
(30 hdc)
10 – 22. Hdc in ea hdc around; ch 1, turn. (30 hdc)
23. Hdc in ea hdc around; ch 1; do not turn. (30 hdc)
24. Sc in BL of 1st hdc and in ea hdc around; join with sl st in 1st sc; ch 1; do not turn.
(30 sc)
25. Sc in 1st sc and in ea sc around; join with sl st in 1st sc; ch 1, turn. (30 sc)
26. Sc in BL of 1st sc and in ea sc around; join with sl st in 1st sc; ch 1, do not turn. (30
sc)
27. Sc in 1st sc and in ea sc around; join with sl st in 1st sc; FO. (30 sc)
• Turn last 2 rows up to form a cuff. Weave loose thread end.
Second leg:
8. With right side facing you, attach light brown with sl st in 1st ch of opposite side of ch5
at crotch; ch 1, hdc in same pl, hdc in next 4 free lps, hdc in next 25 hdc; join with sl st
in top of 1st hdc; ch 1, turn. (30 hdc)
9 – 21. Hdc in same place as joining and in ea hdc around; join with sl st in top of 1st
hdc; ch 1, do not turn. (30 hdc)
22. Hdc in ea hdc around; ch 1; turn. (30 hdc)
23. Sc in BL of 1st hdc and in BL of ea hdc around; join with sl st in 1st sc; ch 1; do not
turn. (30 sc)
24. Sc in 1st sc and in ea sc around; join with sl st in 1st sc; FO. (30 sc)
• There will be small gaps at the front and rear crotch where the stitches don’t quite
meet. Using the same brown thread as pants, tack the stitches together, closing the
gaps.
• Weave loose thread ends.
Left Front placket:
1. With RS facing and working down left side of front opening, join light brown with sc
in side of beginning foundation chain row; make 7 more sc evenly spaced in row ends
down left side; sl st in bottom center of front opening; turn. (8 sc, 1 sl st)
2. Sk sl st, sl st in next sc, sc in next 7 sc; ch 1, FO. (1 sl st, 7 sc)
Waistband:
1. With RS facing, join light brown with sc in 1st foundation ch at waist, sc in next 49 sc,
ch 2, sk end of next sc row, sc in end of next sc row; moving around to left side of front
opening, make a sc in side of sc just made, sc in next 6 sc, sl st in next sl st, make 8 sc
evenly spaced up left front opening; join with sl st in 1st sc of waist. (66 sc, ch-2 sp, 2 sl
st)
PATCH:
1. With green size 10 thread and size 7 hook, ch 7, sc in 2nd ch from hook and in next 5
ch; ch 1, turn. (6 sc)
2. Sc in ea sc across; ch 1, turn. (6 sc)
3 – 6. Sc in ea sc across; FO at end of row 6. (6 sc)
• Sew patch to right leg of pants with black size 20 thread, as shown in picture.
• Sew a black ¼-inch button to top right side of front opening opposite buttonhole. Sew
2 more buttons to front pants waist about ½ in to either side of middle button (when
pants are buttoned).
• Weave loose ends.
SUSPENDER: (Make 2)
1. With cranberry size 10 thread and a size 7 hook, ch 4, sc in 2nd ch from hook and in
next 2 sc; ch 1, turn. (3 sc)
3 – 25. Sc in next 3 sc; ch 1, turn. (3 sc)
26. Sc in next sc, ch 2 (buttonhole), sk next sc, sc in last sc; ch 1, turn. (3 sc)
27. Sc in next sc, sc in next ch-2 sp, sc in last sc; FO. (3 sc)
• Weave loose thread ends.
• Sew suspenders to back waist of pants about ½ inch apart.


CRACKERJACK THE CROW
Head and body:
1. With black size 20 thread and size 10 hook, ch 2, 6 sc in 2nd ch from hook; do not join;
place rnd marker. (6 sc)
2. 2 sc in ea sc around. (12 sc)
3. (2 sc in next sc, sc in next 2 sc) 4 times. (16 sc)
4 – 5. Sc in ea sc around. (16 sc)
6. (Sc2tog, sc in next 2 sc) 4 times. (12 sc)
7. (Sc2tog) 6 times. (6 sc)
• Stuff head.
8. (2 sc in next sc) 6 times. (12 sc)
9. (2sc in next sc, sc in next sc) 6 times. (18 sc)
10. Sc in next 5 sc, (2sc in next sc, sc in next sc) 6 times, 2 sc in next sc. (25 sc)
11 – 14. Sc in ea sc around. (26 sc)
15. Sc2tog, sc in next 5 sc, sc2tog, sc in next 16. (23 sc)
16. Sc2tog, sc in next 3 sc, (sc2tog) twice, sc in next 11, sc2tog. (19 sc)
17. Sc in each sc around. (19 sc)
18. Sc in next 4 sc; sc2tog; sc in next 11 sc; sc2tog. (17 sc)
19. Sc2tog, sc in next 2 sc, sc2tog, sc in next 4 sc, sc3tog, sc in next 3 sc, remove
marker, sc2tog, replace marker. (13 sc)
20. Sc in next 2 sc, sc2tog, sc in next 6 sc; ch 1, turn.
• Stuff body.
21 – 22. Sc in next 6 sc; ch 1, turn. (6 dc)
23. Sc2tog, sc in next 2 sc, sc2tog; ch 1, turn. (4 sc)
24. Sc in 1st sc, sc2tog, sc in last sc; FO. (3 sc)
• Weave loose thread end.
• Flatten bottom sidewise and sew opening together.
Beak:
1. With yellow size 20 thread and size 10 hook ch 5, sc in 2nd ch from hook and in next 3
ch; turn. (4 sc)
2. Sk 1st sc, sc in next 3 sc; turn. (3 sc)
3. Sk 1st sc, sc in next sc; turn. (2 sc)
4. Sk 1st sc, sl st in next sc; FO, leaving long end for sewing. (1 sl st)
• Fold beak lengthwise; carefully sew edges together. Sew beak to face, with upper
edge being between rows 2 and 3.
• With yellow thread, make a straight stitch the width of one sc on either side of the
beak.
Wing (Make 2):
1. Using black size 20 thread and a size 10 hook, ch 2, 1 sc in 2nd ch from hook; ch 1,
turn. (1 sc)
2. 2 sc in next sc; ch 1, turn. (2 sc)
3. 2 sc in next 2 sc; ch 1, turn. (4 sc)
4. 2 sc in 1st sc, sc in ea of next 2 sc, 2 sc in next sc; ch 1, turn. (6 sc)
5 – 7. Sc in ea sc across; ch 1, turn. (6 sc)
8. 2sctog, sc in next 2 sc, sc2tog; ch 1, turn. (4 sc)
9. Sc in ea sc across; ch 1, turn. (4 sc)
10. (Sc2tog) twice; FO, leaving long end for sewing wing to body. (2 sc)
• Sew row 10 of wing to side of body at shoulder. Tack back edge of wing to back of
body with one stitch at row 4 of wing.
• Sew or pin crow to doll’s right shoulder