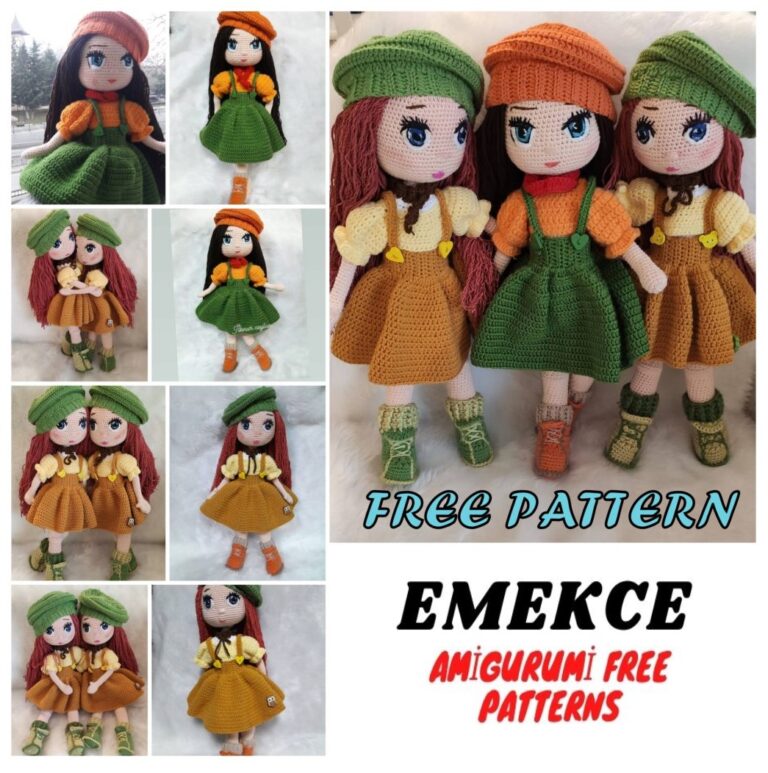
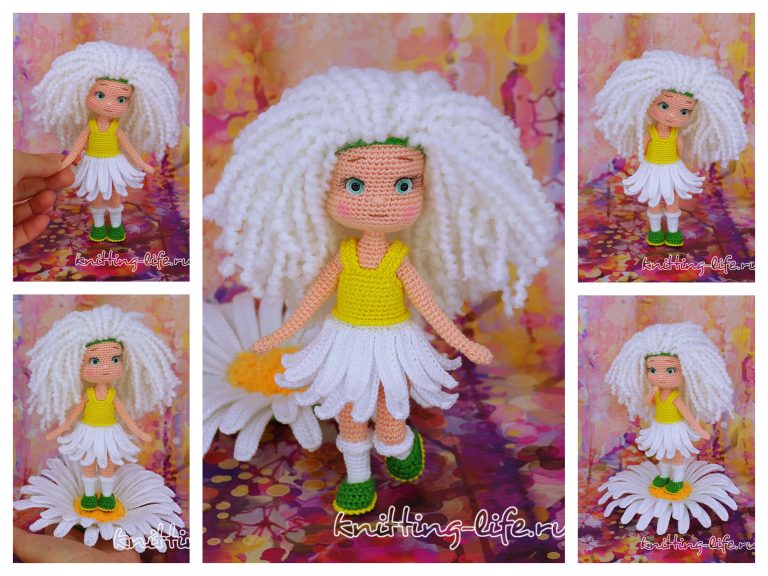
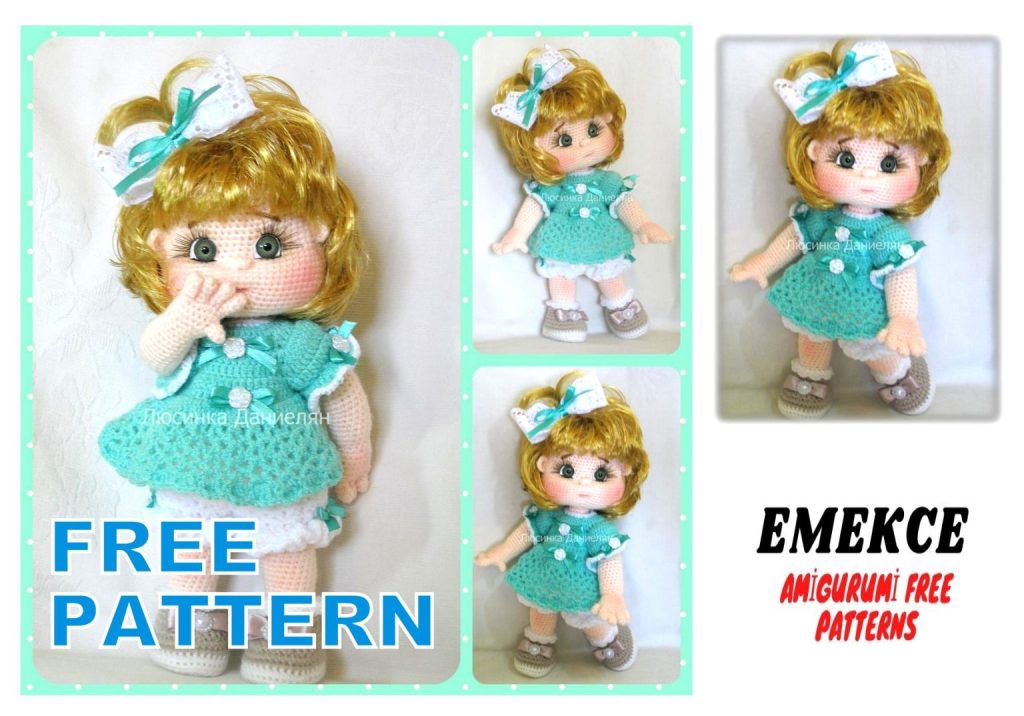
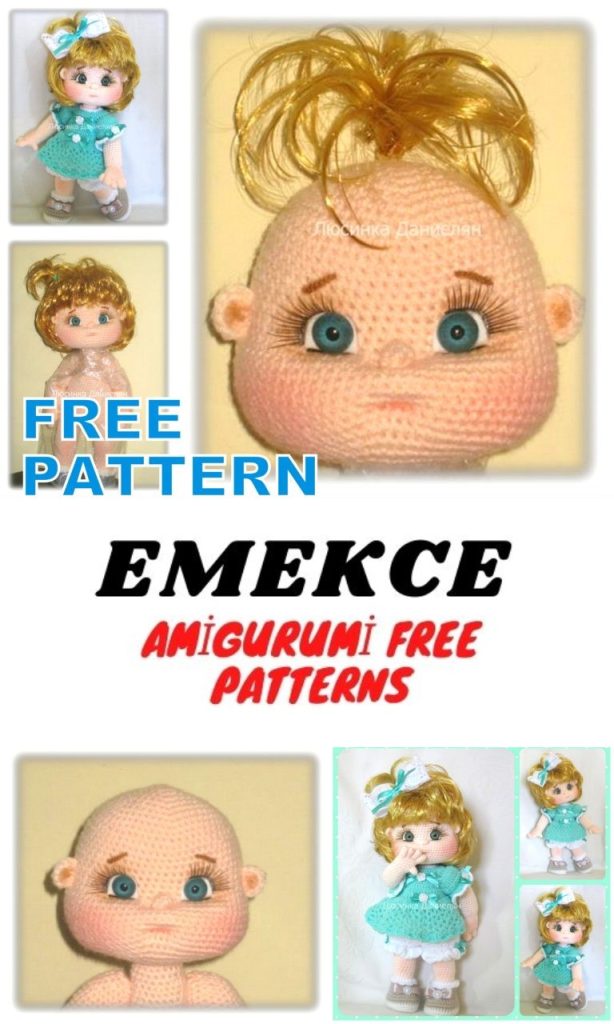
Amigurumi Fat Doll Free Crochet Pattern
The Amigurumi Fat Doll is a delightful crochet project that will bring joy to crochet enthusiasts. With this free crochet pattern, you can create a chubby and adorable amigurumi doll that’s sure to capture hearts. Get ready to unleash your creativity as you embark on this charming crafting journey. Are you ready to craft a unique amigurumi baby with fine threads and your crochet skills?
We will need:
– Kartopu baby soft acrylic yarn (100g / 300m). For Kristal kartopu clothes
(100g / 450m) or any other under your hook, given that for clothing
yarn should be thinner than for the body.
– hooks No. 1.75, No. 2.00 and No. 1.1 or any other under your
yarn.
– long needle for tightening
– strong threads for tighteners in the color of yarn or dental floss
– filler
– Clay Crystal Moment, or other transparent glue, as you used to
work
– Eyes (0.8 cm – 1 cm.), Or half beads, cilia
– a little white felt (for eye protein)
– dry shadows and blush for toning.
– A small piece of wire to strengthen the head.
– elastic bands – hairpieces (2-3pcs)
– decoration to create your image.
With my materials, the kids get 30 cm, excluding hair.
And of course, desire and good mood)))))
Abbreviation/US terminology:
ch – chain
sc- single crochet
dc – double crochet
inc- increase
dec- decrease
sl-st- slip-stitch
n – loop
V – in one loop – 1 dc, 2 ch, 1 dc
Head
1 p -6 sc into magic ring
2 p – inc x 6 times = 12sc
3 p – (1sc, inc) * 6 times = 18 sc
4 p – (2 sc, inc) * 6 times = 24 sc
5 p – (3 sc, inc) * 6 times = 30 sc
6 p – (4 sc, inc) * 6 times = 36 sc
7 p – (5 sc, inc) * 6 times = 42 sc
8 p – (6sc, inc) * 6 times = 48 sc
9 p – (7sc, inc) * 6 times = 54 sc
10 -11 p. 54 sc
12 p – (8sc, inc) * 6 times = 60 sc
13-19 r. 60 sc
20 p- 13sc, inc, (2sc, inc) * 11 times, 13sc = 72 sc
21-29 r. 72 sc
30 p – (10sc, dec) * 6 times = 66 sc
31p – (9sc, dec) * 6 times = 60 sc
32 p – (8sc, dec) * 6 times = 54 sc
33 p – (7sc, dec) * 6 times = 48 sc
34 p – (6sc, dec) * 6 times = 42 sc
35 p- (2sc, dec) * 10 times, 2sc = 32 sc
36 p- (1dec, 2 sc) * 8 times = 24sc
37p – (2sc, dec) * 6 times = 18 sc
Leave the thread for sewing.
Legs
Start with a white thread
Dial the chain from 7ch, start with the second loop.
1 p- inc, 4sc, 4sc in one loop, 4sc, inc – 16sc
2 p- sc, inc, 4 sc, 4 inc, 4 sc, inc, sc – 22sc
3 p – 2 sc, inc, 4 sc, (1sc, inc) * 4 times, 4sc, inc, 2 sc – 28sc
4 p- 3 sc, inc, 4 sc, (2 sc, inc) * 4 times, 4sc, inc, 3sc – 34sc
5 p – 2 inc, 14 sc, 2inc, 16 sc – 38 sc
Cut out the insole.
6 p – 38 sc for the back half-loop. At the end of the row, make offset loops in order to
the marker was in the center of the heel. Tear off the thread and attach the gray thread.
Knit the top of the shoes.
7 -8 p. 38 sc (Using the displacement loop, end in the middle of the heel)
Insert insole
9 p – 10 sc, (1hdc, dec of hdc) * 6 times, 10 sc-32 sc
10 p – 10 sc (dec of hdc) * 6 times, 10sc – 26 sc
11p – we knit for the front half loops, (2 sc, dec) * 6 times, 2 sc -20 sc
We break off the thread and hide it.
We begin to knit a sock. Attach a white thread and knit for loose half-loops 11
a number of
12 p- (2 sc, dec) * 6 times, 2 sc-20sc
13p.20sc
14p – we knit for the front half loops, dec, 16 sc, dec – 18 sc
Break and hide the thread.
Attach the bodily thread to the free half loops of the 15th row.
15 p – dec, 16 sc, dec – 18 sc
16-21r. 18sc
22p – (5sc, inc) * 3 times – 21 sc
23-33 p. 21 sc
Break and hide the thread.
Tie the top of the sock behind the front walls, adding a finer white thread and
knit 1.75 as follows: (in one loop sc, 2ch, sc) * to the end of the row
Similarly, we knit the second leg.
The connection of the legs and body
We begin to knit with the left leg. We put the legs a little toe, attach the thread
flesh-colored to the left leg, gaining 6 vp and attach to the right foot with
sc, put the marker.
34p – Knit on the right foot 21sc, 6inc on the chain, knit 21 sc on the left foot, 6sc on
chain -60sc
35p – 60sc
36p – (8sc, dec) * 6 times -54sc
37 – 45r – 54sc
46p -10sc, dec, 26sc, dec, 14sc -52sc
47 -49 RUR 52sc
50p – 10sc, dec, 24sc, dec, 14sc – 50sc
51p – 50sc
52p – (8sc, dec) * 5 times – 45sc
53-57r. 45sc
58p – (7sc, dec) * 5 times – 40sc
59 – 60. 40sc
61p – (6sc, dec) * 5 times – 35sc
62 – 65 p. 35sc
66p – (5sc, dec) * 5 times – 30sc
67 – 69 p. 30sc
70r – (4sc, dec) * 5 times – 25sc
71-73 RUR 25sc
74p – (3sc, dec) * 5 times -20sc
75p – dec, 10sc, dec, 6 sc -18sc
76 -77r. 18sc
Fasten and hide the thread.
We crochet fingers and a brush with a hook No. 1.75
1r. – Big, pinky.
1 p. – 5 sc into magic ring
2-3 p. 5 sc
Fasten, break, hide the thread.
2. Nameless, middle, index.
1 p. – 5 sc into magic ring
2-4 p. 5 sc
At four fingers, fasten, break, hide the thread. The index thread does not
to break off.
Left hand
Continue to crochet number 1.75
1 p. -2 sc index, 3 sc middle, 2 sc nameless, 5 sc little finger, 3 sc
nameless, 2 sc middle, 3 sc index – 20sc
2 p. – 20 sc
3 p. – 1 sc, 2 sc to knit together with 2 sc of the thumb, 17 sc – 20sc
4 p. – 1 sc, 3 sc of the thumb, 17 sc – 21sc
5 – 6 p. 21 sc
7 p. – (2 sc, 1 dec) * 4 times, 3 sc, 1 dec – 16sc
8 p. – 16 sc
From row 9 we change the hook to number 2
9 p. – (1 inc, 2 sc) * 5 times, 1 sc – 21sc
10 – 17 p. 21 sc
18 p. – 10 sl-st, 11 sc -21sc
19 p. – 10 sl-st, 5 sc, 1 inc, 5 sc -22sc
20 -31 p. 22 sc.
32 p. – (2 sc, 1 dec) * 5 times, 2 sc – 17sc
33 p. – 17 sc
34 p. – (1 dec, 1 sc) * 5 times, 2 sc – 12sc
35 p. -6 dec – 6sc
To thread, cut and hide the thread.
Right hand.
Crochet number 1.75
1 p. – 3 sc index, 2 sc middle, 3 sc nameless, 5 sc pinky, 2 sc
nameless, 3 sc middle, 2 sc index – 20sc
2 p. – 20 sc
3 p. – 17 sc, 2 sc knit together with 2 sc thumb, 1 sc – 20sc
4 p. – 17 sc, 3 sc on the outside of the thumb, 1 sc -21sc
5 – 6 p. 21 sc
7 p. (2 sc, 1 dec) * 2 times, 1 sc, (2 sc, 1 dec) * 3 times – 16sc
8 p. -16 sc
From row 9 we change the hook to number 2
9 p. – (1 inc, 2 sc) * 5 times, 1 sc – 21sc
10 – 17 p. 21 sc
18 p. – 11sc, 10 sl-st. – 21sc
19 p. – 5 sc, 1 inc, 5 sc, 10 sl-st -22sc
20 – 31 row – 22 sc
32 p. – (2 sc, 1 dec) * 5 times, 2 sc – 17sc
33 p. -17 sc
34 p. – (1 dec, 1 sc) * 5 times, 2 sc – 12sc
35 p. – 6 dec – 6sc
Fasten, cut and hide the thread.
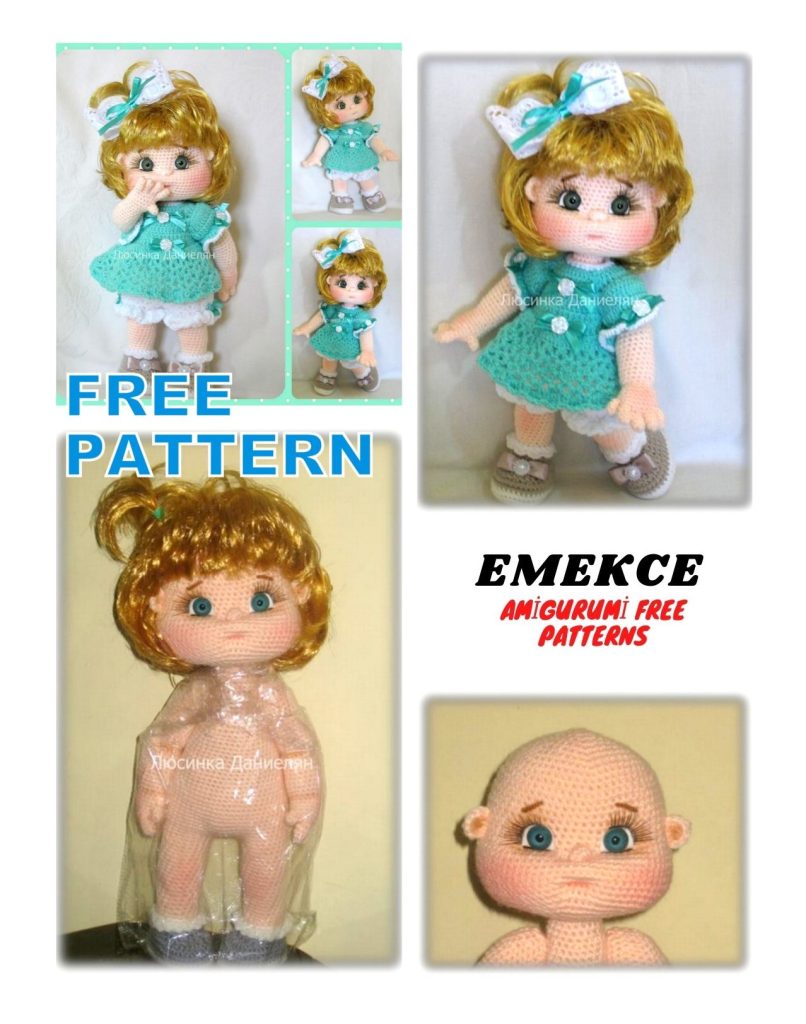
Assembly and design
To fasten the head to the body, cut off the 18cm wire. Wrap the ends with a band-aid
or electrical tape. Insert it into the body, stick your head in and sew your head in a circle, doing
half-loop stitch of the neck and half-loop of the head.
Hands holding
We go down from the beginning of the neck in 6 rows and sew the arms with thread fastening.
lightness, you can at the beginning go through the body with a needle several times, making a deepening
for hands, and then sew the hands with a thread mount.
Eye sockets
We go down to the 20th row from the beginning of knitting the head, put a lilac pin, retreat 5
loops and set the blue pin. From the purple to the side, count 2 loops and
put the yellow pin, also, we retreat 2 loops from the blue and put the blue pin.
with the chin, parallel to the upper pins, set the red pins.
red pins 9-10 stitches.
We go with a needle into the red pin, while leaving a long end, we exit into
lilac pin, we sew a stitch on top, going into the yellow pin and exit
again into the red pin. We tighten the ends of the threads, tie them to 2 knots and hide in
head. Similarly make a weight loss and the other eye socket.
Nose and mouth
From the eye sockets we go down 3 rows and put a yellow pin.
yellow pins 1 loop, put in 2 loops, blue. From the top pins go down to 6
rows and set parallel to the top lilac and red pins.
We go into the yellow pin, leaving a long end, go out into the lilac pin, make a stitch
on the top, going into the red, and put it in the blue pin. The ends are pulled together, bandaged
into two nodes, we hide the ends in the head.
Nose
Dial two air loops and knit a fluffy column of 5 from the hook in the second
double crochet, then pull off the spout.
Sew the nose to the place of its weights. Cut the squirrels from felt and glue in place
eye sockets, then glue the pupils. You can embroider with one stitch under the eyes black
iris. We tint near the eyes, cheeks and mouth. Glue the cilia, dividing one into two
smooth parts with a toothpick.
Ears
Dial 3 air loops, in the third knit 6 dc, tighten a little and hide the ends. The ears
sew at eye level.
Hair clip
For hairstyles, I take these hairpieces-hairpieces and unzip them on tresl-sty. That would
the ends of the cut-off tsl-sts do not rip apart, it is necessary to lubricate them with glue or
colorless nail polish. For that, you need to twist a small piece of tresl-sta into
tight tail and, having sewed it firmly enough, sew in the center of the head.
We get down to the earlobes, with pins we fix the tsl-sts from ear to ear and
Sew in. So repeat row after row until we come to the tail.
Near the tail, we begin to sew in a circle of the head and so on until it closes completely
top of head.
We cut the bangs and remove the extra length over the entire hair growth.
Pantaloons
Crochet No. 1.75
V – dc, 2ch, dc in one loop
We collect a chain of 86ch and close in a ring.
1p -2 ch lift, (skip one V loop, 2ch skip one V loop) * to the end of the row, sl-st
2-10 p. 2 ch lift, (skip to one arch from ch V, 2 dc, to one arch from ch V) * to
end of row, sl-st
Divide the pants in half with the help of sl-st and then knit each pants separately.
11p – 2 ch lift, (skip into one arch from ch V, 2 dc, into one arch from ch V) * to
end of row, sl-st
12p -1 ch lift, sc in each loop to the end of the row
13p – 2 ch rise, 3dc in each loop to the end of the row.
Similarly, we knit the second pants.
We knit a chain of 80 ch and thread along the top of the trousers. Also we pass the ribbon
over ruffles on the bottom of pantaloons.
Dress
Let’s start crocheting 1.1
V – dc, 2ch, dc in one loop
Dial a chain of 35 ch, knit in rotary rows.
1 p – from the second loop from the hook: 5 sc, v, 5 sc, v, 10 sc, v, 5 sc, v, 5 sc – 42sc
2 p – 3ch, 6 dc, V, 7 dc, V, 12 dc, V, 7 dc, V, 6 dc – 54dc
3 p– 3ch, 7 dc, V, 9 inc dc, V, 14 dc, V, 9 inc dc, V, 7 dc – 80dc
4 p – 3ch, 8 dc, V, 20 dc, V, 16 dc, V, 20 dc, V, 8 dc – 88 dc
5 p – 3ch, 9 dc, 1 dc under the arch, 4 ch, skip 22 loops, 1 dc under the arch, 18 dc, 1 dc under
arch, 4 ch, skip 22 loops, 1 dc under the arch, 9 dc – 48dc
6 p – 3ch, 10 dc, 4 dc for ch, 20 dc, 4 dc for ch, 10 dc – 48dc
7p – 3ch, inc from dc to the end of the -96dc row
8p- 3ch, ((in one V loop), 2ch skip, (in one V loop)) * to the end of the row
9-13r. 3ch, ((into one arch from ch V), 2 dc skip, (into one arch from ch V)) * to the end
a number of
14p -3ch, ((in one loop 4 dc, skip one loop, 1sc, in one loop 4 dc)) * to
end of row
Sleeve
1-2 p .2ch, 32dc, sl-st
3p – 1ch, dec to the end of the row, sl-st
4p – 2ch, V to the end of the row
Tie sc sleeves with white thread.
Tie the dress on the fasteners, make loops and sew buttons. If your neck
dresses are a little large, during tying you can make decreases through 3 loops.
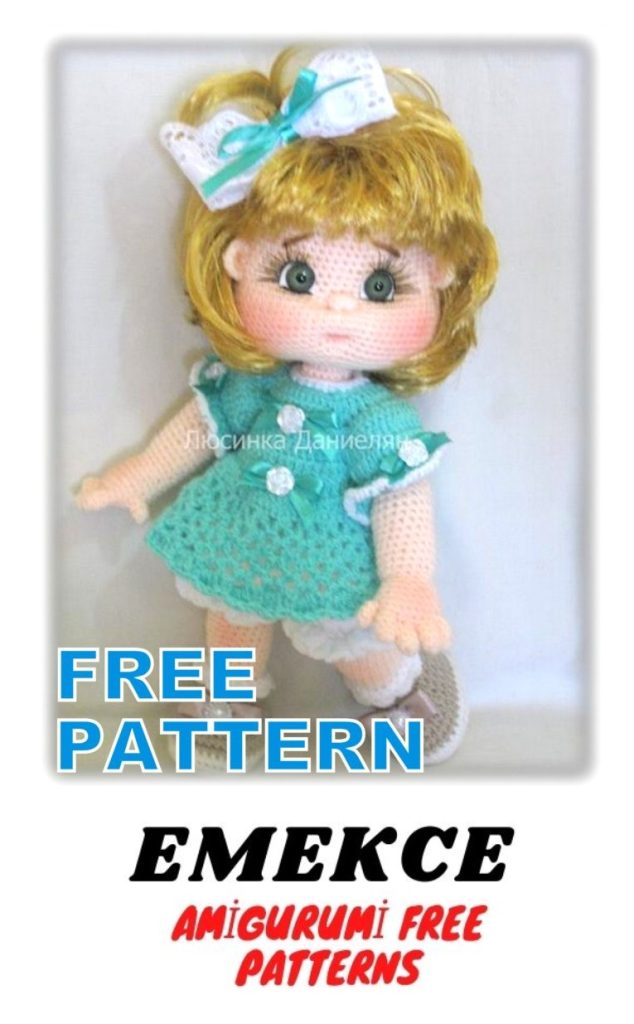
dress with ribbon, buttons and half beads.
Our baby is ready!